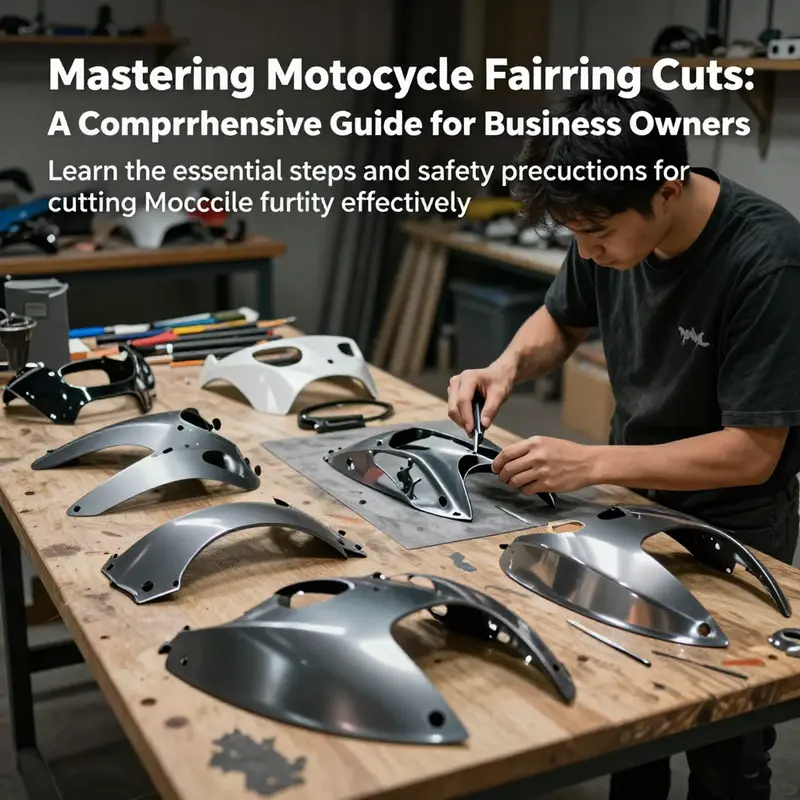
Cutting motorcycle fairings is a crucial skill for businesses involved in motorcycle customization and repair. The ability to modify fairings not only enhances the aesthetic appeal of motorcycles but can also improve their aerodynamics. This article will guide you through the meticulous process of cutting fairings, ensuring you achieve both safety and a professional finish. We will begin by discussing the critical planning and preparation phase, which sets the groundwork for a successful cut. Next, we will delve into the actual cutting process, highlighting the techniques to ensure safe and effective results. Following that, we will focus on finishing the cut for a polished appearance that meets customer expectations. Finally, we will cover vital safety tips that businesses must adhere to while performing these tasks to avoid accidents and injuries.
Cutting with Confidence: Mastering Preparation and Planning for Shaping Motorcycle Fairings
Cutting motorcycle fairings is as much a craft of preparation as it is a test of your steady hand. It begins before the tool touches plastic and ends long after the last edge is smoothed. The goal is not only to remove material but to do so with predictable results: clean lines, minimal stress on the surrounding structure, and a finish that can be repaired, primed, and painted to blend with the rest of the bodywork. When you approach fairing modification with a calm plan, you reduce the risk of warping, cracking, or compromising aerodynamics. In practice, preparation reframes the task from a single cut to a careful sequence that respects the material and the bike’s overall performance. This chapter situates the work within a broader discipline of modification, staying mindful of safety, material behavior, and the rider’s intentions.
First, define your objective with clarity. What is your motivation for cutting? Are you adding ventilation, reshaping for a more aggressive look, or repairing a damaged section that can no longer be maintained with stock lines? The answer to this question drives every subsequent decision. If your aim is ventilation, you might plan a series of precise, curved openings that maintain fairing strength while improving airflow around the rider’s torso and helmet. If aesthetics drive the work, you’ll want symmetry, balanced proportions, and a finish that can be seamlessly integrated with a re-primed surface. If you’re repairing a damaged edge, the priority shifts toward regaining a uniform contour and ensuring that the repair does not create stress risers that could propagate cracks under vibration and wind loads. The objective anchors tool choices, cut lines, and finishing strategies, so treat this step as the intellectual groundwork that supports the hands-on process.
The material you work with matters as well. ABS-based fairings and fiberglass variants react differently to cutting, heat, and post-cut finishing. ABS is forgiving in many ways, but it can crack under sharp corners and stress concentrations if the cut line traverses thick sections or transitions. Fiberglass has more rigidity but can be prone to fraying and fiber splinters if the cut edges aren’t properly managed. The guiding principle is to anticipate how the material will respond to each action you take. For plastics, the overall objective is a crisp line without heat-induced distortion. The reference body of knowledge on cutting acrylic windshields helps illuminate how heat and tool choice influence edge quality, but you must adapt those principles to your ABS or fiberglass fairing, recognizing that heat is a double-edged sword: it can ease some contouring but also invite warping if misapplied.
With objectives in hand, assemble the right set of tools and materials. The decision on tools begins with the scale of your cut. For most fairing work, a fine-toothed blade in a small jigsaw or a rotary tool with a fine cutting wheel handles curved lines and turns with better control than a coarse blade. A coping saw can jog into tight corners, while a straight-edge guide helps maintain a true, mechanical line along your marked path. The principle of control is paramount: choose tools that allow you to take small, deliberate passes rather than forcing a single aggressive stroke. When you think in passes, you reduce heat buildup and the risk of edge chipping or softening the plastic. A rotary tool, for instance, can start a cut gently and let you test the surface reaction at low speed before you advance to more ambitious motions.
Mask off the surrounding areas with masking or painter’s tape to catch stray scratches and to provide a visual barrier. This is not merely cosmetic protection; it preserves the integrity of paint lines that you intend to match later. As you lay out the cut line, consider the surrounding geometry: how will the new edge meet existing contours, seams, and fasteners? A fairing is not a single panel; it is part of an interconnected shell. The connection points, mounting brackets, and fastener holes all bear reconsideration when you alter the panel’s geometry. If you intend to maintain existing mounting locations, you may need to plan for slightly larger holes or new attachment points that accommodate the revised shape. Transparency about these changes up front saves you from a later sequence of corrective work.
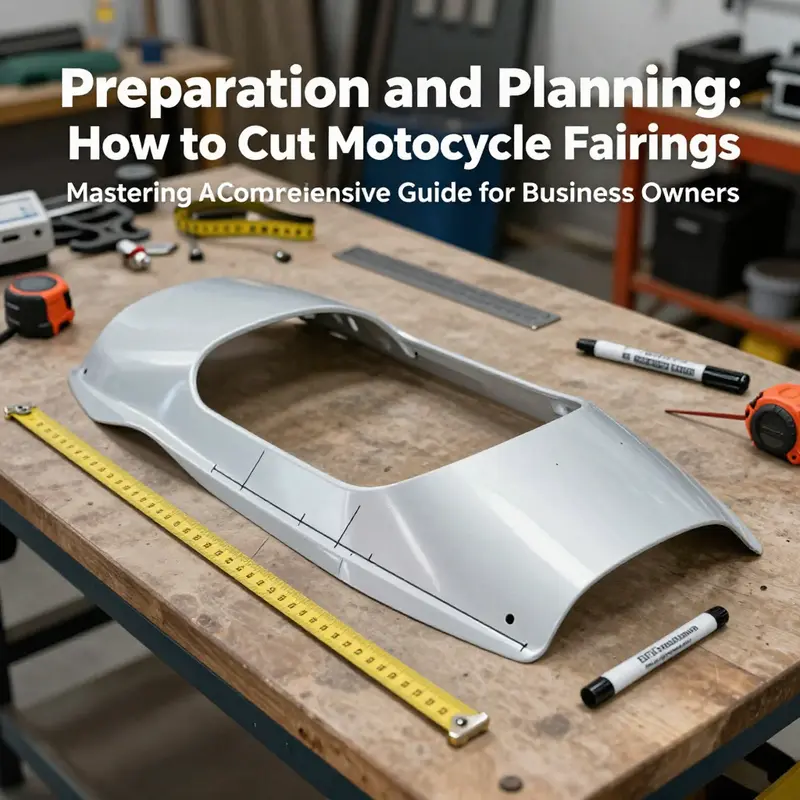
Transfer the design accurately. Use a template or a light sketch to map the intended line onto the surface, and then reinforce those marks with chalk or low-tack tape that won’t leave long-lasting residues. Folding lines into a symmetrical pattern is essential when both sides of the bike are visible in static displays or in photographs. Even a small asymmetry can read as an intentional design choice, but it is rarely deliberate and usually a sign that you need to re-check. Take your time confirming symmetry and alignment; a minute deviation on one side can become noticeable once the surface is finished. When in doubt, step back and measure again. A simple second check can prevent the frustration of redoing a cut after you have already advanced through multiple passes.
Secure the fairing before you begin the actual cutting. Remove the fairing from the bike if possible, or at least clamp it firmly to a stable work surface. A moving piece is the surest path to an errant cut, and even a light vibration from a nearby tool can shift your line. Employ a straight-edge guide to keep the cut aligned with your marked line. The clearer your line and the more stable your piece, the more predictable the result. Think of the guide as a coach that makes sure every stroke follows a pre-planned trajectory rather than wandering into the unknown. If you must work on the bike, be aware of nearby components that can overheat or melt if your cutting action transfers heat beyond the intended edge. Protect those areas with tape or temporary shields, and keep the work area well ventilated to guard against fumes from plastic dust.
The cutting process itself is the most visible stage of preparation, and it benefits from restraint and patience. Start at a low speed to monitor how the material responds. You should see only a slight bite as the edge begins to form. If you sense resistance or the plastic shows a melt line, ease off and reassess your speed and angle. Several shallow passes often beat a single deep pass, because this approach reduces internal stress and the chance of cracking near the edge. Use a steady hand and maintain a consistent feed rate. The goal is a smooth interaction between tool and material, not a dramatic wounding of the panel. If you need to change direction, lift the tool and reset the line rather than trying to snap the tool mid-cut. Small, controlled adjustments keep the line true and avoid ragged corners that will demand more work in finishing.
As you cut, periodically cool the area. Overheating plastic can lead to softening and warping, which defeats the purpose of a precise edge. A damp cloth applied near the cut line or brief pauses to let the tool cool down are prudent practices. Remember that heat not only affects the edge you’re forming; it can propagate through the surrounding material, changing its mechanical properties and potentially creating micro-motions along the edge that complicate finishing. If you’re cutting in a warm workshop, monitor ambient temperature and consider a cooler space or extra ventilation to manage heat and dust effectively. The human element matters here as well; frequent breaks keep the operator steady and help prevent mistakes born from fatigue.
After you have established the cut line and completed the majority of the removal, step into the finishing phase. The aim is to deliver edges that are not only straight but also robust enough to tolerate handling during installation and future maintenance. Begin with coarser sanding to knock down large ripples or tool marks, then progressively move to finer grits. For ABS, a typical sequence might start with 80-grit to shape and smooth the initial edge, then move to 120- to 180-grit to refine, and finish with 220-grit or finer for a gloss-ready surface prior to filler or paint. Sand in a circular motion rather than back-and-forth strokes, as this approach reduces visible grooves and keeps the edge uniform. When you are satisfied with the contour, wipe the area clean with a damp cloth and inspect for any residual burrs or micro-snaps that could catch a glove or the edge of a sealing strip. If the cut reveals unevenness or minor imperfections, a light layer of plastic filler or ABS cement can fill shallow gaps. Allow sufficient cure time and sand again to blend the repair with the surrounding surface. The quality of this finish determines how convincingly the modification will read after paint.
Prime and paint follow a similar logic of preparation. A clean edge with a consistent texture accepts primer better than a rough, irregular surface. Remove dust and oils with a soft cloth and isopropyl alcohol before applying primer. For a professional result, select a primer that’s compatible with the plastic you are working with and that bonds well with the final paint system. Apply in thin, even coats, allowing proper flash times between layers. Once the primer is dry and uniformly smooth, you can proceed to color and clear coats, following the manufacturer’s recommendations for curing times and temperature. If you are blending a cut edge with the rest of the fairing, subtle color matching and a careful approach to edge transitions are essential; a painted edge that reads as an abrupt break will betray the modification under lighting or at close viewing distances. Take care to manage dust, fisheye issues, and any paint lift that can occur at plastic corners where the body meets a seal or fitting.
Test fit and reinstall with the same patience you applied to the cut itself. Do not assume that a visually perfect edge equals mechanical compatibility. Align the cut line with mounting points, check for interference with other panels, and confirm that the new edge does not interfere with the rider’s leg movement or with ventilation paths you intended to improve. It is common to need minor adjustments after a test fit, such as trimming a few millimeters here or there or reworking a seam line to maintain comfortable transitions between panels. Reinstall carefully and verify that fasteners engage with their threaded holes and that no new gaps develop where the edge intersects adjacent surfaces. If you had to modify attachment points, recheck stiffness under ride-like loads. A fairing is part of the bike’s aero package; modest changes in shape can alter airflow, and it’s wise to assess how those changes affect stability, windblast, and general feel at speed.
Safety and quality considerations thread through every stage of preparation and planning. The knowledge base emphasizes that aggressive modifications—like mounting an excessively tall or unwieldy windshield—can disturb a motorcycle’s stability and aerodynamics. The same caution applies to fairing cuts: do not create a scenario where a softened edge or misaligned seam changes the rider’s line of sight, or creates additional drag or buffeting. Use quality materials for repair and finishing to avoid cracking or delamination under vibration and road debris. Cheap fillers or poorly matched adhesives can fail when the bike is on the move. When you plan, you’re protecting performance and safety as much as you’re pursuing aesthetics. Finally, consider airflow and visibility effects. Changing the fairing can alter the way air flows around the rider and the bike, which can influence both cooling and wind buffeting at speed. A measured approach, therefore, honors the practical constraints of riding as well as the desire for a sharper look.
In the broader ecosystem of repair and modification resources, there is value in connecting with broader communities and reference materials. If you’re exploring fairing options or seeking design inspiration that aligns with your objective, you can browse relevant category pages that index various fairing styles and brands. For example, the BMW fairings category showcases a range of replacement panels and styling options that can inform your decisions about contouring and integration with stock lines. This internal resource provides context about how different shapes sit within the bike’s overall silhouette and how to approach compatibility with mounting points and seals. It’s worth noting that the approach to planning and cutting remains applicable across brands; the core discipline is about translating intent into a precise, repeatable process that preserves structural integrity while enabling design exploration. BMW fairings demonstrates how a catalog of shapes can inspire your own modifications, even if you ultimately tailor a line to your unique bike.
For readers seeking concrete, hands-on demonstration, real-time guidance can be invaluable. A step-by-step video guide on how to cut ABS plastic fairings offers a practical complement to the principles described here. Watching an experienced technician perform the cut, handle edge finishing, and manage edge safety can help you calibrate your own expectations and tempo. The video covers tool selection, safety precautions, edge finishing, and post-cut inspection, making it a practical reference that aligns with the cautious, methodical approach recommended in this chapter. This resource is available at the following external link:
External resource: https://www.youtube.com/watch?v=QXKtFqzYwLc
The synthesis of preparation, planning, and disciplined execution creates a path to outcomes that feel professional and durable. When you invest time in marking and confirming lines, selecting the appropriate tools, and managing heat and stress on the material, the actual cut becomes a controlled operation rather than a risky improvisation. The result is a fairing that remains securely attached, that plays well with the bike’s aerodynamics, and that accepts paint and finish in a way that survives the test of time on the road. In the end, the best modifications feel almost inevitable because every step aligns with a defined objective, a careful plan, and a principled respect for the material and the machine. The channel from intention to execution is navigable when preparation is the focus and planning informs the moment of cut. With that grounded foundation, you can move into the execution phase with confidence, knowing that your work respects safety, performance, and the identity of your bike.
Edge by Edge: The Quiet Precision of Cutting Motorcycle Fairings

The silhouette of a motorcycle is defined as much by what is removed as by what remains. When an owner decides to alter fairings, the task is not simply a hack with a blade; it is a careful conversation between design goals, material behavior, and the realities of plastics that heat, flex, and respond to pressure in unexpected ways. The act of cutting is a bridge between look and fit. It requires planning that starts long before the first stroke and ends only when the panel sits true against its chassis, unwrinkled, evenly aligned, and ready for finish. In this chapter, the path from line to finish unfolds as a single, continuous practice—a rhythm of measurement, protection, and patient execution that respects the material and the rider’s intent. The goal is not just a straight edge or a sharper line; it is a coherent transformation where form, function, and durability keep step with aesthetic ambition. The process begins with a clear vision of what the modification will accomplish and continues with disciplined technique that guards safety, preserves the surrounding structure, and yields a professional result that looks as if the fairing were designed to accommodate the change from the start.
Preparation begins in the mind and moves outward through the fairing itself. Marking the cut line is more than a line; it is a statement about symmetry, proportion, and the bike’s overall stance. A straight edge laid against the panel allows the marker to glide with confidence, producing a line that looks and feels deliberate. The choice of where to cut—whether to remove a small notch for better airflow, to widen a vent, or to shorten a corner for a cleaner wheel arch—will determine the rest of the workflow. It is essential to ensure the line mirrors on both sides where the design calls for symmetry. If a change is meant to balance the bike’s profile, the line may need incremental adjustments. The key is to visualize not just what is cut away, but how the new edge will interact with the lines of the frame, the stance of the rider, and the visual rhythm of the bike from all viewing angles.
Protection is the quiet partner of precision. The area around the cut line deserves masking tape, a soft film, or painter’s tape that cushions the surface against small slips or wobble during cutting. This is not merely a precaution; it is a practice that keeps the finish pristine and prevents scratches that can become magnified after paint is applied. As the line is prepared, the rest of the panel remains shielded from dust and heat, two forces that can distort edges or leave gritty specks under the primer. The tools chosen for the work are not gadgets but extensions of patient craft. A rotary tool with a fine cutting wheel provides controlled, narrow kerfs that allow the operator to feather the line with micro-adjustments. For larger, more aggressive shaping, a small, steady hand and a guide become invaluable. The guide, whether a straight piece of wood or a metal strip, acts as a rails system for the bit, delivering an even cut along the entire length. This approach matters: the tool should sing through the plastic, not slam through it.
The cutting process itself is a choreography. Begin at a slow speed to prevent heat buildup that can soften the ABS or other plastics commonly used in fairings. Heat is a sneaky adversary; it can cause the surface to melt or warp if the tool is pushed too hard or allowed to linger too long in one spot. The idea is to move steadily, letting the bit do the work rather than forcing it. Several shallow passes are far preferable to a single, aggressive pass. Each pass should remove a thin layer of material, so the plastic has time to cool and settle before the next stroke. This method reduces stress on the material, lowers the risk of cracking, and makes the final edge crisper.
During the process, keeping the cut as true as possible is essential. A light touch, a steady hand, and the discipline to stop when the line begins to drift are what separate a rushed result from a professional one. The tool should be kept in motion, and the user should monitor heat, not just line. If the area begins to feel warm to the touch, it is wise to pause, let the plastic cool, and perhaps apply a damp cloth to the surrounding region. Cooling the edges as you work preserves the integrity of the surface and reduces the risk of distortion as the cut progresses.
After the line is fully cut, the finishing steps are where precision becomes polish. The edges first need smoothing to remove any micro burrs or saw-like irregularities that naturally arise from a cut. Start with a lower-grit abrasive—the 80-grit range—then advance to a finer 220-grit to refine the edge. Sanding is not about aggressive material removal; it is about revealing an even, continuous edge that transitions cleanly into the surrounding surface. Sand in a circular motion to avoid creating visible grooves that run along the line. The goal is a belt of smooth plastic that looks like a deliberate shaping rather than a repair.
Dust control is part of the finish as well. The sanding process creates a cloud of fine particles that can embed into the surface or drift onto areas that will later be primed and painted. A soft cloth passed over the area followed by a wipe with isopropyl alcohol helps ensure the surface is clean and ready for adhesion. When the cut line has been smoothed and the surface clings only where it should, body filler can be employed if the goal requires a more dramatic change in shape. The filler should be applied in thin layers, allowed to cure fully, and sanded again to achieve a flawless plane. Patience here matters: skimping on curing time invites pinholes or cracking under paint.
Priming and painting are the final acts of the transformation. A good prime improves paint adhesion and reveals any remaining imperfections, so they can be addressed before color is applied. Once the primed surface is smooth, a high-quality automotive-grade paint is applied. The finish should be consistent with the rest of the fairing in color depth and gloss, ensuring the new edge sits in harmony with the bike’s overall look. The result is not only a new contour but a cohesive narrative where the fairing still communicates the bike’s intent and temperament. In this context, the aesthetic becomes a function of the technique, and the technique is a function of the plan that guided every stroke and every pass.
The journey from line to finish is also a careful negotiation with safety. Eye protection and a dust mask are not mere add-ons; they are essential to any modification project. When plastics are cut, the air can fill with fine particles that irritate the lungs and eyes alike. A well-ventilated space becomes a quiet workshop ally, even if the day is calm. Work gloves protect your hands from sharp edges and from the heat that can cumulatively gather on a line that has been worked for an extended period. The idea is simple: do not push beyond your limits, and respect the plastic as a material that resists the impulse to be reshaped in a single breath. Excessive force is a sure path to cracking or taking off more than intended. The best modification emerges from a patient rhythm that respects both the material’s boundaries and the rider’s vision.
For those who want to explore compatible options that inform a design choice rather than replace a panel outright, a catalog of fairings can be a helpful guide. Browsing a category dedicated to Honda fairings, for instance, offers insight into how factory contours respond to similar modifications and where lines naturally balance with frame geometry. This reference can inspire safer, more predictable shaping, and it can help you anticipate how a change in one region of the fairing might ripple across the overall silhouette. You can explore such options here: Honda fairings.
In keeping with the spirit of shared knowledge, it’s also worth acknowledging that many riders look to real-world demonstrations to translate theory into technique. A practical demonstration can illustrate the pace, steady hand, and respect for heat that this process demands. A popular performance clip from a creator in the riding community shows the method in action, offering real-time guidance on technique, tool control, and the critical safety practices that accompany cutting work. While the video itself is a snapshot of a craft, the essential lessons—plan, protect, proceed slowly, and finish with care—remain universal. For those who want to see the approach in motion, the video is an accessible resource that complements the written guidance, illustrating how the edges respond to gradual, controlled cutting and the discipline of not forcing material to yield beyond its natural limits.
This chapter does not stand apart from the surrounding discussion but rather reinforces a consistent approach to modifying or repairing fairings. The broader topic—how to cut motorcycle fairings—asks for more than a passable result; it asks for an outcome that respects safety, aesthetics, and durability. A clean cut can improve airflow, aid mounting alignment, or simply refresh an old look without compromising the fairing’s structural integrity. Because plastics respond to heat and stress, the careful, repeatable process described here helps ensure that the modification holds up under the vibrational realities of riding. Committing to multiple shallow passes rather than a single aggressive push reduces the probability of micro-cracks that can propagate under temperature changes and wind pressure. The emphasis on cooling, smoothing, and priming ensures the final edge is not only visually pleasing but technically sound.
In the end, the rider’s eye will tell the story. A well-executed cut reads as intentional design rather than an afterthought. The edge is not merely a boundary but a transition—between existing lines, between air and panel, between the bike’s past and its modified future. The objective is not to remove material at speed but to sculpt it with care, so the fairing remains robust, the finish durable, and the overall look coherent with the bike’s character. The value of such work lies not in the thrill of the cut but in the quiet confidence that the modification has been executed with restraint, skill, and a respect for the material’s limits.
External resource: those who want a broader sense of practical demonstrations can refer to online real-world guides and visual tutorials that illustrate the technique in action, including user-generated clips that emphasize safe practice and precise cutting. For a direct demonstration, you can view the related resource here: https://www.tiktok.com/@twinstunts/video/734567890123456789
Polish and Protect: Finishing Cuts on Motorcycle Fairings for a Showroom-Ready Result
Cutting a motorcycle fairing is only half the job; the way you finish the cut determines whether the modification looks intentional and professional or rushed and amateurish. A clean edge reads as care and skill. It protects the fairing from stress cracks and ensures paint and adhesives bond correctly. This chapter walks through the finishing steps in a single, integrated flow so you can move from raw cut to a durable, polished edge with confidence.
Start by inspecting the cut immediately. With your shears, rotary tool, or saw still warm in hand, hold the fairing up to the light and view the cut from several angles. Look for small chips, hairline cracks, or uneven sections where the blade wandered. These are normal and expected; the finishing process is designed to address them without overworking the area. Take note of undercuts or areas where the material has melted. Those spots will need gentler sanding to avoid removing too much material and changing the fairing’s profile.
Secure the fairing for finishing. Use a workbench or padded sawhorses to hold the piece steady. If the part has delicate mounting tabs or thin sections, support them with scrap wood or foam to distribute clamping pressure. Avoid direct contact of metal clamps with the cut edge—wrap clamp faces in tape or use rubber pads to prevent new dings. A stable setup reduces vibration and keeps your sanding smooth.
Begin with low-aggression smoothing. If the edge has significant burs or sharp remnants, use a file or a coarse sanding block to knock down the high points. Work with the contour of the fairing, not against it; follow the curve to preserve the intended shape. Keep strokes consistent and short to avoid gouging. For thermoplastic fairings, light passes are better than heavy ones: plastics can melt from friction and then harden into a rough edge. Maintain tool movement and let the abrasive do the work.
Transition to power tools carefully. A rotary tool fitted with a sanding drum or fine grinding bit speeds the process and reaches tight radiuses, but only use it on low speed. High RPM generates heat, which softens many fairing plastics and yields a ragged, melted finish. Use short bursts and let the tool coast between passes. If the fairing is fiberglass, you can move a bit faster but still avoid prolonged contact in one spot. For long straight edges, a small oscillating sander or an angled belt sander on a gentle setting provides a consistent surface.
Sand progressively. After removing the biggest imperfections, move through grits to refine the edge. Start around 80–120 grit to shape and remove tool marks, then progress to 220–320 grit to smooth. For the final tactile finish, use 400–600 grit. Each step should remove the scratches of the previous grit and bring the edge closer to the intended profile. Sandpaper wrapped around a soft block helps keep edges even; for interior curves, use folded pieces of sandpaper or small, shaped sanding sticks. Keep your hand steady and use the same pressure across the edge.
Pay attention to the inner lip and mounting areas. These spots are often overlooked but are crucial for fitment and durability. Remove any sharp protrusions that could stress mounting hardware. Smooth the inner edge so bolts and brackets sit flush without causing point loads. If the cut changed a mounting hole or tab, mark the location and consider reinforcing it later with adhesive or rivets designed for plastic repairs.
Clean continually. After each sanding stage, wipe the area with a soft cloth to remove dust. Plastic dust clings and can hide imperfections. Use a tack cloth or a lint-free rag dampened with isopropyl alcohol to remove fine particles and oils. This cleaning step is essential before applying filler, primer, or paint because contamination causes adhesion problems or visible defects in the finish.
Repair and fill when necessary. Some cuts reveal voids or thin sections that need attention. For small gaps or uneven spots, a two-part body filler formulated for plastics will restore shape quickly. Mix the filler to a uniform color and apply thin layers, building up only what you need. Let each layer cure fully then sand smooth with 220 grit before adding the next layer. For larger structural repairs—such as cracks or missing mounting tabs—use reinforced repair techniques. Fiberglass fairings may be patched with woven cloth and resin on the inside to regain strength, then finished with filler on the exterior. For thermoplastics, welding or specialized plastic repair adhesives can rejoin sections, but these techniques require practice to avoid adding excessive bulk.
Feather the transition. Whether you used filler or simply smoothed the cut, feather the edges so the repaired area transitions subtly into the original surface. Hold your sanding block at a slight angle and work outward from the edge to blend. Feathering reduces visible ridges after painting and prevents sharp transitions that catch light differently. Once the edge is uniform, clean again to remove the fine dust created by feathering.
Test fit repeatedly. Reattach the fairing to the bike and verify clearances and alignment. Doors, vents, and mating surfaces should fit as they did before the cut unless your design intentionally changes them. Look for pressure points or areas where the new edge contacts other parts. If interference exists, remove the fairing and adjust the edge carefully. It is far easier to trim a little more than to rebuild a portion removed too aggressively.
Prepare for primer and paint. A superb painted edge starts with proper surface prep. Use a degreasing agent safe for plastics to remove fingerprints, waxes, or release agents left from manufacturing. Then apply a plastic adhesion promoter if the substrate is ABS or similar; this promotional layer helps primer stick. Choose a primer compatible with both the fairing material and your chosen paint. Apply primer in thin, even coats, allowing proper flash time between layers. Lightly scuff the primed area with 600 grit before color coats to remove dust nibs and to create a fine key for the paint.
Mask with care. When painting around a newly cut edge, mask adjacent surfaces to protect them from overspray. Use low-tack painter’s tape and quality masking paper. Extend the masked area beyond the visible section to avoid hard lines. If you’re only painting the edge to seal and protect it, consider carefully feathering the paint to blend into the existing finish so the repair appears seamless.
Consider edge sealing. Unpainted plastic edges are more susceptible to moisture ingress and mechanical wear. Applying a thin bead of clear sealant or flexible edge sealer will protect the cut area. For painted edges, multiple clear coats provide both protection and gloss continuity. Allow proper cure times for each layer—rushing clear coats will trap solvents and lead to poor finish.
Address stress points proactively. Sharp corners or thin tabs near a new edge invite cracking over time. Add reinforcement where necessary: small backing plates, epoxy fillets, or riveted plates can distribute load. When possible, maintain radiused corners instead of sharp 90-degree cuts; radiuses reduce stress concentration and improve longevity.
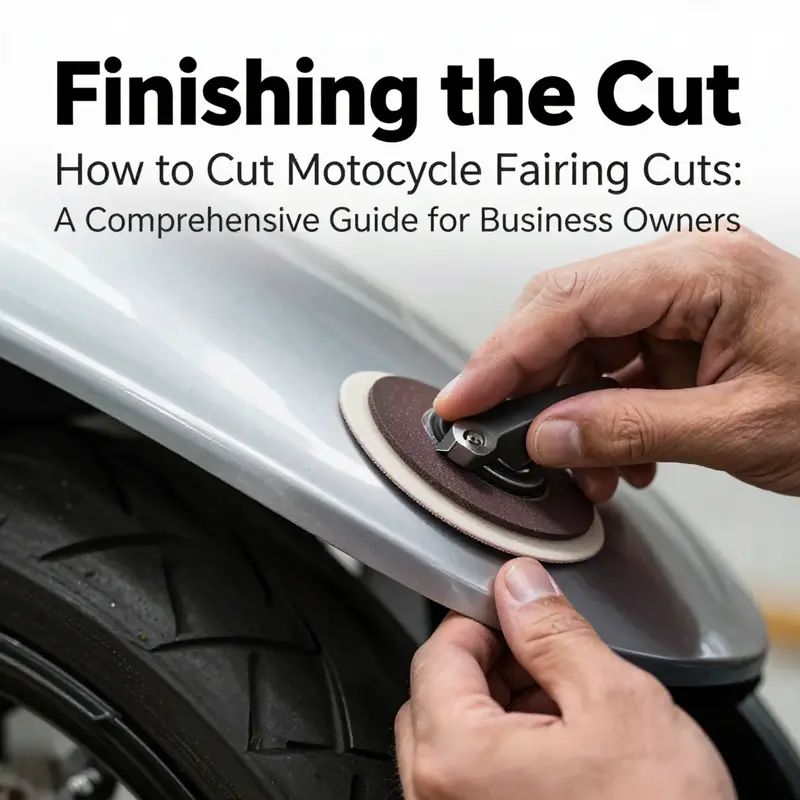
Final sanding and polishing. Once paint has cured, wet sand the area lightly with 1000–2000 grit to remove minor imperfections and to level clear coats. Follow with a polishing compound and a soft pad to restore gloss. Keep pressure light and move continuously to avoid burning through the clear coat. Use a microfiber towel for the final wipe to remove polishing residue and inspect the shine.
Safety and environmental notes. Work outdoors or in a ventilated bay when sanding and painting. Use a respirator rated for organic vapors and particulate filters to protect your lungs from fine plastic dust and paint fumes. Collect and dispose of sanding dust and solvent-soaked rags according to local regulations. Minimizing waste keeps your workspace safer and cleaner.
A professional finish is a combination of patience, correct materials, and repeated testing. Each step builds on the last: a thoughtful smoothing process reduces the amount of filler needed, proper cleaning ensures primer and paint adhere, and careful masking and sealing protect the final surface. If you need replacement or matching panels, consider researching available fairing sets to better match contours or colors—options exist by bike model that can save time and ensure perfect fitment, such as categories covering fairings for CBR models.
For additional techniques and safety reminders, consult a deeper how-to resource that explores tool selection and advanced repair methods: https://www.motorcycle.com/how-to-cut-motorcycle-fairings-like-a-pro/.
Safety in the Shape: Prudent, Precise Cutting of Motorcycle Fairings

Cutting motorcycle fairings is more than a simple trim from a template. It is a measured act of design and restraint that sits at the intersection of craft and caution. When a fairing is altered, every edge carries significance—from how it interacts with airflow and rider protection to how it mirrors your personal vision for the bike. The work calls for a quiet, steady hand, a clear plan, and a method that respects the material you’re working with. The goal isn’t just to remove plastic; it is to refine it, preserve its integrity, and arrive at a result that looks deliberate, not improvised. In this pursuit, safety isn’t an afterthought but the compass that guides every decision you make along the way. The chapter that follows threads together the practical steps with the mindset that underpins them, illustrating how careful preparation, disciplined technique, and thoughtful finishing can transform a modified fairing into something both functional and visually coherent with the rest of the bike.
First comes preparation, not because it sounds orderly but because it makes the rest of the process predictable and controllable. You begin with personal safety and environment, because the air around you becomes a factor as soon as you introduce a cutting edge to plastic. The equipment you wear should be nonnegotiable: a sturdy pair of safety goggles to shield eyes from flying shards, gloves to guard the hands from sharp edges, and a dust mask to avert inhalation of fine particles and fumes that emanate from heated plastic. The aim is not to create a dramatic scene of risk but to keep the work silent and secure, so that focus remains on the line you intend to cut and the control you maintain over the tool you use.
Equally important is the space you choose. A well-ventilated area is essential because the cutting process can release fumes from plastics as they heat. Even a modest exhaust setup can make a meaningful difference, drawing away dust and airborne particles that accumulate on surfaces and in lungs. A clean, uncluttered workspace reduces the chance of a misstep. It invites a calm, unhurried pace, which is precisely what safe cutting demands. If you are working in a shop or garage, designate a specific area for cutting tasks and keep it free of nonessential objects so your clamps, straightedges, and guiding tools have unobstructed access to the fairing.
No matter how small the cut, the way you secure the fairing matters more than the exact tool you choose. The fairing should be clamped firmly to a stable workbench. A dedicated vise or sturdy clamps that distribute pressure evenly across a broad contact area helps prevent flexing or slipping. If a clamp marks the surface, place a protective layer between the clamp and the plastic—think a thin scrap of wood or rubberized pad. The idea is to hold the piece still without introducing new damage or stress points where the cut will occur. In a moment when your line is marked and the tool is ready, you’ll appreciate the difference that a solid hold can make, because a moving surface is the enemy of precision.
The choice of tool is the second major decision, and the right choice depends on your fairing’s material, thickness, and the precision you require. A rotary tool with a fine cutting wheel is well suited for intricate work and curved lines. It gives you the ability to follow a marked line with small, controlled increments, reducing the heat that can accumulate if you push too hard. For larger, straighter cuts, a small jigsaw or coping saw can work, but these require more control and often more time. The key is to avoid forcing a tool through plastic in a single pass. Instead, advance with multiple shallow passes, letting the blade do the work rather than your body forcing it. The principle echoes through the rest of the process: steady pressure, measured steps, and patience over speed.
The actual cutting, however, hinges on a disciplined technique. Start at a low speed and let the tool’s motion do the work. High heat is the enemy; once plastic overheats, it can melt and warp, creating an edge that’s difficult to clean and unsightly to boot. A guiding edge helps keep you true. You can clamp a straight piece of wood or metal along the marked line to act as a guide for your tool. The aim is a clean, straight edge where the line remains visually decisive and the cut line remains invisible beneath the finishing touches. If the design calls for a rounded transition or a bevel, you’ll need to adjust your approach gradually. The main principle remains: control your path, not your tool’s speed alone. The more passes you make, the more consistent the cut will feel and look, and the less stress you place on the material.
Cooling is not merely a comfort; it is a technical necessity. Periodic pauses to allow the tool and the plastic to cool help prevent micro-cracks that can propagate later. A damp cloth placed nearby can be used to cool the surrounding area, but never apply water directly to the freshly cut edge, where the heat and moisture can introduce warping or contaminants that affect how the edge will take paint or filler. Once the line is fully cut, the work transitions from volume removal to edge refinement. Here you begin the finishing stage that determines whether the modification reads as deliberate or accidental.
Finishing the cut requires attention to the edge’s quality. Start with rough sanding to remove burrs and uneven spots. An 80-grit sandpaper is a reasonable starting point to knock down high spots, followed by a finer 220-grit to smooth the surface. Sand with the grain of the plastic or in a circular motion if the material does not have a natural grain; the objective is to eliminate visible grooves and micro-etching that betray a hurried job. After the rough sanding, inspect the edge in bright light. If you notice any unevenness, you can apply a light application of body filler to level the surface. Allow it to dry completely before re-sanding. This step is crucial if you are crafting a new shape or finishing a cut that creates an irregular boundary where material thickness varies. The filler should be described as a temporary partner to the original plastic’s resilience, not a permanent cover-up of flaws. When the edge is smooth and uniform, you move into the priming and painting phase, which seals and protects while also delivering color and cohesion with the rest of the fairing.
All of these technical steps are underwritten by a safety mindset that doesn’t disappear once you near the end of the job. The moment you commit to cutting, you acknowledge risk—risk of sharp edges, of dropped tools, of accidentally cutting too deep, or of overheating the material. The best antidote to risk is a disciplined approach: plan each cut, prepare every edge, and proceed with control. If something doesn’t feel right, it’s legitimate to pause, reassess your line, or even revert to a practice sheet on scrap material. Practicing on offcuts is a pragmatic ritual that often reveals hidden issues—the way a gentle curve behaves under a certain tool, where a line begins to telegraph the stress that comes from a deeper cut, or how much pressure a particular plastic type tolerates before it begins to chip rather than cut smoothly. This preparatory stage is about building confidence in your capacity to read the material and respond to its signals, not about pushing through fear with bravado.
The process gains maturity as you become mindful of finishing options and the expectations you set for the piece as a whole. Sometimes, a clean cut is all that is required: the edge is smooth, the line is sharp, and the modification integrates with the bike’s shape as though it was always that way. Other times, you may be creating a new silhouette that demands body filler, primer, and paint to achieve a uniform, factory-like result. In either case, the underlying discipline remains the same: measure twice, cut once; cool often; sand to a finish; and paint with a patient, thorough approach. The painting stage should use an automotive-grade approach to prep and topcoat. Priming creates a uniform base that accepts color evenly, and a durable topcoat resists chips and micro-mabrasions that can arise from road debris and temperature cycling. If your aim is to achieve a seamless look, you may also consider a clear coat to protect the new contours and provide a subtle sheen that harmonizes with the rest of the fairing’s finish.
Beyond the mechanics of the cut and the finish lies the broader sense of what you’re trying to achieve. A well-executed cut doesn’t merely alter a shape; it respects the bike’s original lines and the rider’s relationship with the machine. The safest and most satisfying modifications are those that intentionally slow the eye and invite a second, more attentive look. When a cut aligns with a design intent—whether to improve airflow, reduce weight in a noncritical area, or simply refresh the aesthetic—your work should communicate that intent with clarity. In this light, the safety practices become part of the creative truth of the modification. They are not constraints but the means by which you preserve both form and function.
If your goal includes replacing or augmenting parts later, the selection of compatible, high-quality fairings is a consideration that sits alongside safety. For riders exploring options for replacement components or new styling directions, the Honda fairings category offers a representative spectrum of choices that can complement thoughtful cutting work. You can explore the options and find a fit that matches your modified shape by visiting the Honda fairings category. Honda fairings category.
Throughout this journey, it’s essential to reference established safety guidance and current best practices. The core principles—protective equipment, a well-ventilated workspace, secure clamping, deliberate tool selection, measured cutting, mindful cooling, and careful finishing—remain constant across different projects and material variants. They form the backbone of a process that can yield both safety and satisfaction in equal measure. When the line, the tool, and the edge converge in a controlled, attentive manner, the result is a fairing that looks as though it grew with the bike, not something added after the fact. This is not a rush job, but a conversation between the rider, the tool, and the material where safety serves as the loudest, most consistent voice.
For readers seeking a broader perspective on safely guiding a modification like this, the Cycle World article on how to cut motorcycle fairings safely offers an external reference that complements these practical steps. It reinforces the idea that safety is a continuous practice, not a single checklist. You can review additional insights at the following external resource to broaden your understanding and verify the techniques described here: https://www.cycleworld.com/motorcycle-maintenance/how-to-cut-motorcycle-fairings-safely/.
Final thoughts
Mastering the art of cutting motorcycle fairings is fundamental for businesses in the motorcycle industry. With the right preparation, tools, and techniques, you can ensure clean cuts that enhance the overall appearance and performance of motorcycles. By adhering to the outlined safety measures and finishing processes, businesses can deliver high-quality work while minimizing risks. This comprehensive understanding will not only boost customer satisfaction but also reinforce your reputation as a knowledgeable and skilled service provider in the motorcycle customizations field.