
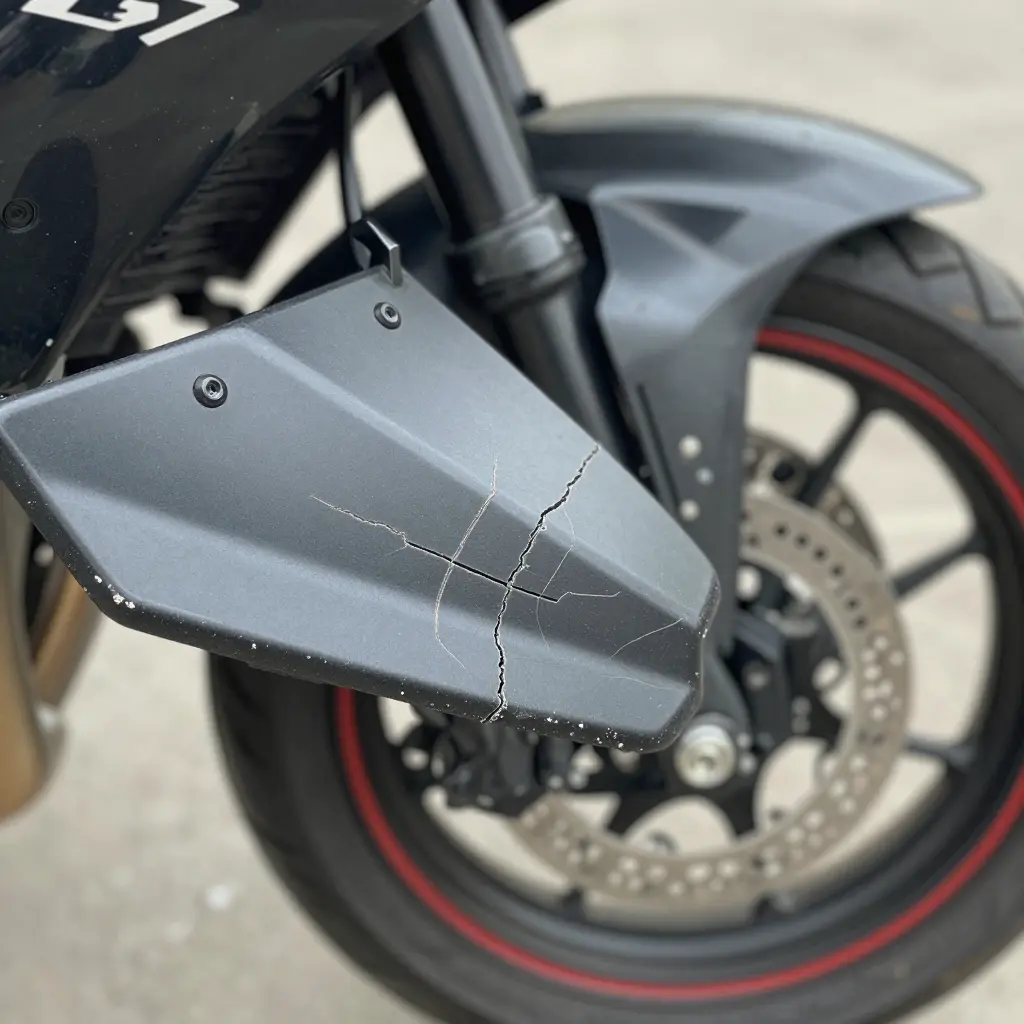
What Fairing Mounting Tabs Are, and Why They Fail Before the Panel
Fairing mounting tabs are the small molded projections, usually plastic and sometimes reinforced or metal, that bolt a body panel to the motorcycle’s frame, subframe, or a metal stay bracket. A large fairing panel hangs from only a handful of them.
That geometry fails in a predictable way. Vibration from the engine, road, and airflow travels up the frame and collects at each tab, where the mass of a big panel meets a small, fixed point. The tab flexes and fatigues much faster than the flexible panel around it, so cracks open at the tabs while the outside of the fairing still looks clean.
This article covers how that happens and what to do about it:
- Vibration mechanics – how cyclic energy loads and fatigues the mounting points.
- Materials – how ABS, fiberglass, and reinforced plastics behave under repeated stress.
- Diagnosis – how to locate hidden vibration cracks before a panel drops.
- Repair – practical options for cracked, broken, and rebuilt tabs.
- Prevention – mounting techniques and hardware that reduce the stress load.
For broader context on how these panels fit together, start with our overview of motorcycle fairings and our practical fairing guide.
Once you treat the tab as the part designed to fail first, inspection, repair, and reinforcement all get easier to plan.
How Vibration Reaches the Fairing Assembly
A fairing sits at the end of a long mechanical chain. Vibration starts well below the panel and travels up through the frame, bracket, and mounting hardware before it reaches the plastic. That path is why a fairing can crack while the visible surface still looks untouched.
Three Sources, Three Behaviors
- Engine vibration starts at the crank and cylinder head. It is periodic and tied to firing order, so its frequency rises and falls with engine speed.
- Road vibration enters through the tires, suspension, and steering head. It is irregular and broadband, driven by surface texture and wheel imbalance rather than RPM.
- Aerodynamic vibration arrives as pressure buffeting across the outer skin, pulsing against the panel and its attachment points.
The chassis does not just pass these inputs along. Frame, brackets, and fasteners act as filters: they amplify some frequencies and damp others before the energy reaches the fairing.
Frequency, Resonance, and Amplitude
Each source occupies a different frequency band. Engine orders typically fall in the low-to-mid range that climbs with RPM; road inputs sit in a lower, rougher band; and aerodynamic buffeting adds a slower, repeating pressure cycle. When one of those bands overlaps the natural frequency of a bracket or a mounting tab, resonance occurs and small inputs suddenly produce large motion.
Amplitude behaves the same way. As RPM increases, engine excitation frequency and force both rise, so the displacement transmitted into the fairing grows until the assembly approaches its resonant peak. For a deeper look at the panel itself, review what a fairing actually is before tracing the loads further.
This is where motorcycle fairing vibration concentrates. The energy collects at the stiffest, thinnest transition points, and the plastic fairing tabs that hold the panel in place absorb the most cyclic stress.
Vibration does not arrive as a steady hum across the rev range. It spikes wherever the engine’s firing frequency matches the natural frequency of the fairing and its mounting tabs.
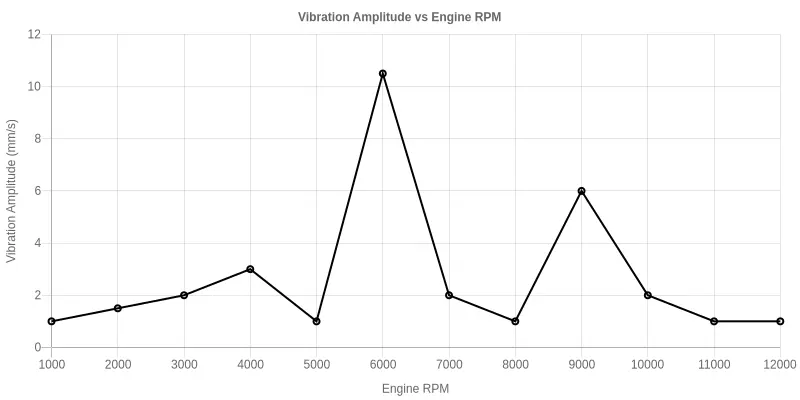
Figure 1: Vibration amplitude (mm/s) across the engine RPM range. The sharp peak around 5250 RPM marks the primary resonance point, where the fairing and its mounting tabs experience their highest cyclic stress.
Why Mounting Tabs Fail Before the Panel Does
Fairing mounting tabs are the narrow plastic fingers that bolt the bodywork to the frame, and they are almost always the first parts to crack. The reason is that load behaves differently in a small area than in a large one.
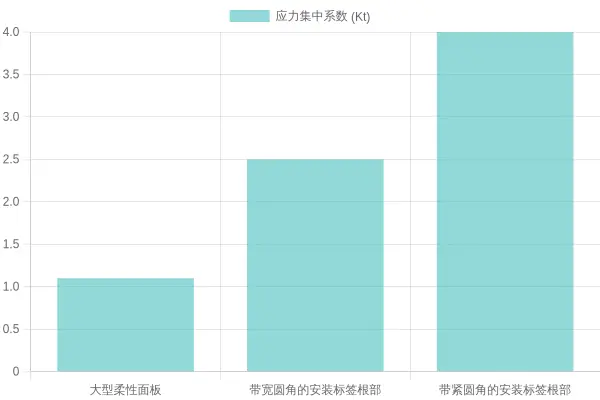
When the bike vibrates and flexes, stress moves through the fairing. A wide, flexible panel spreads that load across enough material that no single point sees an overwhelming force. A tab is small and comparatively rigid, so the whole load entering the panel funnels into its slim root. The result is a sharp spike in fairing tab stress where the tab meets the bodywork.
The inner corner at the tab root acts as a stress riser: stress lines bunch together where the geometry changes suddenly. Engineers call this stress concentration, and it means the same force now acts on a much smaller cross-section.
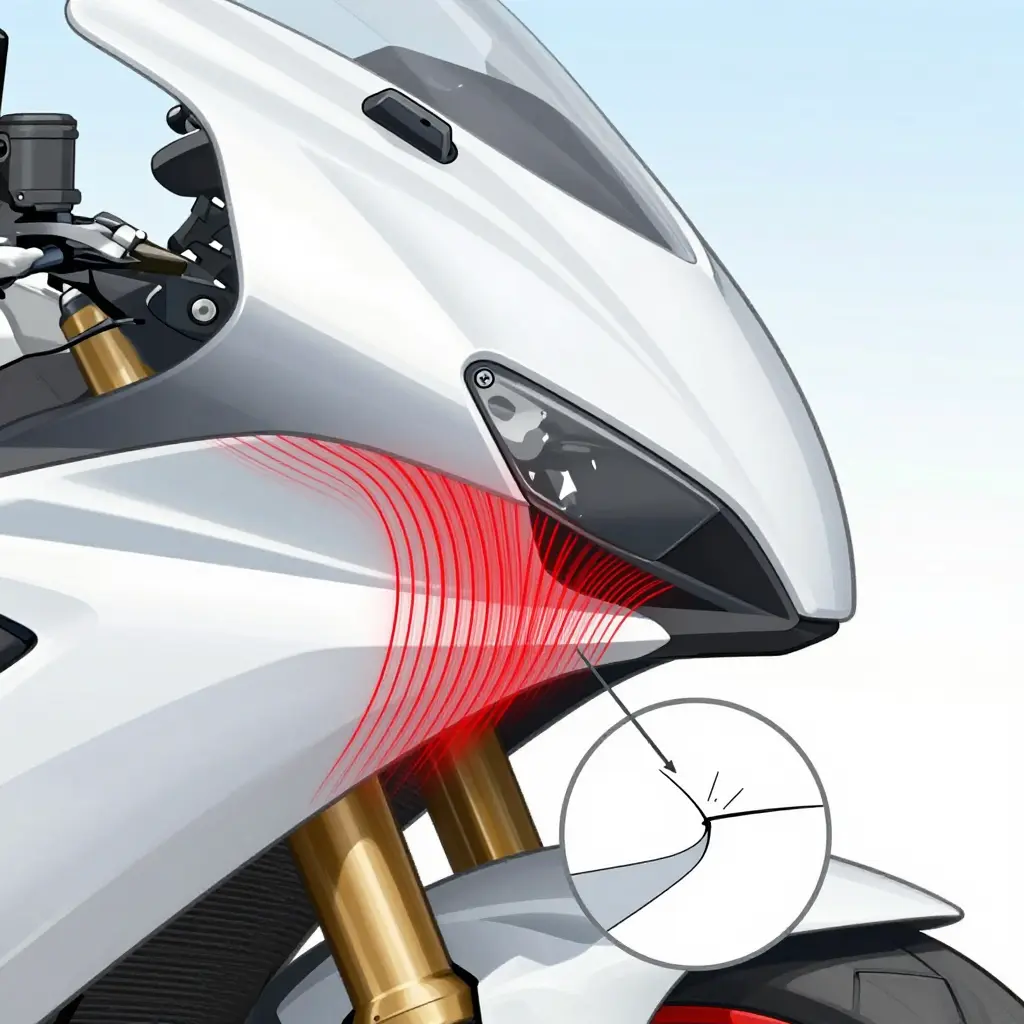
Under constant vibration, that concentrated stress becomes cyclic fatigue. Every bump, engine pulse, and road ripple flexes the tab back and forth millions of times, and each cycle adds a little more damage. This slow buildup, known as plastic fatigue, happens even when individual loads feel harmless.
Cracks almost always begin at the fillet, the curved transition at the tab root. If that radius is too tight, it sharpens the concentration and gives the crack a ready-made starting point. From there, mounting tab cracks spread quickly across the tab because so little material is left to resist them.
The panel lasts longer for the same reason: it spreads stress, while the tab concentrates it. To see how tabs fit into the rest of the bodywork, see our guide to how motorcycle fairings are built and mounted. The mismatch is why tabs give out first.
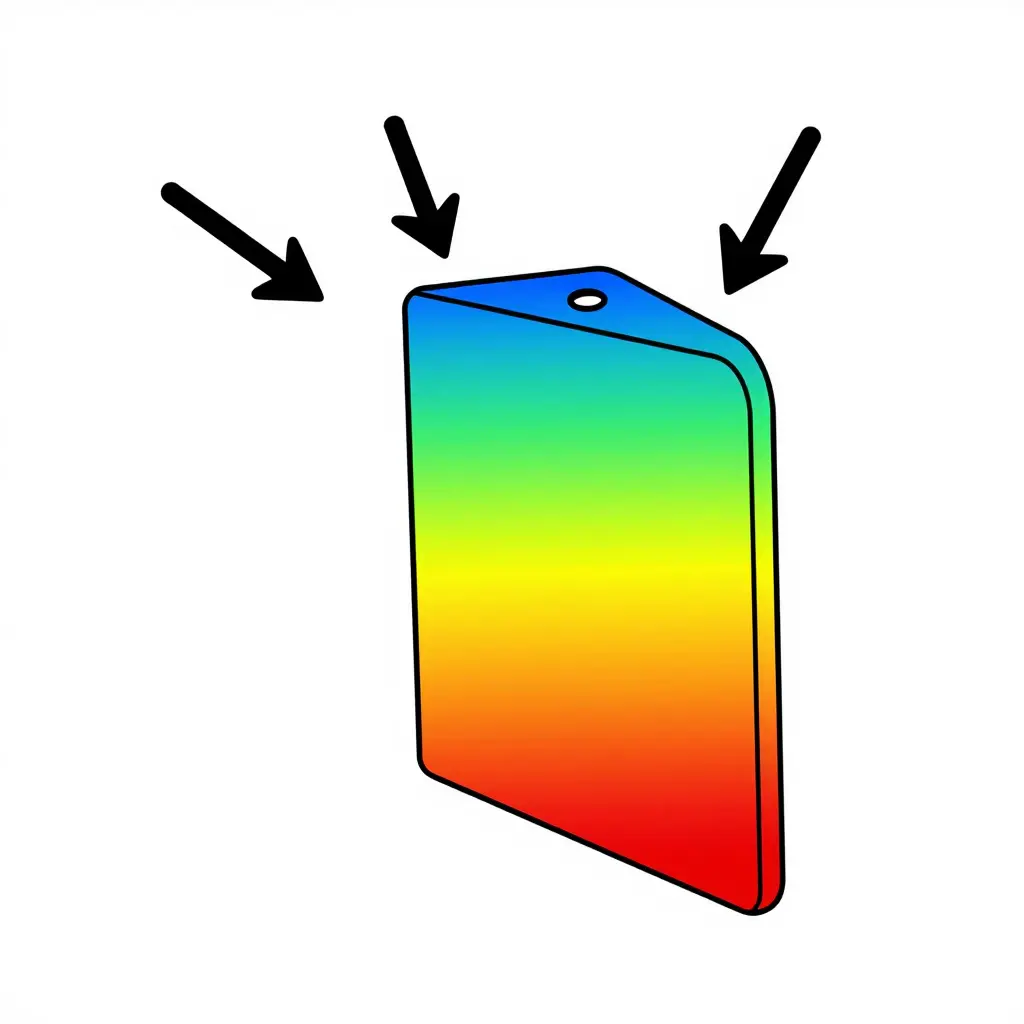
Caption: Directional arrows show vibration loads pushing on the top of a fairing mounting tab; the color gradient runs from blue to red at the fillet, where stress concentrates and cracks begin.
Symptoms of Mounting Tab Failure
A tab rarely snaps without warning. It usually gives off smaller signs first, and most riders overlook them until a panel finally lets go.
-
Rattling or buzzing at a specific RPM. A healthy fairing stays quiet across the rev range. Once a tab starts to crack, the panel loses its grip on the frame and engine vibration finds a frequency that sets the plastic humming. You will usually hear the buzz only in a narrow band of engine speed, often between 3,000 and 5,000 rpm, and it fades as revs climb past it.
-
Visible cracked tabs. The fracture is often small enough to hide behind the fairing, but once you remove the plastic the damage is obvious. Look for hairline cracks at the base of each tab where it meets the panel body, the highest-stress point and the first place failure begins.
-
Missing or loosened fasteners. A cracked tab can no longer hold a bolt reliably, so screws and clips back out on their own or disappear. A fastener that keeps loosening no matter how often you tighten it usually means the surrounding tab has given way.
-
Panel misalignment. When one or more tabs fail, the fairing drifts out of position. You may see uneven gaps between panels, a seam that no longer lines up, or a section of plastic sitting proud of the bodywork. Riders often spot this misalignment first.
-
Spider-web cracks radiating from bolt holes. A cluster of fine cracks spreading outward from a mounting bolt hole is the classic sign of tab failure. These radiating cracks show where repeated vibration and fastener torque have concentrated stress in one spot, and they often come just before a complete tear-out.
Catching these signs early makes fairing tab repair simpler and cheaper than waiting for a panel to break loose at speed. It also gives you time to weigh a quick fix against upgraded aftermarket fairings before the next ride.
Plastics do not all crack at the same rate. The material a tab is molded from largely decides how many vibration cycles it survives before a crack starts.
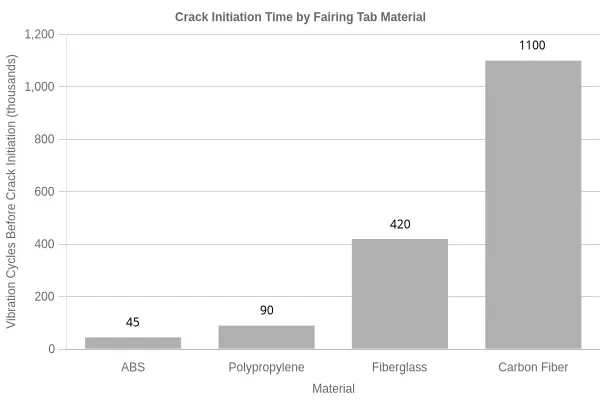
Figure 2. Approximate vibration cycles required for crack initiation across common fairing tab materials, ordered from weakest (ABS) to strongest (carbon fiber). Values are illustrative averages and vary with tab geometry, mounting torque, and amplitude.
Cheap ABS tabs begin cracking after roughly 45,000 cycles, and polypropylene lasts about twice that. Move to a composite such as fiberglass or carbon fiber, and the threshold climbs into the hundreds of thousands or past a million cycles. That gap is why a tab can fail long before the panel it holds. For the context behind these numbers, see how fairing materials and mounting points are designed before you pick a replacement.
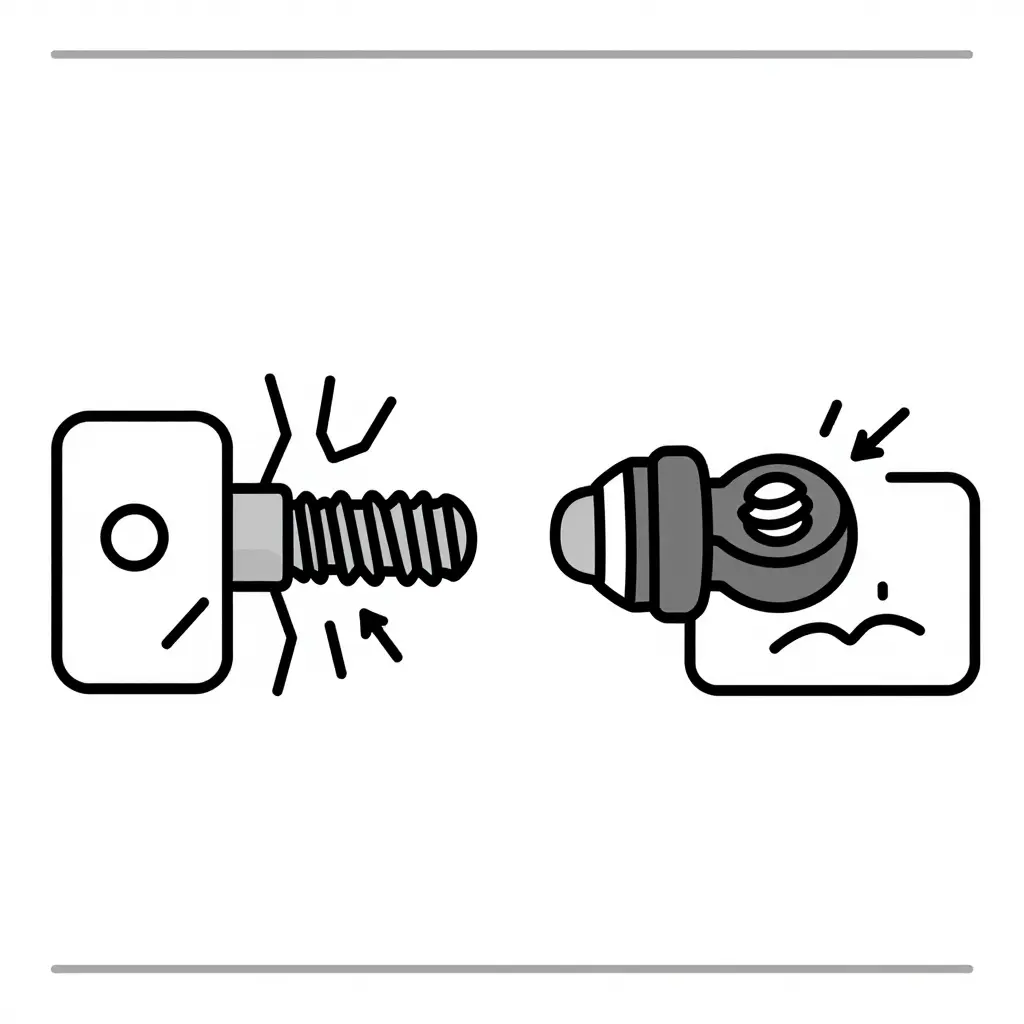
Figure 3: Rigid bolt vs. isolated mount. On the left, a bolt grips the tab directly, so every engine buzz and road shock loads the plastic at full force and concentrates stress at the bolt hole. On the right, a rubber grommet and isolator sit between the fastener and the tab, letting the mount flex and absorb energy before it reaches the plastic. The same tab under the same vibration sees much less stress transferred in.
How to Diagnose Fairing Mounting Tab Damage
By the time you hear a rattle or see a cracked panel, the tab behind it may already be damaged. A careful inspection catches the problem while it is still repairable.
Start With a Light and a Mirror
Get behind the plastic. A compact flashlight and an inspection mirror let you see the inner faces of the tabs that face away from you, where the first stress lines almost always appear. Work slowly around each mounting point and follow every tab back to where it meets the panel.
Look for Hairline Cracks
Hairline cracks often begin at the base of the tab or along the bolt hole. They look like faint white or gray streaks against the plastic and are easy to miss in direct sunlight. Change your viewing angle several times, because these fractures only catch the light from certain directions. If you are comparing the original geometry, a set of custom motorcycle fairings can help you judge how a healthy tab should sit.
Gently Flex the Panel
With fasteners removed, apply light hand pressure near each tab and watch for movement that should not be there. A healthy tab flexes as one solid piece; a damaged one shifts, clicks, or shows a visible gap at its base. Never force it. Just enough pressure to reveal play.
Check Torque Witness Marks
Factory paint marks or your own witness lines show whether a bolt has backed out and been over-tightened. Misaligned marks point to uneven clamping, a common cause of tab fatigue.
Dye Penetrant Testing for Hidden Cracks
When visual checks come up empty but something still feels wrong, dye penetrant testing reveals cracks your eye cannot. Clean the tab, apply the penetrant, wait, then wipe and add the developer. Any crack bleeds a bright, telltale line. The method works on non-porous plastics as well as metals, though some penetrants can stain or attack certain plastics, so test a hidden spot first.
Run through these steps and you will usually find the failure before the panel does.
When a tab finally gives out, it is rarely one cause acting alone. For the bigger picture of how these failures fit into motorcycle fairings explained, start with this breakdown.
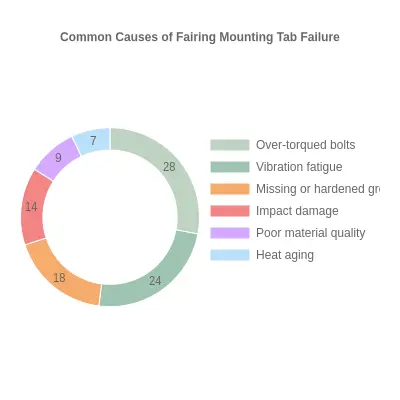
Figure 4: Distribution of the most common causes of fairing mounting tab failure, led by over-torqued bolts (28%) and vibration fatigue (24%), with grommet issues, impact damage, poor material quality, and heat aging rounding out the remaining share.
Repair vs. Replacement: What to Do With a Broken Fairing Tab
A snapped mounting tab does not automatically mean the end of your fairing. A careful fairing tab repair often restores full strength for a fraction of the cost of new plastics. But repair is not always the smart call. The right choice depends on how the tab broke, how much stress it carries, and how long you want the fix to hold.
Plastic Welding
Plastic welding uses a hot-air tool and a matching filler rod to melt the broken tab back into the surrounding material. Because it fuses the same base plastic, the joint keeps its natural flex, which matters when vibration caused the crack in the first place.
Best for clean cracks at the tab base with both pieces still present. Expect a solid, flexible joint at a modest price.
Epoxy with Fiberglass Reinforcement
When a chunk of the tab is missing, epoxy reinforced with fiberglass mat adds real structure. The fiberglass bridges the gap and spreads load across a wider area instead of concentrating it at one point.
It is slightly heavier and less flexible than a weld, so use it on tabs that carry load rather than ones that only align the panel.
Tab Reconstruction Kits
Reconstruction kits let you build a brand-new tab from ABS sheet and solvent cement, often using a molded template. This is the most involved DIY route, but it is the right answer when the original tab is gone entirely. A fresh tab with the correct bolt hole can outlast the surrounding brittle plastic.
When Full Fairing Replacement Wins
Fairing replacement becomes the better option when a tab is missing along with cracked mounting bosses, or when the panel shows multiple stress fractures radiating outward. If the plastic is already brittle and faded from years of sun exposure, a repair may only delay the next failure.
Replacement also makes sense when several tabs are gone at once, since chasing them one by one often costs more than a single new set. If you are weighing that decision, look at affordable replacement fairings before assuming OEM prices are your only path. Either way, plan on a color match or a full respray, and this guide to repainting motorcycle fairings walks through blending the new panel into the old.
Cost, Reliability, and Longevity Compared
The trade-off is simple: repairs are cheap but finite, while replacement costs more and lasts longer. Here is how the options compare.
| Option | Typical Cost | Reliability | Expected Longevity |
|---|---|---|---|
| Plastic welding | Low | Good for minor cracks | 3-6 years |
| Epoxy + fiberglass | Low to mid | Strong, slightly stiff | 5-7 years |
| Tab reconstruction kit | Mid | Strong when done right | 6-8 years |
| Full fairing replacement | High | Highest, factory fit | 10+ years |
The Bottom Line
If a single tab is cracked and the plastic is still supple, repair it and ride on. If the panel is brittle, tab-less, and cracked in several spots, replacement is the cheaper decision over time. Match the fix to the damage, keep an eye on nearby tabs, and your fairing will stay bolted down through thousands of miles of vibration.
Prevention and Upgrades: Stopping Tabs Before They Crack
Prevention starts with the fastener. Follow the manufacturer’s torque spec for every mounting bolt, and use a calibrated torque wrench rather than judging by feel. Over-tightening crushes the plastic around the hole; under-tightening lets the panel chatter against the mount. Both load the tab unevenly, and both lead to a crack.
Rubber grommets and isolators are the next defense. These cushions absorb the high-frequency vibration that fatigues plastic over time, so replace any that have hardened, flattened, or gone missing. Fresh isolators are one of the cheapest ways to prevent fairing cracks.
Reinforcement plates around the tab roots spread stress across a wider footprint. Bonding or bolting a small plate at the base of each tab gives thin plastic somewhere to hand off load instead of concentrating it at one point. This helps most on panels that carry accessories or see constant flex.
Make fastener checks part of regular maintenance. Look for loose bolts, stripped threads, and corrosion, then re-torque to spec. A tab cracked at its root will only spread, so catch it early and reinforce it before it takes the whole panel with it.
Finally, start with quality fairings. Well-made panels use thicker material, cleaner tab geometry, and reinforced mounting points from the factory. Choosing durable motorcycle fairings from the start means fewer surprises later, and it pays to compare construction details across trusted brands before you buy.
FAQ Fairing Mounting Tabs
Short on time? These are the questions riders and shops ask most often about why these small plastic mounting points fail and what you can do about it.
Why do mounting tabs crack before the panel does?
Mounting tabs are thin, cantilevered stress points that carry the full weight and vibration of a fairing while flexing constantly. A broad panel spreads its load across a wide surface; a tab concentrates force into a narrow neck, so fatigue micro-cracks form there first. Over thousands of miles, repeated vibration cycles at that bottleneck eventually snap the tab while the larger panel stays intact.
Can a snapped tab be repaired?
Yes, a cleanly broken tab usually can be repaired rather than replaced. The most durable option is plastic welding with a donor piece of matching ABS, reinforced with stainless mesh or fiberglass behind the joint. Epoxy-only repairs often fail because they are brittle, so use a flexible adhesive made for plastics and allow a full cure before reinstalling the fairing under load.
Does over-torquing cause cracks?
Yes. Overtightening fasteners squeezes the tab and creates stress risers that radiate outward as cracks. Every bolt has a specified torque value for a reason, and exceeding it crushes the plastic and deforms the buffer around the mount. Follow the factory torque spec and use a calibrated torque wrench on plastic fasteners to avoid premature failure.
Do rubber grommets actually help?
Yes, rubber grommets and wellnuts are a genuine upgrade, not a gimmick. They isolate the fairing from engine and road vibration and absorb the sharp spikes that fatigue plastic. Worn, hardened, or missing grommets are one of the most common causes of tab cracks, so replacing them during any fairing service is a cheap, effective way to extend tab life.
How often should fasteners be checked?
Check fairing fasteners at every oil change, roughly every 3,000 to 5,000 miles, and always after a drop, tip-over, or rough road trip. Vibration gradually loosens bolts, and a single missing fastener shifts extra load onto its neighboring tabs. A quick walk-around with a wrench takes minutes and can prevent a more expensive repair later.
Are aftermarket fairings more prone to tab failure?
It depends on quality. Cheap, unbranded fairing kits often use thinner plastic and imprecise tab geometry that fits poorly and stresses the mounts from day one. Higher-quality sets from reputable brands can match or even exceed OEM durability. If you are shopping, compare materials and read reviews before buying the best aftermarket motorcycle fairings.
Why the Tab Fails First
The damage you see is rarely the damage that started the problem. On a fairing, the cracked, spider-webbed panel is usually the last part to fail. Long before that fracture appears, the mounting tabs have been working through two forces: stress concentration, which magnifies load at every sharp corner and bolt hole, and vibration fatigue, which cycles those stresses millions of times until the plastic gives up. The panel looks fine because it is hanging on tabs that failed first. That is why an owner can replace a fairing that looks perfect and then watch the new one crack in the same spot.
The prevention steps above decide whether a repair lasts. Gusset or reinforce tabs before they crack. Use rubber isolators and correctly torqued fasteners so vibration is damped rather than passed into the plastic. Keep mounting hardware matched and snug, not over-tightened. Add flexible washers or bushings at contact points. Inspect tab roots at every service instead of waiting for a rattle. For a broader refresher on how fairings are built and mounted, see this motorcycle fairings overview. Handle the tabs and the vibration, and the panel takes care of itself.