
Restoring motorcycle fairings is a crucial aspect of bike maintenance and performance, directly impacting its aesthetics and value. As a business owner in the motorcycle industry, understanding how to effectively restore fairings can enhance customer satisfaction, improve the resale value of bikes, and showcase your expertise. This comprehensive guide explores the methods for restoring fairings, addressing everything from minor scratches and haze to deep cracks and yellowing. Each chapter will provide practical insights and techniques to ensure your approach is efficient and effective, ultimately leading to a well-maintained and visually appealing motorcycle.
null
null
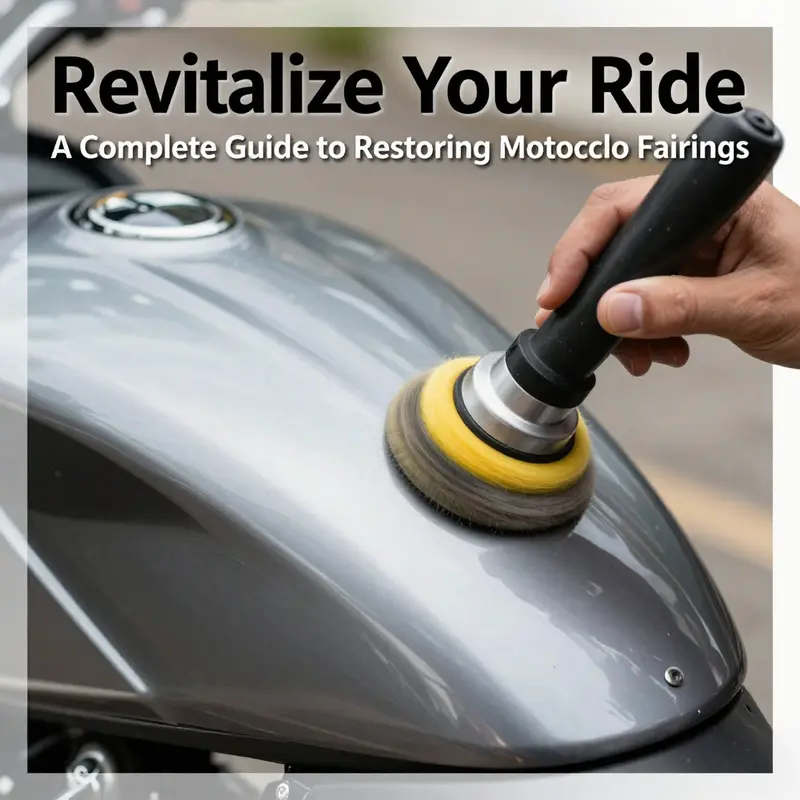
From Deep Scratches to Glassy Clarity: Mastering the Restoration of Motorcycle Fairings
When a fairing bears deep scratches and cloudiness, the problem is rarely cosmetic alone. The damage often speaks to the material beneath the surface, the way light interacts with the plastic, and the long-term effects of UV exposure. This chapter follows a deliberate, layered path that moves beyond quick fixes and toward a restoring process that preserves structural integrity while recapturing the original gloss. It is a sequence that respects the material, the craft, and the rider’s desire for a fairing that looks nearly new. The distinction between surface haze and something more invasive is crucial. Cloudiness can be a shallow oxidation layer, but it can also indicate micro-abrasions that have penetrated the clear coat. Deep scratches, by contrast, often tunnel through the protective film and into the base plastic or paint layer. Misjudging the severity risks compounding damage or creating an uneven repair. The first act, then, is honest assessment, followed by a controlled, patient restoration that treats the problem at its depth, not just its face.
A thorough cleaning anchors the process. Dirt, wax, and oils can mask or exaggerate defects, so begin with a dedicated plastic cleaner that is safe for ABS or polycarbonate fibers. This isn’t the moment for household solvents or rough cloths that could embed new scratches. Use a clean microfiber cloth and work in a cool, shaded area to avoid introducing new heat, grease, or dust. The goal is a perfectly clean canvas, free of residues that could cause fish-eyes or adhesion failures later in the process. As you wipe, pay attention to edges and corners where grime tends to accumulate. Only after the surface is pristine should you contemplate abrasive work, because any contaminant left on the surface will create chatter marks and will compromise the feathered edges that are essential to a seamless repair.
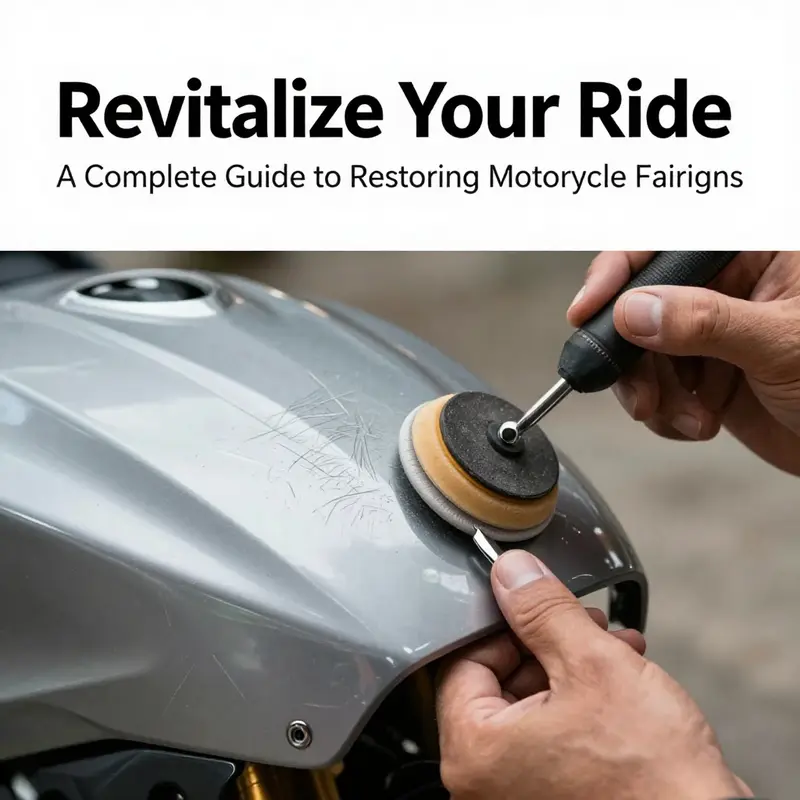
With the surface prepared, focus on the most telling signs of depth: the scratches themselves. For a scratch that veers into the clear coat, you want to feather the transition rather than widen the trench. Start with progressively finer sanding, using a careful, controlled motion. Begin at a relatively modest 320 grit to smooth the edges of the scratch and to begin dissolving the sharp boundaries. Move gradually to 600 grit, letting the paper do the work with light, even pressure. The aim is not to remove too much material but to create a gentle ramp that merges the damaged area with the surrounding panel. If you encounter tiny pits or dents where the scratch has gouged, that is where a filler comes in. Abrasive work should always be followed by a careful inspection under daylight to ensure you can see a uniform surface rather than a series of invisible traps waiting to bite when the sun hits the panel at an angle.
Where aggrieved areas dip or crater, filler becomes the practical ally. A body filler designed for plastic repairs is applied in thin layers to level the surface. It is essential to work in small increments, letting each layer cure fully before applying the next. Once the filler is set, sanding resumes with a finer progression—from 1000 grit up to 2000 grit—to erase the last evidence of the repair and to craft a flawless feathered edge that blends into the adjacent unfazed plastic. The transition should be so subtle that a close inspection cannot reveal where the repair begins or ends. Any roughness or unevenness here will show up again after painting, so patience at this stage pays dividends later.
Priming follows as the foundation for adhesion and color fidelity. A primer tailored for ABS or polycarbonate plastics provides the bite needed for the paint to lock onto the surface and to distribute subsequent layers evenly. Apply thin, even coats in a well-ventilated area, and allow sufficient drying time between passes. A primer that seals the repaired zone helps prevent staining, improves color match, and reduces the risk of solvent penetration that could reheat or warp the plastic under heat and sun. After the primer cures, recheck the area for any pinholes or slight irregularities. If you find any, spot-apply a touch more primer and sand back to a uniform plane. The surface should now feel uniformly smooth to the touch and appear uniform in color and sheen under bright light.
Color matching is the heartbeat of a convincing repair. Factory colors are a precise recipe, and even small deviations in hue or brightness can betray a repair that otherwise looks sound. The color-matching step often involves blending and layering thin coats rather than a single, heavy spray. With a spray gun or appropriate aerosol technique, apply multiple light coats, allowing each to dry before the next. In this phase, temperature and humidity influence how the paint lay down and cure. Work in steady, controlled conditions to avoid runs or sags. The goal is an even, consistent color that harmonizes with the neighboring fairing. If your vehicle’s palette is complex, you may need to blend in adjacent panels to mask the repaired area more effectively, ensuring the overall effect reads as a single, continuous surface rather than a patchwork.
After the base color has achieved uniformity and is fully dry, a clear coat goes on to restore gloss and provide UV protection. The clear layer should be applied in several ultra-thin coats, not a single heavy film. Each pass should dry fully before the next, which reduces the risk of orange peel and preserves a glassy finish. Once the clear has cured, a gentle, controlled buffing removes any minor imperfections and brings back a depth of shine that mirrors factory quality. This step often reveals whether the color match or panel harmony needs a touch more refinement, so approach it with a balanced mind—neither rushing nor overworking the surface.
Yet restoration isn’t simply about chasing a flawless mirror. Cloudiness that refuses to yield to polishing often signals deeper issues than surface oxidation. Here the process diverges from straight repair work and moves into a decision point. If the haze persists after diligent polishing with progressively finer compounds and a dual-action polisher, you may be facing oxidation that has penetrated beyond the surface or micro-scratches etched into the clear coat through years of sun exposure. In such cases, it is prudent to evaluate the feasibility of continuing with polishing versus proceeding with more aggressive repair kits designed for plastic panels. Advanced abrasives and fillers in these kits can level a damaged area more aggressively, but they demand careful application, temperature control, and meticulous finishing to avoid heat damage or uneven results. If the cloudiness remains stubborn despite these efforts, replacement may be the only way to truly restore the panel to factory clarity. The decision to replace is not a concession to failure but a recognition of physical reality: some effects of aging are simply beyond the reach of surface restoration.
The limits of restoration must be acknowledged honestly. If a scratch has compromised the base paint or underlying plastic, or if micro-cracks radiate outward from a large scratch, a patch job can look convincing from a distance but fail under load or impact. In such scenarios, the safest course is to replace the affected fairing or the damaged section. This is especially true when structural integrity is implicated, or when the crack runs along a high-stress area where flex and vibration could worsen a repaired seam. When replacement becomes the recommended path, you can still approach the process with the same care and discipline as a repair. Measure and source a fairing section that matches the model and color, and then plan the removal and reinstallation with attention to mounting points, alignment, and sealing. The aim is not just visual restoration but functional integrity that keeps the bike safe and stable at speed, under braking, and during wind loads.
For riders who want to push resilience beyond cosmetics, consider advanced protection once the repair is complete. A ceramic or similar protective coating can add a layer of durability that resists future micro-scratches, UV damage, and yellowing. It does not replace good maintenance, but it can extend the life of the finish and reduce the need for frequent polishing. The overarching theme is balance: match the level of intervention to the severity of the damage, respect the material, and preserve the structural and aesthetic cohesion of the bike. If a repair feels uncertain, stepping back and seeking a professional assessment can save time, materials, and frustration while delivering a result that approaches factory standards.
Sourcing replacement parts is a practical consideration that often follows a decision to replace rather than repair. If you need to explore options for authentic-looking or closely matching panels, a dedicated category for fairings by brand can be a useful starting point. For a model-specific search, you can browse the Honda fairings category to find panels that fit your bike’s chassis and color scheme. This targeted approach helps ensure compatibility and reduces the risk of misalignment after installation. It also makes the process of reassembly more straightforward, since the mounting points, gaskets, and fasteners are designed to fit the original geometry.
In the end, the restoration of deep scratches and severe cloudiness is not just about reclaiming a cosmetic look. It is about extending the life of the fairing, preserving the bike’s aesthetic coherence, and maintaining performance through careful materials handling. The path from rough, scarred plastic to a smooth, glassy surface is a sequence of disciplined steps: thorough cleaning, feathered sanding, precise filling, careful priming, color-accurate painting, and a protective clear coat. It is a process that rewards patience and precision, turning a fatigued surface into a showcase that reflects both the rider’s care and the machine’s enduring value. If the damage exceeds what you feel capable of handling, a professional restoration offers a route to factory-like results without compromising safety or durability.
External resources can provide additional guidance and nuance, especially for more complex color matching or finishing techniques. For further detail and step-by-step procedures, you may consult a comprehensive guide on motorcycle fairing repair. [External resource: https://www.motorcycleride.com/motorcycle-fairing-repair-guide]
Cracks and Breaks, Restored: A Practical Guide to Fixing Motorcycle Fairings
Every rider knows that a fairing is more than just a piece of bodywork. It is a shield against the wind, a statement of style, and a structural element that helps keep the bike rigid and aerodynamic. When a fairing cracks or splits, the urge to fix quickly can be strong, but the repair choices should reflect the damage, the material, and how the bike will be ridden after repair. This chapter outlines a practical approach to cracks and breaks, combining technique, material behavior, and riding realities so you can decide whether to repair, rebuild, or replace with confidence. The goal is to restore integrity, maintain appearance, and return the bike to safe, rideable condition.
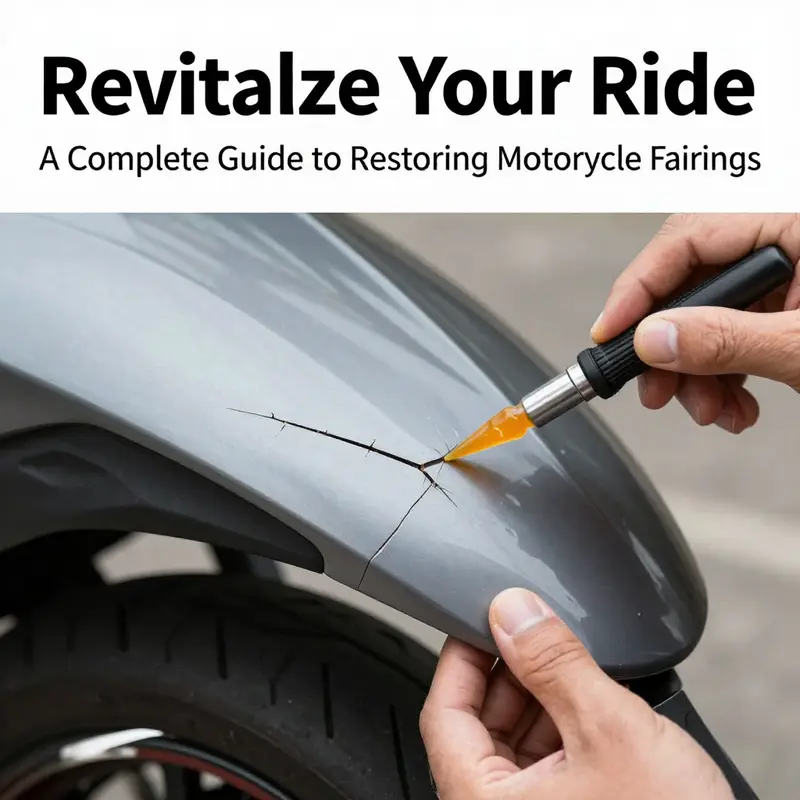
Cracks in plastic fairings often come from a collision, a hard drop, or from repeated vibration and temperature changes. The first impulse is to reach for a quick fix, but cracks can propagate under load. The approach should match the crack’s geometry and location. Narrow, linear cracks along an edge are good candidates for plastics welding, which fuses the material and can create a bond stronger than a surface adhesive when done with control. Wider fractures or complex breaks that create voids may require fillers to rebuild the missing mass before shaping and refinishing. If the fairing carries a critical load path or a mounting point, the decision is about safety and long term durability.
Preparation is essential. Clean the damaged area to remove oils, dirt, and dust because contaminants hinder adhesion. Dry the surface and roughen lightly to improve the repair material’s grip. The repair method should align with the material, typically ABS plastic or polycarbonate, which differ in heat response, bonding characteristics, and how they accept fillers and coatings. Work in a well ventilated space and wear gloves and goggles as a safety baseline.
When cracks are narrow and straight, plastic welding offers a strong, flush finish. Choose a compatible welding rod that matches the parent plastic’s chemistry and color. Control the heat: too much warps the plastic, too little prevents fusion. A plastic welding gun provides a steady heat source, and careful passes along the crack allow the molten rod to merge with the base material. Move your hand with a steady speed and shallow passes to avoid creating humps or burn-throughs. The preparation matters too: a clean crack surface and a roughened texture improve adhesion. After cooling, the seam should be smooth and flush. A light sanding and a polish can restore surface clarity and minimize the repair’s visibility. The result can be durable, especially for well contained, linear cracks that do not cross into areas under heavy load.
For more extensive damage where a weld is impractical or risky, a filler repair is sensible. This path accepts substantial material loss or complex breaks that interrupt panel continuity. Clean and dry, then mix a body putty or two part filler designed for automotive plastics. Prepare per the manufacturer’s instructions, apply with a spreader to fill voids, and feather the edges to blend with contours. Once cured, sand progressively from coarse to fine to achieve a flush surface. A careful finish is crucial because any imperfection in the fill will show up after finishing. After filling, restore color and gloss while preserving adhesion and durability.
A repaired crack does not automatically restore the fairing’s original strength, especially if it reaches load bearing or mounting regions. In some cases, replacing the affected panel is the safer route. Large fractures, cutouts, or heavily loaded areas may require OEM or quality aftermarket replacement to ensure safety and reliability. Replacement should be weighed against cost, availability, and the time and effort of repair. It is not a defeat to replace; it is a prudent decision for long term safety.
In all cases, finish matters as much as structure. After repair, prime, thinly apply color coatings, and finish with a clear coat for UV and abrasion resistance. Test color in a small, inconspicuous area, because lighting can shift shade. The aim is a uniform appearance that blends with the bike at riding distance, not studio perfection.
Beyond technique, consider the fairing’s purpose and your expectations. For cosmetic or lightly loaded parts, a well executed weld or fill can be durable and attractive. When damage is near mounting points or in regions with vibration or aerodynamic stress, the risk of crack propagation may require replacement for safety. If unsure, seek professional assessment. The finally repaired surface should look complete and behave as a true part of the machine, not a patch that hints at compromise. For compatibility or aftermarket alternatives while planning repairs, browse catalogs to locate exact fits and color matches. For example, consulting a manufacturer’s catalog can provide a sense of fitment and the route you should take for your model. In the end, balance damage scope, panel function, and rider expectations to decide between repair and replacement. Minor cracks can be elegantly handled with welding or filler, while more extensive damage may require full replacement to guarantee safety. If in doubt, professional evaluation is strongly advised to ensure safety and quality.
External resources for plastic repair techniques can supplement practical work, such as reputable guides and manufacturer recommendations.
Restoring Motorcycle Fairings: Reversing UV-Driven Yellowing and Discoloration for a Like-New Look
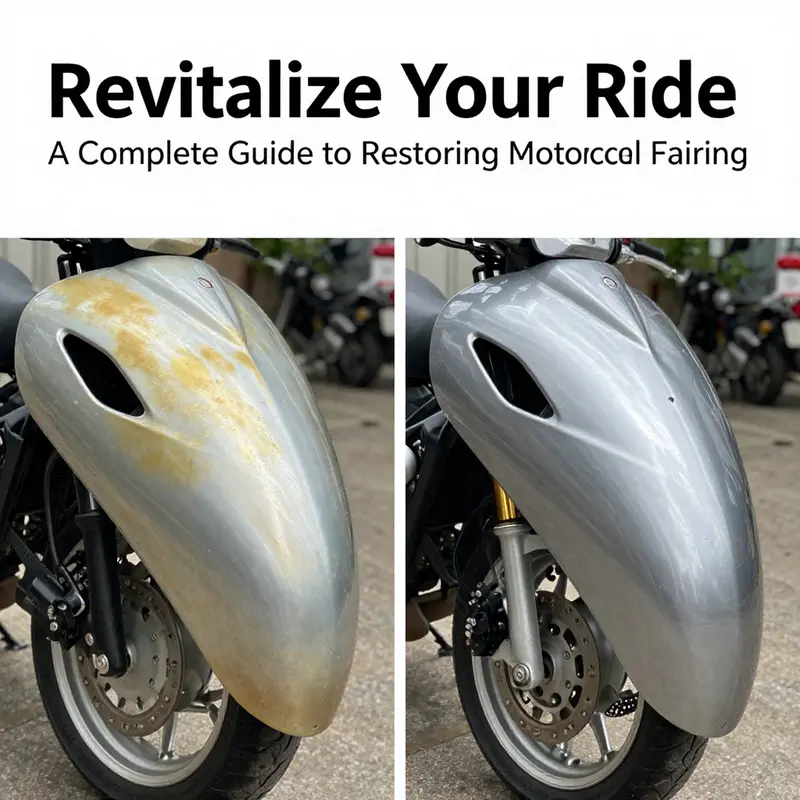
Discoloration and yellowing on motorcycle fairings can creep up gradually, and many riders treat it as an unavoidable sign of aging. Yet the truth is more forgiving: with careful steps focused on the surface condition and the underlying plastic, you can reclaim clarity and restore a fairing’s original vibrancy. The key is to understand what causes yellowing, how the surface responds to cleaning and polishing, and when to push beyond polishing into refinishing or repainting. At the heart of this process is a simple idea: treat the plastic with products formulated for it, protect it from further sun damage, and respect the material’s limits. The discoloration you’re dealing with is often a mix of surface oxidation, subtle material degradation, and, in some cases, a uniform change in shade that makes a single panel appear mismatched. Before you reach for a compound or a solvent, take a moment to assess the surface condition. If the fairing has become chalky to the touch, or if the color has shifted across the entire piece rather than in isolated patches, you’re more likely dealing with UV-induced aging rather than just a surface smear. That distinction will guide how aggressively you work and how you finish. The first practical step is to clean the surface thoroughly, using a plastic-specific cleaner designed for automotive or motorcycle plastics. These cleaners do more than lift dirt; they help remove surface grime, oils, and oxidation layers that obscure the true appearance underneath. When you apply the cleaner, use a soft, non-abrasive cloth, and work in small sections to ensure you don’t miss tracks of residue or leave cleaner sitting on a hot surface. Always follow the manufacturer’s dwell times and wiping technique. The goal is to reveal the material beneath, not to erase the texture or to smear residues around. A crucial part of this process is testing. Start on a small, inconspicuous area to confirm that the cleaner lifts the yellowing without compromising the plastic’s protective surface. If you notice any hazing, rubbing off a gloss, or a change in the surface feel, back off and reassess the product choice or technique. In many cases, the discoloration lives at the surface—a film of oxidation that can be removed with a careful polish. When you move to polishing, you’re asking the surface to shed a thin layer of the oxidized skin, softening micro-scratches and restoring clarity. Use a fine-grade polishing compound and a dual-action polisher or a microfiber cloth. The approach is incremental: begin with a coarser compound to address deeper micro-scratches and haziness, then step down to finer compounds. The objective is a smooth, clear finish that reflects light evenly rather than a deceptive, glossy coating that sits atop a dull surface. If the haziness resists polishing, or if deep discoloration remains, you may be dealing with a more pervasive issue. This is where the restoration toolkit often offers a more aggressive option—an abrasive system designed to level the surface before the final polish. These repair kits can restore clarity when simple polishing falls short, but they require careful handling. The risk of thinning or scorching the plastic is real, especially with polycarbonate blends or ABS, so follow the instructions precisely and test in a hidden area first. The next gatekeeper is UV protection. Even as you remove yellowing, your work is only half complete if you don’t shield the surface from future sun damage. Many specialized plastic cleaners include UV inhibitors that help slow the progression of new yellowing; if yours does not, consider applying a dedicated UV protectant formulated for automotive plastics after polishing. Such a step can make a meaningful difference in how long the restored finish lasts between washings and detail sessions. It’s worth noting an important practice: avoid household cleaners and solvents. Alcohol, acetone, and similar solvents can attack the plastic’s surface, degrade the protective layer, and accelerate deterioration. The same caution applies to rough scrubbing or aggressive rubbing that could create new scratches. Work delicately and deliberately, keeping the cloth damp rather than dry, and maintain a light touch to avoid embedding new scratches into the surface. The honest truth about yellowing is that not all of it can be reversed. If the discoloration is deep and uniform, penetrating beyond the surface, a simple polish may not restore the “like-new” appearance. In such cases, refinishing or repainting becomes the more realistic option. The refinishing process begins with a careful assessment of the fairing’s structural integrity and the depth of the yellowed layer. Where the color change is superficial, you can remove the top layers of the affected area by gentle sanding to eliminate the discolored surface. Then apply a primer suitable for plastics, followed by a color-matching base and a clear coat. The aim is a seamless integration with surrounding panels, a nearly invisible repair that preserves the overall look of the motorcycle. This is not a quick, one-evening fix; it requires patience, a clean paint booth or a well-ventilated workspace, and an eye for color matching. For some riders, the practical alternative to refinishing is replacement of the affected fairing segment. If the yellowing accompanies brittleness, hairline cracks, or a loss of structural strength, replacing the panel ensures safety and classic aesthetics. When you’re weighing restoration versus replacement, balance the cosmetic outcome with the fairing’s long-term durability and your riding requirements. The material you’re working with—commonly ABS plastic or polycarbonate—plays a pivotal role in both the process and the expected outcome. ABS tends to respond well to careful polishing and can accept refinishing with a well-prepared surface, while polycarbonate, though tougher against impact, can scratch more easily during restoration. The texture and finish that the fairing originally carried are also essential. For example, matte or satin finishes respond differently to polishing than high-gloss surfaces. In all cases, the goal is a controlled, even result that respects the panel’s original geometry. A practical touch is to consider brand-specific resources for care and maintenance. Those seeking brand-specific guidance can explore the Honda fairings category, which offers compatible options and care guidelines tailored to that line. While you may be dealing with a general issue of yellowing, brand-specific checklists can help align touch-up steps with the underlying mounting points, texture, and surface coatings. After you complete the restoration steps—whether simply cleaning and polishing or moving into refinishing or repainting—take a moment to re-evaluate the entire fairing, ensuring color consistency across adjacent panels. The sun-facing surfaces often show the most noticeable mismatch, so pay attention to the front cowling, side panels, and any graphics that might complicate color blending. If you’ve chosen to repaint, ensure the environment is suitable for curing clear coats and polishes. A controlled climate minimizes dust settlements and helps achieve a uniform gloss. Remember that you’re not only restoring color but also protecting the plastic from future damage. UV inhibitors, protective sealants, and proper washing routines build a longer life for the fairings and help maintain the visual return on your efforts. A disciplined maintenance cycle—gentle washing with a dedicated plastic cleaner, periodic light polishing, and timely reapplication of UV protection—can extend the revived appearance far beyond a single season. In terms of practice, the take-home messages are simple, yet powerful. Start with cleaning, then evaluate whether polishing meets the goal of clarity; if not, consider a controlled abrasive approach. If discoloration is more than skin-deep, plan for refinishing or, if necessary, replacement. Always protect the work with barrier products and test all steps on an inconspicuous area before committing to the entire surface. And as you cross this bridge from dull to vibrant, maintain a mindful respect for the material’s limits and the time required to achieve a truly even finish. For further insights into care practices that align with long-term finish quality, remember that care resources from helmet and accessory disciplines can offer parallel guidance on maintaining surface integrity and color stability. External resources like SHOEI’s care guidance provide valuable context for protective approaches that complement your fairing restoration work. Care & maintenance guidance can inform your approach to preserving the finish you’ve earned through careful restoration, even as you continue to ride and expose the panels to sunlight, heat, and road grime.
Final thoughts
Successfully restoring motorcycle fairings is not just about aesthetics; it also enhances performance and extends the longevity of the bike. By understanding how to handle issues like scratches, cracks, and discoloration, business owners can greatly improve their service offerings, attract more clients, and increase customer loyalty. Each technique discussed serves as a valuable tool in managing the condition of fairings, ensuring that every motorcycle looks its best and maintains its value over time.