
Maintaining the aesthetic appeal of motorcycles is crucial for any business owner dealing in motorcycle sales or repairs. Scratches on fairings not only affect the bike’s look but can also diminish its market value. Understanding how to effectively repair these imperfections can enhance customer satisfaction and loyalty. This guide introduces business owners to a structured approach for addressing scratches on motorcycle fairings, categorized into four key areas: minor scratch repairs, techniques for deeper scratches, professional repair methods for major damages, and essential tips for effective repairs. Each chapter builds upon the last, equipping you with knowledge to keep your motorcycle fairings looking their best.
Polish, Patch, and Preserve: Mastering Minor Scratches on Motorcycle Fairings
A motorcycle’s fairing is more than a stylish shield for its rider. It’s a shield for the bike’s body, a canvas that takes daily hits from road debris, weather, and the occasional careless spin of a boot or tool. When a scratch appears, it’s tempting to shrug and ride on, but even superficial abrasions can invite moisture intrusion, haze, or further scuffing if neglected. The good news is that most minor scratches on plastic fairings respond well to straightforward,-at-home care. The goal is not to erase every mark with brute force but to restore the surface sheen, maintain color clarity, and preserve the integrity of the plastic. This approach blends careful assessment with gentle polishing, targeted filling if necessary, and protective finishing that keeps your fairing looking showroom-new for longer. In practice, patching up a small scratch becomes less a sprint than a mindful, stepwise ritual that respects the material and the finish you started with. The first step is honest depth assessment, because the repair path changes dramatically once you’ve determined whether you’re looking at a surface-only abrasion or something that has breached the paint or clear coat.
To begin, inspect the scratch under good lighting and, if possible, with a magnifying glass. A surface scratch will usually appear white or pale only on the clear layer and won’t reveal any base color. A deeper blemish, by contrast, may expose a lighter underlying shade or even feel rough to the touch when you run your fingernail over it. If you can feel a groove or there’s a noticeable depth, you’re dealing with more than a simple polish job. In this chapter, we’ll stay focused on minor to slightly deeper but not structural damage—that is, scratches that have not caused a fracture in the plastic itself. For anything that penetrates through the paint into the base color or, worse, the resin, the repair path shifts toward more involved methods or even professional restoration. The line between DIY-friendly fixes and professional-grade work is drawn by depth, not by the size of the blemish. With that in mind, minor scratches can be addressed through a sequence of clean, controlled steps that respect the plastic’s integrity and the finish’s clarity.
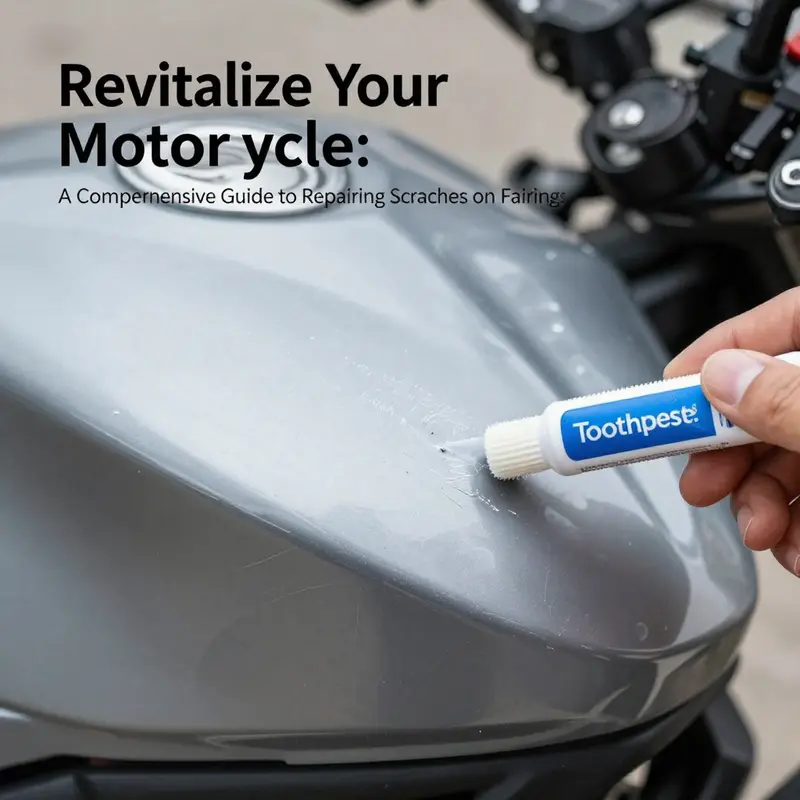
Among the least invasive options, the toothpaste method stands out for its accessibility. The idea is to use a mild abrasive to micro-polish the surface, smoothing out the micro-scratches and restoring the diffused light that makes a plastic surface look hazy. The toothpaste used should be non-gel and white; minty, gel-based varieties can contain additives that might leave a residue or affect the gloss. Apply a small dab directly onto the scratch or onto a clean, soft microfiber cloth, then gently rub the area in small, circular motions for about 30 to 60 seconds. The key is control: do not press hard, and keep the motion light to avoid creating new abrasions. After the circular work, wipe away the paste with a clean, damp cloth, then dry the area thoroughly. If you’ve been careful, the scratch will be less noticeable, and in many cases it will disappear entirely. It’s a quick, inexpensive test that can save a fairing from unnecessary refinishing. If the surface still shows faint blemish after toothpaste, a dedicated plastic polish or scratch remover offers a step up. These products are formulated for automotive and motorcycle plastics; they carry more consistent micro-abrasives and polishing agents designed to refine the clear layer without digging into the base. Apply per the product’s instructions, typically with a fresh microfiber cloth in light, even strokes, and then buff to a high gloss. This approach often yields a nearly invisible result on very shallow marks and provides a more durable finish than toothpaste alone.
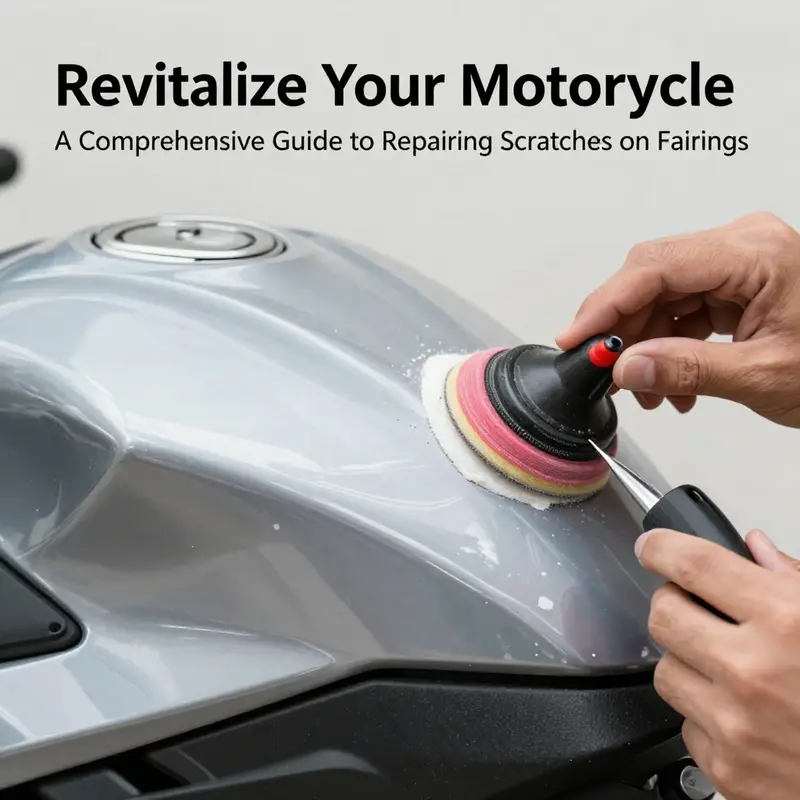
For even more controlled restoration, many riders turn to a nanopore polishing sponge. This modern tool lives between a traditional cloth and a proper polisher; it’s designed to deliver a uniform, ultra-fine abrading surface that gently smooths the clear coat without introducing new scratches. If you’re using a nanopore sponge, dampen it slightly and work the area with light pressure in long, straight passes to keep the polish even across the scratch. The sponge’s micro-particles are engineered to correct swirl marks and micro-scratches while preserving the surrounding finish. After polishing, wipe the area clean and assess the gloss. In most cases, this method gives a noticeably clearer appearance with less risk of rounding over the edges of the scratch, something that can happen with heavier abrasive compounds.
These approaches cover the simplest category of blemishes—those that don’t reach color or base plastic. But what happens when a scratch breaches the clear coat and begins to reveal the base paint? In the realm of minor repairs, there is a clear, practical sequence that balances aesthetics and durability without becoming a full panel repaint. Start again with a thorough cleaning of the area. Remove dirt, oil, and wax with a dedicated plastic cleaner or isopropyl alcohol. A clean surface improves adhesion and prevents dust from getting trapped between layers during the repair. Once dry, evaluate whether a touch-up paint pen is appropriate. If you can find a close color match to your machine’s original finish, a thin, careful application of the paint can fill the scratch and restore color depth. The key with paint pens is to apply multiple ultra-thin coats rather than a single heavy layer. Each coat should dry enough to avoid smudging, and you should allow the paint to cure according to the pen’s instructions—usually around 24 hours. Only after the color has stabilized should you consider sealing it with a clear coat to protect the repair and blend it with the surrounding panel.
A word about clear coats: if you’re applying a new layer of clear coat or a topcoat over the repaired area, multiple light coats are critical. Heavy coats tend to run or sag, especially on curved fairing surfaces. A light, even mist of clear per pass, with ample drying time between coats, yields the smoothest finish and the best optical clarity. When the clear has cured, a final light polish over the entire panel helps the repaired area blend with the rest of the fairing, restoring the uniformity of the gloss and ensuring the repair does not stand out under bright sun or streetlights. The process, while seemingly exacting, becomes routine with patience and consistent technique. Keeping the work environment clean is essential; dust is a formidable foe to a flawless finish. A closed garage, free of drafts, makes sanding and polishing steps more predictable and reduces the risk of specks marring the surface.
As you refine your technique, remember that not all fairings are created equal. Some plastics are softer or more translucent, which affects how aggressively you can polish or how easily color matches can be achieved. A practical tip is to practice on a small, inconspicuous area or on a spare repair panel if you have one. This approach allows you to gauge how much pressure you can apply, how the color responds to the glaze, and how many light coats are necessary for a near-invisible repair. When in doubt about color matching, or when the scratch is larger than a coin or sits oddly near a seam, consider stepping back from the DIY approach. The final result of a poorly matched repair can be more glaring than the original scratch. In such cases, a professional auto-body shop with a paint booth, proper color matching, and experience in plastic welding or bonding can deliver a seamless result without compromising the fairing’s motor-friendly aesthetics. Even for minor color repairs, professionals can ensure that the repair adheres properly to the panel and that the finish remains durable against heat, sun exposure, and road salts.
If you’re pursuing a pragmatic path that balances cost, time, and outcome, an emphasis on controlled, repeatable steps pays dividends. Each stage—cleaning, assessment, polishing, filling, and sealing—builds on the previous one, creating a cumulative effect that often surpasses the original shine. The process becomes a ritual you can repeat after every ride. The more you practice, the more confident you become about distinguishing between a surface-only blemish and something that truly needs deeper intervention. The result is not just a repaired mark but a smoother, more resilient finish that resists future micro-scratches and fogging. When you encounter color-lifting or a perceptible texture change, that’s a signal to reconsider the scope of the repair and whether to escalate to a color-matching pen, a dedicated clear coat, or a professional service. In short, minor scratches on a motorcycle fairing are rarely an impossible problem; they’re opportunities to hone a careful, methodical approach that protects your bike’s appearance without sacrificing its structural integrity.
For riders who want to pursue model-specific guidance, there is value in exploring category collections that reflect your bike’s make and aesthetic. If you ride a popular brand, you may find model-tailored guidance or parts that help you maintain color and texture consistency across panels. For example, the following link points to a broad catalog of fairings that can be helpful when sourcing compatible pieces or color-matched accents: Honda fairings. This internal resource can guide you toward compatible styling, paint schemes, or finish options that complement the repaired area and keep the entire bodywork cohesive. As you integrate these choices, keep your repair process focused on the level of damage. The goal is to preserve the overall look and protection of the fairing while avoiding over-treatment that might alter the panel’s flexibility or weight.
In closing, the micro-ecosystem of a minor scratch’s repair is a blend of observation, patience, and precision. The toothpaste and nanopore sponge strategies offer accessible, incremental improvements for the most common surface blemishes. If the paint layer is compromised, a cautious approach with color-matched touch-up and a clear seal can restore color integrity without compromising the base plastic. For larger or deeper repairs, professional intervention remains the prudent path. The delicate balance between restoring appearance and preserving material integrity should guide every step. With practice, you’ll gain a reliable instinct for when to polish, when to fill, and when to seek expert help. The aim is not to erase every trace of a ride but to keep it looking its best for the long road ahead.
External resource: https://en.wikipedia.org/wiki/Plastic
null
null
Precision and Strength: Mastering Major Motorcycle Fairing Repairs
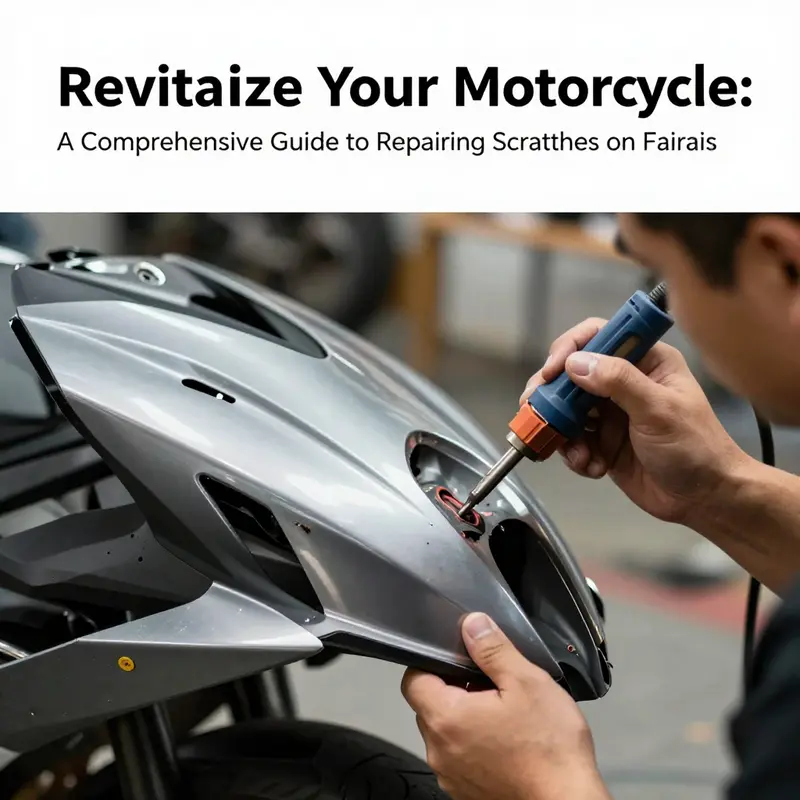
Major damage to a motorcycle fairing demands more than a cosmetic touch-up. It requires a plan, patience, and techniques that restore both appearance and structural integrity. In the hands of a skilled technician, the repair begins long before the patch is visible. It starts with a comprehensive damage assessment that looks beyond the surface, seeking hidden stresses, internal cracks, or delamination that could compromise safety or longevity. A deep scan of the affected panel sets the course for the entire process. The technician checks fit, alignment, and how the load path travels through the fairing. Even when the surface looks intact, a load during aero dynamics, impact, or vibration can propagate cracks or cause a soft spot to form at the joint lines. This upfront evaluation is more than due diligence; it’s a safeguard against future failures and a key to a seamless finish.
Material choice guides the repair from the earliest moment. ABS thermoplastic fairings respond well to heat-based techniques and to high-strength polymer pastes that mimic the flexibility of the original plastic. When the damage extends through the outer shell to the core or to internal lacing, the repairs become more exacting. Fiberglass and carbon fiber fairings require a different playbook. For these composites, technicians employ resin infusion, patching with fresh fabric, and carefully controlled curing. The goal isn’t merely to fill a hole but to rebuild stiffness and resilience so the panel can carry its aerodynamic role without altering structural dynamics. The process balances strength with flexibility, so the repaired area can tolerate heat, cold, and vibration without becoming a brittle stress riser.
As the work proceeds, the surface is stripped back to a clean baseline. Cleaning removes oils, waxes, and dust that would sabotage bonding. Isopropyl alcohol is commonly used to wipe the area after thorough washing. This step ensures the filler, patch, or weld will adhere evenly. For major repairs, the next stage is surface preparation through careful sanding. A sequence of grits—from rough to fine—helps blend the repaired area into the surrounding panel. Starting with a coarser abrasive to knock down high spots, the technician then moves to finer grits, typically stepping through 80, 120, 400, and up to 600 or more. Sanding is performed wet or dry depending on the material and the chosen repair method. The key is to sand with consistent, controlled strokes in one direction where possible to minimize swirl marks that can later show through paint.
When the repair involves filling, a specialized filler compound or two-part epoxy paste is chosen to match the original material’s properties. For ABS, the filler must bond well to thermoplastics and maintain flexibility after curing. In fiberglass or carbon fiber panels, the patch usually uses a compatible resin system and reinforcing fabric. The patch is applied in layers, with the outer layer feathered to achieve a smooth transition to the original surface. Curing time is not rushed. A fully cured repair gains maximum strength and resists cracking when later painted or clear-coated. In some cases, technicians describe a staged cure, letting the panel rest in a controlled environment to minimize warping or sun-induced distortion.
Once the repair has cured, the surface is re-sanded to achieve an impeccably flush plane. This step uses progressively finer grits—commonly moving from 200 to 400, then 600 and beyond—often with the area kept damp to reduce dust and heat buildup. The goal is a surface that looks and feels like the factory finish, with no evidence of the repair seam. If the panel uses a clear coat or a special finish, the edge between the original and repaired area must disappear under the right lighting. The technician may perform test polishing on a small, inconspicuous area to ensure that the same gloss level and color depth will be achieved later in painting.
Priming marks a decisive turn toward a seamless appearance. A high-quality primer is sprayed or brushed onto the repaired site to seal the repair and to provide a uniform base for paint. Primers for plastics often include fillers and adhesion promoters designed to bite into thermoplastic surfaces. After priming, the panel is allowed to cure, and then it is lightly re-sanded with a fine grit to ensure the primer layer is perfectly smooth. The subsequent paint layer is applied in multiple ultra-thin coats rather than one thick application. This practice minimizes runs, prevents orange-peel texture, and helps the finish hold up to environmental exposure. Each coat is carefully sanded before the next, creating a flawless canvas for the final clear coat.
The clear coat is not merely a gloss layer; it protects the color, guards against UV damage, and can dramatically affect the perceived depth of the finish. A proper clear-coat schedule emphasizes cleanliness, temperature control, and humidity management. The technician follows an exact sequence: light mist coats to build a uniform film, then fuller coats to achieve the desired thickness. The area is allowed to cure between coats, and the finish is checked under different lighting to confirm there are no trapped dust motes, runs, or sags. A polished final layer brings out the underlying color and restores the smooth, glassy surface that meets the eye in a high-end factory finish.
After the finish hardens, the attention turns to detailing and quality assurance. Polishing compounds and gentler buffing wheels are used to refine the surface, eliminate micro-scratches, and restore the appearance of the rest of the vehicle. This is where a repaired panel must look indistinguishable from its neighbors. The technician checks for a consistent texture, even color, and precise alignment with adjacent panels. A critical part of this stage is fitment testing. The repaired fairing must not shift, misalign, or create new contact points with the fuel tank, windscreen, or other fairing pieces. If the repair affects the panel’s aerodynamic lines or mounting points, those measurements are rechecked and corrected before the system is reassembled.
Safety and reliability guide every decision. In some cases, particularly with large sections or load-bearing panels, engineers may run limited stress checks or consider replacement if the repair cannot guarantee safety under real-world loads. A durable repair isn’t a finish line; it is a performance guarantee that the fairing, once reinstalled, behaves like a single, cohesive structure. The goal is to restore original design integrity as closely as possible while ensuring long-term durability against road debris, sun exposure, and the temperature variations a bike experiences on a daily ride.
Within this framework, the repair process remains faithful to a few core rules. First, material compatibility matters. The choice of filler, adhesive, and cloth must match the panel’s base material and its behavior under heat and flex. Second, cleanliness is king. Dust and grease become enemies of a strong bond and a perfect finish, so every step—from the workshop environment to the wipe-down before painting—relies on meticulous tidiness. Third, patience pays. Rushing cures or paint layers invites defects that are hard to conceal later. Finally, the final aesthetic is inseparable from the underlying structure. A visually flawless finish is only as good as the repair’s mechanical integrity. For readers seeking practical examples and deeper context on professional techniques, a detailed case study from seasoned shops offers valuable insight into how these principles translate into real-world results. Fairings category provides a broad view of compatible panels and their mounting interfaces, helping align repairs with original geometry and fit.
This approach, grounded in thorough assessment, material-specific strategies, and disciplined finishing, helps repair technicians deliver outcomes that endure. It also underscores a broader truth: major fairing repairs are as much about preserving design coherence as they are about restoring surface beauty. When done correctly, the repaired panel doesn’t just look right; it behaves like the rest of the bodywork, preserving aerodynamics, mounting integrity, and the rider’s sense of confidence on the road. For those who want a window into the professional perspective, real-world examples and expert insights illuminate the path from damaged panel to showroom-like finish. External references offer a look at how top studios tackle complex repairs and the considerations they weigh when deciding between patching versus replacement. https://www.bikeexif.com/2024/07/09/professional-motorcycle-fairing-repair-techniques/
From Subtle Scratches to Uniform Shine: A Practical Path to Restoring Your Motorcycle Fairing
The sight of fine scratches on a motorcycle fairing tells a story of rides and realities. The glossy curves that once reflected every sunset can hold micro-scratches that catch the light differently. The fairing, usually made from durable plastic, protects the bike and the rider from wind and spray. Restoring it demands more than a quick wipe; it requires a mindful, patient approach that respects the material and the finish. The first step is to assess how deep the damage goes because depth determines the repair path. When you can tell whether a scratch is surface level or deeply etched, you set the tone for what comes next and avoid wasting time on methods that won’t work.
Depth matters: surface-level scratches that have not breached paint or clear coat are treated differently from deeper scrapes that reveal the plastic. A careful resolution at home can yield a durable result if you stay within the right boundaries. The goal is a smooth, uniform surface that reflects light evenly again, not a patch that looks painted on or rough to the touch. The more you understand the distinction, the less likely you are to create a new round of damage while trying to fix the old one. This is not a race; it is a careful calibration of pressure, material, and patience.
For surface-level scratches, start with a clean panel and consider a gentle polish. Fine-grit sanding is sometimes advised, but only if the scratch is truly superficial. A more reliable route is a dedicated plastic polish or scratch remover designed for automotive plastics. These products can refine the surface without removing material. In many households, a small amount of mild, non-gel toothpaste can provide a quick fix for the faintest marks. Rub in gentle circular motions for 30 to 60 seconds, rinse with water, and dry thoroughly. If you decide to try toothpaste, test first on a small, hidden area to avoid any unexpected hazing. The aim is to restore gloss and reduce visibility, not to create new micro-scratches. If you are unsure about how deep a scratch runs, begin with the least invasive option and proceed slowly, watching for any change in texture or hue. The prudent path often yields a superior finish with less risk of compromising the underlying plastic.
If the scratch has penetrated through the clear coat and shows a lighter line on the plastic, the repair steps change. Start with a thorough cleaning to remove grease and debris. Wash with mild soap and water, rinse well, and dry. Wipe the area with isopropyl alcohol to remove any remaining oils that could interfere with adhesion later. The next step is to create a smooth foundation for filler. Lightly sand the scratched region with fine sandpaper in the 1500 to 2000 grit range, moving in one direction to minimize swirl marks. The goal is not to remove large amounts of material but to flatten the irregularities and create a uniform plane. Be deliberate but gentle; a harsh scuff can leave you with a haze that is harder to correct than the original scratch.
Apply a two-part plastic repair putty or epoxy filler to the damaged zone. Mix according to the manufacturer’s instructions, then apply the filler slightly above the level of the surrounding surface. Use a plastic spatula or similar tool to shape it flush with the surrounding area. Let the filler cure completely, which often means waiting about 24 hours. Do not rush this step, as a prematurely sanded filler can crumble or shrink and ruin the final finish. The curing window is a quiet moment in the process—a time to reflect on the finish you want and to let chemistry do its work without haste. After curing, inspecting the edge where the repair meets the original surface helps you decide how much more refinishing is needed before you proceed further.
Once the filler is fully cured, begin the smoothing stage. Sand with progressively finer grits, starting at around 2000 and moving to 3000 while keeping the area wet. The aim is to produce a surface that is perfectly flush with the adjacent panels. After sanding, wipe again with alcohol to remove any dust, then re-polish the entire repaired area. If the color has shifted, a color-matched paint layer can help conceal the repair. Use a very light touch and multiple thin coats, allowing each coat to dry before applying the next. Dedicated paints for automotive plastics can be used or a compatible paint pen for spot touching, followed by a clear coat to seal the color. The key is gradual concealment rather than a heavy hand that makes the patch obvious. Each layer should be thin enough to cure evenly and avoid drips or sags that will stand out under sunlight.
Color matching by itself may not fully conceal the repair if the base paint has faded or if the panel has a metallic or pearlescent finish. In that case, repainting the affected section or the whole panel might be needed to ensure uniformity. The process then requires priming, base coat, and a clear coat that provides the same gloss and depth as the surrounding area. This multi-step finish is why many riders opt for professional repair when the damage is sizable or color complexity is high. The result should look continuous rather than patchy, with a finish that resists moisture and stands up to sun exposure. A careful blend and an even, unbroken gloss across the repaired zone are the hallmarks of a job done right. If you are aiming for a factory-like appearance, you may need to re-spray entire panels to guarantee an even color and depth that all the light will want to reflect.
For more extensive damage, the situation changes again. Large areas of exposed plastic or structural cracks may require a professional repair. In rare cases plastic welding is used to fuse cracked sections before filling and finishing. This heat process must be done with precise control to avoid warping. Because of the risks, this is not a DIY task for most riders. If you encounter such damage, seek an experienced shop that can evaluate whether patching, panel replacement, or a full refinishing is the most sensible route. A professional can also ensure color accuracy and a durable seal against moisture intrusion. In practice, the decision hinges on the extent of the damage, the value of the finish, and the time you can invest in a repair that may still require professional expertise to look seamless.
Across all repairs, a set of best practices remains constant. Start with a clean workspace free of dust and grease. Use plastics-specific repair materials and follow the instructions on curing times for fillers and finishes. Apply coatings in multiple ultra-thin layers rather than one thick layer to reduce runs and orange-peel texture. Allow each coat to dry fully and cure before handling the panel. These steps become more important if the bike spends long periods outdoors, as UV and heat can reveal subtle imperfections that were not visible under indoor light. The discipline of patient curing and controlled heat is often what separates a professional finish from a hurried, acceptable one. When you eventually stand back and inspect the panel in the sun, you should see even tone, no raised edges, and a uniform gloss that mirrors the rest of the bodywork.
The decision to repair or replace can hinge on the fairing’s overall condition, color complexity, and the value of maintaining symmetry. For some bikes, replacing a single panel is the cleanest path to a pristine finish. If you decide to keep the original panels, ensure the repaired area is seamless and resistant to future weather exposure. If possible, consider inspecting other panels for similar micro-scratches to prevent a piecemeal appearance from developing over time. Balanced evaluation helps you preserve the bike’s aesthetic integrity and resale value. A well-chosen path—repair when feasible, replace when necessary—preserves not only appearance but the overall structural integrity of the fairing.
Finally, view scratches not as defeat but as a signal. They prompt better washing techniques, a more careful approach to protective coatings, and a deeper understanding of the plastic’s behavior under sun and moisture. A regular routine of gentle washing, prompt attention to new scuffs, and careful use of protective plastics conditioners can slow the spread of new marks and maintain gloss longer. The craft is as much about patient maintenance as it is about the repair itself. When you approach fairing care as a continuous practice, you build a resilience into your bike that mirrors the durability of its panels. If you want to explore options for sourcing fairing parts or replacement panels, you can examine the Honda fairings category for a sense of available options and mounting compatibility. Honda fairings category. For more detailed guidance, you may wish to consult a professional detailing or body shop. The Cycle World guide referenced below offers a comprehensive overview of the processes and precautions that underpin successful repairs.
External reference: https://www.cycleworld.com/motorcycle-repair/motorcycle-fairing-scratch-repair-tips/
Final thoughts
Repairing scratches on motorcycle fairings is not merely about aesthetics; it reinforces the value and durability of your inventory. Business owners who invest time and resources into learning these techniques can dramatically improve customer perceptions and satisfaction. From handling minor scratches with household solutions to addressing significant damage with professional repairs, equipping yourself with this knowledge ensures that you can uphold your reputation as a quality-focused motorcycle dealer. By implementing effective repair methods and adhering to best practices, you can enhance both the visual appeal and marketability of your motorcycles, thus solidifying your business’s success.