
Proper installation of a motorcycle fairing is crucial for improving aerodynamics, enhancing rider experience, and ensuring safety. For business owners in the motorcycle industry, offering fairing installation services can significantly boost customer satisfaction and loyalty. This guide will walk you through the essential steps in preparing for, installing, and finalizing the fairing installation process on any motorcycle model. By following these detailed chapters, you’ll gain crucial insights into best practices, equipping you to manage installations confidently and efficiently.
Laying the Groundwork: Preparation That Shapes a Seamless Motorcycle Fairing Install

Preparation is the quiet force behind every clean fairing install. It isn’t the flash of a snug fit or the gleam of fasteners torqued to spec; it’s the careful, almost methodical work done before a single screw turns. When you approach the task with patience and a clear plan, you set up the fairing to sit true, align with the bike’s lines, and perform as designed at speed. The preparation phase blends practical know-how with a disciplined approach to safety, fit, and future maintenance. It begins long before the first bolt is touched and extends beyond the moment you tighten the last fastener. In this space, you sketch the overall blueprint for success, then follow it with consistent, repeatable steps that protect the frame, the bodywork, and your riding experience.
A foundational element is compatibility. The fairing you intend to install must be designed for the motorcycle’s frame geometry, mounting points, and year-specific attachments. Compatibility isn’t a vague notion; it’s a precise map of bolt patterns, spacing, and access points for panels, lights, and electronics. Without that alignment, the risk is not merely a misfit, but interference that can ripple through steering, braking, or airflow. Before you lay out tools, confirm the fit by comparing mounting tabs, bracket positions, and the path that the fairing will travel around the headstock and forks. If dimensions or attachment points diverge, that fairing becomes a source of rattles, misalignment, or worse—fatigue on fast rides when vibrations magnify tiny gaps into larger concerns.
With compatibility checked, the right tools become your next line of defense against dodgy fits or cracked plastics. A well-curated toolkit is more than a collection of wrenches; it’s a focused set of devices calibrated to the torque and precision a good fairing demands. A socket wrench set, screwdrivers, a selection of Allen keys, and a torque wrench are the core. Depending on the design, you may need a plastic pry tool or trim removal bars to lift panels without scuffing paint or gouging the vinyl. The moment you realize you’ll need a specific fastener—be it a clip, a bolt, or a nut with particular thread length—you pause and pull the exact item from the kit rather than improvising with something ill-suited. It’s a habit worth cultivating: treat every fastener as part of a tailored, vehicle-specific system rather than a generic component that can be forced into place.
Work environment is not glamorous, but it is decisive. A level, stable surface provides a predictable foundation for the bike to rest while you work. The center stand is a helpful ally if your model includes one; it keeps the bike upright, minimizes tipping risk, and helps you keep your hands free for precise placements. Lighting matters, too. Adequate illumination prevents subtle misalignments from slipping by and reduces the likelihood of cross-threading or misplacing a bolt. The ignition should stay off, and, when appropriate, the battery may be disconnected to eliminate the risk of accidental short circuits when cables, connectors, or harnesses are moved. Cleanliness follows as a companion discipline. Wipe mounting points, headlight housings, and frame rails with a lint-free cloth to remove dust, oil, or old residue that could interfere with bolt tightness or the fairing’s seal against the air. A clean canvas is a fairing’s best friend; it reduces the chance of binding, misalignment, or premature wear.
Cleaning extends to removing the existing fairing, should you be replacing it rather than installing a new set. This step is not a courtesy; it’s a diagnostic opportunity. As bolts come free, you’ll be looking for signs of wear, corrosion, or deformation on mounting surfaces. Such discoveries inform whether you should replace a bracket, a spacer, or a fastener before attempting the new install. When panels are glued in place, a plastic trim tool helps you separate them from the frame gently. The goal is to avoid paint damage and preserve the integrity of electrical connectors or relays tucked behind the panels. Once the old assembly is out, you’ll have a clear view of the raw mounting surfaces and the precision tolerances you’ll be working within with the new fairing.
The next stage blends anticipation with careful ergonomics. Aligning the new fairing isn’t a theatrical moment; it’s a quiet measurement exercise that pays dividends in the long run. You’ll hold the panel near the mounting holes and simulate engagement to confirm the lines you see in the mirror will translate to a true, symmetrical profile on the bike. If the fairing design relies on brackets or supports, temporarily secure it with the provided fasteners or clips to check fitment. This is the moment to notice any unexpected interference with the fuel tank, headlight housing, or the edge of fenders. It’s also the time to verify that the fairing’s contours don’t obstruct control interfaces, such as the throttle assembly or the lever pivots. A visual check holds enormous value here; you want the gap around the edges to be even and the fairing to sit flush without binding any surface when you gently press on its surfaces.
Symmetry is the silent standard in any fairing installation. Use a level or straight edge to ensure that the alignment respects the handlebars, fenders, and bodywork lines. Even a subtle tilt can become an annoyance at speed, creating wind noise, buffeting, or unexpected air-gap behavior around the panels. If a hinge or latch mechanism is part of the design, verify that the fairing can open and close without contact with adjacent components. This is not merely about appearance; it’s about practical service access for maintenance or inspection, which becomes part of the ongoing ownership experience. When you’re satisfied with the provisional fit, you proceed to the fastening stage, but only after confirming the torque guidelines supplied by the manufacturer. The torque values are not decorative numbers; they are engineered limits that secure the components without compromising the plastic’s integrity or the threads’ longevity. Over-tightening can strip threads or crack plastic; under-tightening invites rattles and potential detachment at speed. The act of tightening is, in its own way, a mindfulness exercise—the careful rhythm of securing each point in a crisscross pattern that distributes pressure evenly and preserves panel alignment.
Once the fairing is in place, the road test begins before you leave the driveway. Don’t skip this critical rehearsal. Gently push and pull on the panels to detect any movement that might indicate a loose fastener or misalignment. Check that electrical connections are fully seated and that lights and signals operate as intended. The first ride should be performed at a low speed to feel how the new geometry behaves with real airflow and rider weight. Listen for unfamiliar vibrations or rattles and observe any changes in steering characteristics or wheel alignment that could hint at a mounting issue. The aim is not to chase a perfect sound in a single trial but to confirm that everything behaves predictably and to identify any trim, clearance, or interference problems that would require a re-check of fitment or torque.
As you work through this preparation phase, you may encounter model- or design-specific considerations that deserve careful attention. For instance, some fairings rely on a pre-installed bracket system or a precise sequence of steps that must be followed to achieve the intended rigidity. In practice, this means following the sequence to engage brackets first, then sliding the fairing into position and locking it with clips or additional bolts. The principle remains consistent across designs: the better your foundational alignment, the smoother the final assembly and the longer the fairing will stay attached under the stresses of wind, vibration, and cornering.
Safety is a thread that runs through every paragraph of preparation. Adhere to torque specifications, never force components, and avoid altering factory parts unless the manufacturer explicitly authorizes it. If you’re uncertain about a particular step, seek professional guidance or consult the official service manual for your bike. The goal is not to rush but to build a reliable, repeatable process that you can trust on the road. In the long run, the time invested in careful preparation pays off with improved aerodynamics, reduced wind noise, and a more comfortable ride that feels as integrated as the bike’s original design.
In the broader context of preparing for a fairing install, take advantage of model-agnostic tips that translate across many bike types. Start with a fresh mounting surface whenever possible. Replace corroded fasteners or bent brackets to preserve alignment and safety. Use a torque wrench consistently to avoid the pull between under- and over-tightening. If you do encounter adhesives on older fairings, plan for longer disassembly and a more deliberate cleaning phase to ensure you won’t trap grime under the new panels. And finally, document your process. A simple note of what was removed, what was replaced, and the exact torque values used can make future maintenance easier and faster. In the end, preparation isn’t a hurdle to overcome; it’s the framework that makes every subsequent step predictable, repeatable, and safe. This is how a fairing transition—from concept to secure, aerodynamically sound reality—truly becomes a skill you can rely on.
External resource for deeper guidance on the installation process can be consulted for those who want to explore practical demonstrations and diagrams that complement hands-on practice: https://www.revzilla.com/blog/motorcycle-fairing-installation-guide
Solid Fasteners, Seamless Fit: The Hardware-Driven Road to a Smooth Motorcycle Fairing Install

Installing a fairing on a motorcycle is rarely just about slipping plastic over a frame. It is a careful negotiation between parts that must work together under vibration, wind pressure, and handling forces. The hardware you choose and how you torque it determines whether the fairing enhances aerodynamics, reduces rider fatigue, and stays put at highway speeds. When you approach the task with a mindset that prioritizes hardware integrity, the rest of the installation becomes a sequence of precise, repeatable steps rather than a guessing game. This chapter weaves together the practicalities of mounting brackets, fasteners, and torque settings with the broader aim of achieving a fairing that sits flush, functions without interference, and endures the rigors of riding. It is a discussion that respects both the art and the engineering behind a well-fitted shell that doesn’t rattle, crack, or warp over time.
The journey begins long before you lay eyes on the fairing itself. Compatibility is the foundation. The fairing must be designed for your exact motorcycle make, model, and year, because even small deviations in mounting points or geometry can create misalignment that compounds as you tighten fasteners. It is tempting to assume that a universal kit will simply bolt on, but the truth is that fitment varies with model families, production years, and sometimes even regional variants. In practice, this means verifying that the kit is specified for your bike and, if possible, cross-checking the mounting points against the frame, front fork crowns, triple clamps, or existing midsection supports. The installation manual that comes with the fairing is not decorative; it is the map that keeps you from bending tabs, over-stressing plastic, or hitting a wiring loom with a fastener.
With compatibility confirmed, you assemble your toolkit. The typical hardware kit includes mounting brackets or supports, a collection of bolts and washers, and sometimes specialized fasteners designed to anchor the fairing components to the frame or to the bike’s bodywork. The exact hardware list is model-dependent. Some kits feature dedicated brackets ready to drop into pre-threaded holes or on integrated collars; others require you to adapt with spacers or shims to achieve the right stance. The takeaway is simple: read the instructions closely, and gather the items called for. A clean workspace matters as well. Park on a level surface, engage the center stand if you have one, and ensure the bike is stable. A wobbly stand turns a straightforward bolt-in into a struggle that ends with cross-threaded holes or cracked plastic. Before any bolt is touched, wipe mounting points—handlebars, front forks, frame rails, and the contact surfaces of the brackets—with a clean cloth to remove dust, oil, or debris. Debris can create gaps and throw any alignment off when you finally tighten.
As you prepare, consider the electrical and control interfaces that often run beneath or through the fairing. Some fairings accommodate speakers, lighting, or integrated switches, and those additions introduce a layer of complexity. In some cases, the hardware kit may be augmented by electrical connectors, grommets for weatherproofing, or clip-in harnesses. If your fairing has any electronics, plan for the routing of wires and the possibility of removing or re-securing access panels without disturbing the fairing’s grip on its brackets. In models with more elaborate electrical integration—where the fairing forms part of a sound system or a data bus—the installer may encounter service notes about software updates, ignition safety checks, or charger connections. The broader principle applies: keep lines neat, protected, and free from pinch points that could abrade a wire or rub a connector during vibration.
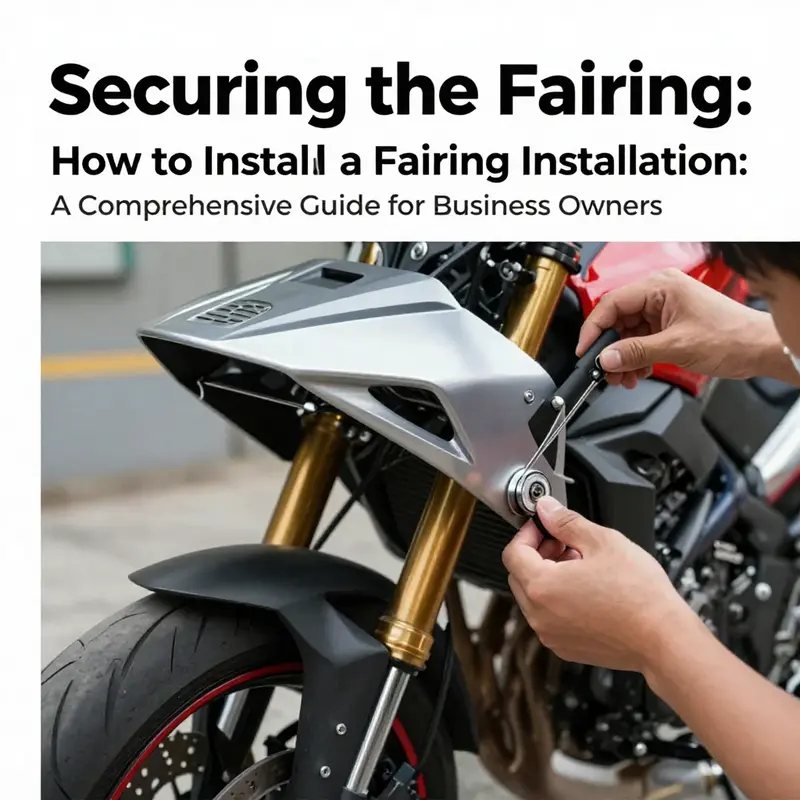
Mounting hardware is the heart of the installation. Brackets attach to the frame, handlebars, or front fork area, and those brackets are fastened with bolts and washers supplied in the kit. The guidance here is unambiguous: use the torque specifications provided by the manufacturer. Torque wrenches are not optional tools for this work; they are the safeguard that prevents under-tightening that allows movement, and over-tightening that can strip threads or crack plastic components. A common, safe practice is to tighten in a crisscross or star pattern. This approach distributes pressure evenly and reduces the risk of warping the fairing’s mounting surface. It also helps maintain symmetry, which is crucial for the fairing’s lines and for the rider’s perception of the bike’s stance. If your kit includes locking clips or secondary fasteners, install them only after you’ve achieved the correct initial alignment and snug torque on the primary fasteners. Re-check the torque after the entire assembly sits for a moment, because plastics may settle and clamps can shift ever so slightly as you move from a static to a dynamic state.
The process of positioning and securing the fairing is where the craft of the install reveals itself. First, you place the fairing onto its mounting structure with care. Don’t force parts into misaligned holes; instead, back off and adjust until the surfaces meet cleanly, with the panels sitting along the bike’s body lines. A visual check is essential: look for even gaps around edges, alignment with the headlight or indicators, and symmetry across the bike’s left and right sides. The crux is to ensure that the fairing appears as a single, cohesive shell rather than a collection of panels pressed together. When you’re satisfied with the fitment, begin tightening in a crisscross sequence to apply even pressure. Use a torque wrench to reach the precise manufacturer’s values. If anything resists or binds, stop and reassess. For instance, if a mounting tab sits proud or a bracket interferes with a control lever, the problem is not solved by forcing it. Correct the misalignment or replace a misfit hardware piece; forcing it can crack plastic or bend a frame mount, with consequences that echo in handling and safety.
A fairing’s job is not just to look right; it must stay right under the demands of real-world riding. With the fasteners snug, perform a light test of stability. Gently push and pull on each panel to verify there is no movement, rattle, or creep. If you hear a sound, locate its source. A minor rattle can be a sign that a screw needs to be retightened, but more serious cases may indicate an insufficiently seated bracket or a misaligned edge that makes contact with a moving part at certain throttle or braking states. The rider’s comfort and the bike’s aerodynamics depend on catching these issues before they become a habit that ruins the fairing’s performance or the rider’s confidence.
It is helpful to think of model-specific guidance as a practical map rather than a set of universal rules. Some bikes are designed to be paired with a specific fairing kit that uses pre-installed bracket systems and a precise sequence of steps. In these cases, you may remove the original side panels, attach the new fairing brackets with the recommended fasteners and torque, slide the fairing into position, and secure it with locking clips and additional bolts, followed by reinstalling side covers and checking all connections for tightness. The essence remains consistent: verify compatibility first, prepare the mounting points, and respect torque values. If you are working with a model that has a tradition of particular hardware configurations, consult the manufacturer’s service guidance or a professional manual to confirm that the approach you take aligns with the bike’s engineering requirements. For riders who want to explore model-specific hardware options in a broader sense, a helpful resource category on fairings can be found in the Honda fairings section, which provides examples of compatible mounting hardware and bracket standards. You can explore this category here: Honda fairings category.
The road wisdom that accompanies hardware-focused installation is built on safety and longevity. Do not skip torque specifications, even when you feel sure you can judge by hand. Never force fasteners beyond their thread engagement, and avoid modifying factory components unless you have explicit authorization from the manufacturer. If you are unsure at any point, step back, consult the service manual, or seek professional help. The fairing is not a cosmetic add-on; it is a structural element that interacts with steering loads, airflow, and rider control. A misstep in hardware can translate into misalignment, increased wind buffeting, or even a failure at speed. Keeping to proper torque values, ensuring clean mounting surfaces, and verifying fitment before riding creates a resilient, integrated system rather than a fragile shell.
A final note on model-specific nuances can help when you move from the general to the particular. Some model families use a combination of pre-installed bracket systems and additional fasteners, while others require you to source a bespoke wiring harness kit to integrate with the bike’s electrical ecosystem. In cases where the installation touches the electrical side, anticipate time for routing, cable management, and weatherproofing. It may also be necessary to update dealer software or recalibrate certain electronic modules if the installation affects how sensors or indicators report data. The key idea is to approach the task with a full understanding that the fairing is both a mechanical and, in many configurations, an electrical system component. By aligning your hardware choices with the bike’s design philosophy, you guarantee a durable, respectful fit that honors the machine’s engineering.
In summary, the hardware—the brackets, bolts, and fasteners—serves as the invisible backbone of a successful fairing installation. When your hardware is compatible, correctly chosen, and torqued to spec, the fairing’s silhouette becomes a true extension of the motorcycle rather than a loose shell. The right steps foster a harmonious relationship between engineering and aesthetics, translating into smoother airflow, improved rider comfort, and lasting performance. If you ever doubt a decision, remember that the torque values are not arbitrary; they are the tension that keeps the entire assembly behaving as one under pressure. Respect them, follow the manual, and your fairing will perform as intended for years to come.
External resources can offer broader context on how installation intersects with integrated accessories. For a deeper look at how hardware choices interface with audio-integrated fairings and other components, see this Harley-Davidson resource on the audio fairing lower speaker kit page: https://www.harley-davidson.com/en-us/vehicle-parts/accessories/audio-fairing-lower-speaker-kit.html. While this example comes from a different riding culture, it illustrates the principle that fairing hardware often intersects with electrical interfaces and dedicated mounting strategies, underscoring why precise alignment and secure fastening are essential across any model or configuration.
The Secure Fit: Mastering a Precise Motorcycle Fairing Installation for Aerodynamic Performance
Installing a motorcycle fairing is a careful craft, blending aerodynamics with mechanical precision. The goal isn’t just to bolt a shell onto someone’s bike; it’s to create a seamless contour that complements the frame, maintains control, and withstands the stresses of riding at speed. A successful install begins long before you thread a single bolt. It starts with compatibility, proceeds through methodical assembly, and ends with a measured balance between rigidity and alignment. If you treat the process like a controlled ritual rather than a hurried task, you’ll find the fairing behaves as an integrated part of the machine rather than a loose shell begging to rattle loose on the highway. The emphasis here is on disciplined preparation, careful fitting, and torque-based tightening that respects the material and the rider alike.
First comes preparation and compatibility. Every fairing is designed for specific makes, models, and years, and attempting to force a panel onto an incompatible chassis invites misalignment, handling quirks, and stress on fasteners. Before you touch the bike, verify that the chosen fairing is intended for your motorcycle’s exact model and year. Gather the right tools: a socket wrench set, screwdrivers, Allen keys, and a torque wrench. Depending on the design, you may also need a plastic pry bar or sealant recommended by the manufacturer. Create a clean workspace on a stable, level surface. If your bike features a center stand, engage it to keep the motorcycle upright and stable. Disconnect the battery if the installation manual calls for it, and wipe down all mounting points—handlebars, front forks, frame rails—with a clean cloth to remove dust, grease, or debris that could interfere with bolt tightness or adhesive work.
With the bike prepared and the fairing chosen, you’ll often begin by removing components that would interfere with the new setup. This step is not merely about clearing space; it’s also about documenting what comes off and labeling fasteners so reassembly is straightforward. If you’re replacing an old fairing, or removing mirrors, lights, or trim that could block access, take your time to photograph the process and keep hardware organized. A calm approach here reduces the risk of misplacing parts or reassembling in the wrong order, which can lead to fitment issues down the line. This is especially important when the design uses pre-drilled bracket holes, which must align precisely with the bike’s chassis.
The core of the installation rests on mounting hardware. Most fairings rely on brackets or supports that fasten to the frame, handlebars, or front fork area. Begin by positioning these mounting components with the bike in a stable stance. Lightly place the brackets in their approximate locations, then loosely thread the bolts so you can still adjust. The aim is to achieve precise alignment before any final tightening. It is here that the torque settings come into play; over-tightening can crack plastic components or distort the mounting points, while under-tightening invites movement or rattles at speed. Always follow the manufacturer’s torque specifications to the letter, using the torque wrench to enforce consistent clamping pressure.
Positioning the fairing itself is a step that rewards patience. Gently set the fairing onto the mounting brackets, taking care to line up with surrounding bodywork, the headlight cluster, and the rider’s line of sight. A true-fit fairing should sit flush and level against the bike’s bodywork, with no obvious gaps or misalignments when viewed from multiple angles. If you notice any wobble or a tiny tilt, stop and reassess. Adjust the brackets or the fairing’s position slightly, then recheck the alignment. The goal is a symmetrical silhouette that mirrors the bike’s geometry while respecting the space around the headlight, indicators, and mirrors. When the alignment looks right, you’ll move into the final securing stage.
As you tighten, a disciplined sequence becomes your ally. Tighten fasteners in a crisscross or cross-pattern that distributes pressure evenly across theFairing’s mounting points. This approach minimizes the risk of warping and helps maintain the consistent gaps that influence airflow. Keep the torque wrench in constant use for these steps, matching each fastener to its specified value. If the design requires a staggered tightening order, follow the sequence offered in the installation manual or the bracket design notes. Sloppy tightening—especially on plastics or composite components—can lead to cracks or accelerated wear around mounting holes. A steady hand and a patient eye are far more valuable than a show of force.
The final mechanical checks matter as much as the first. After the bolts are snug, perform a stability test by gently pushing and pulling the fairing from several directions. It should resist movement with no rattling or creaking. Visually inspect for any gap that could channel air into unwanted places or cause buffeting at speed. Check clearances around the front tire during steering lock and full lock turns, and verify that the fairing does not contact the tire, brake lines, or suspension components when the front wheel moves through its travel. Functionality must also be verified: ensure that the integrated controls—like signals or any mounted windscreen—operate freely without binding or interference. This is not a cosmetic exercise; a misfit can degrade control and comfort on the road.
Model-specific guidance is a practical compass in this journey. For example, certain models come with pre-installed bracket systems and a fixed sequence that, if followed, yields the best aerodynamics and reliability. The essence remains the same: remove any obstructing panels, attach the brackets to the frame with the correct bolts and torque, slide the fairing into position, lock it with necessary clips or additional fasteners, and then reinstall any side covers while confirming all connections are tight. Regardless of the bike’s make, the discipline of aligning, testing, and tightening remains constant. If you own a bike with a dedicated service manual, consult it closely; it often contains critical notes about the bracket geometry, cable routing, and any model-specific pitfalls that a general guide might overlook.
In this process, the theme of safety threads through every decision. Never skip torque specifications; they protect both rider and machine. Avoid using brute force when a part resists tying into place; plastics, fasteners, and brackets can fail under unnecessary stress. Do not modify factory parts beyond what the manufacturer authorizes, and if you’re uncertain, seek professional guidance or reference the official service manual. The goal is not to race through the installation but to create a robust, repeatable mounting that can withstand vibrations, wind pressure, and the rough rhythms of regular riding.
A touch of practicality helps bridge theory and execution. If you’re working with a rider who frequently changes fairings for cosmetic or performance reasons, consider labeling each fastener with its location and its torque spec. This small habit reduces the risk of cross-threading or misplacing a bolt during reassembly, especially when you’re moving between different fairing sets. Equally, maintain a clean workspace during the install. Dust and grease are the silent adversaries of precision. A simple wipe-down before every tightening keeps the seating surfaces and holes free of debris that could compromise the fit.
For riders who want to deepen their understanding or tailor the process to a specific bike line, internal resources can provide guidance. For owners exploring a broader range of fairing designs, the Honda fairings collection can serve as a practical reference point for compatibility checks and design perspectives. The linked category consolidates a variety of fairing shapes and mounting philosophies, helping you gauge what works best with your chassis. Honda fairings can offer a useful mental map as you compare bracket layouts, edge contours, and mounting point spacing. This isn’t a substitute for the official manual, but it can sharpen your eye for where adjustments may be needed before you commit to tightening the final fasteners.
The installation chapter closes not with a final flourish but with a calm, measured ride into test territory. After you complete the setup, take a short, careful test ride at low speed. Listen for vibrations, rattles, or wind noises that betray micro-misalignments. Revisit any suspect fasteners and recheck torque values if necessary. Once you’re satisfied with the feel and sound of the bike, you can gradually push toward higher speeds to confirm the fairing’s stability under real-world conditions. The look of satisfaction you’ll notice in the ride isn’t just about aesthetics; it’s about the assurance that the fairing contributes to, rather than detracts from, the bike’s performance and the rider’s comfort.
To bring the thread full circle, remember that while the steps outlined here are grounded in practical, repeatable actions, the exact order and details can vary with the specific model and fairing design. A robust installation hinges on fidelity to the manufacturer’s instructions, exact torque targets, and the integrity of every mounting point. It also benefits from a patient, deliberate approach to alignment and an honest appraisal of fitment before and after a test ride. The more you invest in precision at the outset, the more you’ll gain in aerodynamics, handling, and rider comfort when you’re out on the road. And if you ever feel uncertain, pause and consult the official service manual for your exact model, which remains the most authoritative guide for your bike’s fairing system.
External resource: https://www.motorcycle.com/motorcycle-service-manuals
Final Checkpoints: Verifying Safety, Alignment, and Aerodynamics After a Motorcycle Fairing Install

Installing a fairing marks a turning point in how a bike looks, sounds, and slices through the air. But the work doesn’t end once the last screw goes in. The final checks are the quiet, decisive act that transforms a cosmetic upgrade into a precise, rider-friendly system. They ensure safety, preserve control feel, and protect the bike from the stresses of wind, vibration, and road debris. The goal is not merely to have a snug shell bolted to the frame; it is to verify that every mounting point behaves as the manufacturer intended, that the fairing sits where it should, and that it cooperates with the bike’s controls rather than interfering with them. This is the moment when aerodynamics align with ergonomics and mechanical integrity, and a rider can trust the fairing to stay in one piece under real-world conditions. As you approach these checks, remember that consistency matters more than intensity. A measured, methodical approach tends to catch issues early and prevent rattles, loosening, or misalignment from becoming a road-side repair story rather than a one-time setup win.
Begin with the simplest, most tangible item: fasteners. The mounting bolts and fasteners must be tightened to the manufacturer’s specifications. The goal is not to squeeze the life out of plastic threads or to crush mounting points but to create a secure, uniform clamping force across every interface. A torque wrench is your ally here. Set it to the value recommended by the manual, and progress in a disciplined order, often described as a crisscross pattern around the fairing’s perimeter. This pattern distributes pressure evenly, reduces the risk of warping, and minimizes the chance that one corner will bear more stress than another. Over-tightening can strip threads or crack plastic components; under-tightening invites rattles and, worse, detachment at speed. If you’re comparing the feel of a bolt to another bike you’ve worked on, resist the temptation to rely on memory alone. Use the specified torque and the same technique each time. The repeatability of torque control is what separates a secure installation from a fragile one when the bike is bouncing over a pothole or railing against gusts on the highway.
Next, you’ll want to tighten your eye for alignment. A fairing that is even slightly off-kilter creates more than a cosmetic misalignment; it disrupts airflow and can place uneven loads on mounting points. Before you fully tighten every fastener, step back and visually verify symmetry along the bike’s centerline. Check that the gaps between the panels are uniform and that the fairing lines line up with existing bodywork and the headlights. If there’s a noticeable tilt or a skewed edge, stop and re-check the mounting brackets and their seats on the frame. Misalignment can create aerodynamic drag, increase wind noise, and, over time, compromise the structural integrity of the fairing mountings. Small shifts during the first days of riding can compound into larger ones, so treat any incongruity as a signal to pause and adjust rather than to ride and hope for the best.
The fit—how the fairing sits around moving parts and nearby components—is another critical axis of checks. You want a flush seating around the handlebars, mirrors, and fuel tank, with no interference that could produce friction, wear, or heat damage. Move the handlebars from lock to lock and gently test the clearance between the edge of a panel and the throttle housing, or the panel and the brake lever. Open and close the fuel cap, and confirm that the fairing doesn’t collide with the cap’s mechanism. Look at the spaces near the headlights and indicators; any visible gaps or contact with wires can indicate a misaligned bracket or a mis-sized panel. If you expose wiring harnesses to the edge of a panel or the panel’s inner surface, confirm that the harnesses are routed with slack—not taut—and secured with clips or ties to prevent pinching on heat cycles or during vibrational movement.
Wiring deserves its own careful yardstick. Integrated lighting and instrumentation harnesses add functionality, but they also multiply the chances of pinch points and abrasion. Ensure every connector seats fully and that the harness is routed away from hot surfaces, moving components, or sharp edges. Wires should be fastened at regular intervals with appropriate ties or clamps to prevent chafing as the bike flexes through corners and over irregular pavement. A quick tug test can help spot loose connectors, but avoid yanking on cables with full force. Instead, gently flex the area around each connector to simulate the strain that occurs during riding. The aim is to create a path that cushions movement and avoids snagging on other parts during control inputs or through dynamic suspension travel.
A visual inspection, though seemingly obvious, is essential. Scan the entire fairing surface for scratches, dents, or signs of stress fractures, especially near mounting zones, edge seams, and where two panels meet. These are often the first indicators of a tight, but poorly seated, fit or a bracket that is under unusual strain. Look for seams that sit unevenly or reflect a light line that suggests a panel has flexed or shifted. If you detect a crack or a noticeable stress line, halt further tightening and reassess the bracket system. In many cases, a re-torque of the fasteners combined with a realignment can rectify the issue, but a damaged panel or cracked mount should be addressed before the bike returns to the road.
Beyond the surface, a stability test helps you sense the fairing’s behavior in response to real-world vibrations. With the bike upright, gently press on the fairing at multiple points—near the corners, along the midsection, and at any high-stress junctions. You’re assessing for wobble, creaks, or a degree of movement that shouldn’t exist. Any creak or wobble is a sign that something isn’t seated correctly or that a fastener isn’t performing as intended. It’s not unusual to re-check a bracket after a brief ride; vibrations can reveal looseness that static torque alone cannot reveal. If movement is detected, recheck the torque values, then re-align the panel sections and verify that every bracket is properly anchored to its intended anchor point.
Operational checks are the final waypoint before a road test. You must ensure the fairing does not obstruct the rider’s view or interfere with the bike’s controls. Confirm that the throttle operates smoothly with no binding or unusual resistance in the fairing’s edge vicinity. Ensure brakes respond without delay and that levers can be pulled without contact with any fairing panels. Check that the indicators, headlights, and any integrated lighting remain clearly visible and are not dimmed or blocked by the fairing. Mirrors should remain unobstructed, and their adjustability should not be compromised by edge contact or panel alignment. If the fairing uses a venting system or any airflow-enhancing geometry, verify that airflow paths do not direct hot air toward the rider or into areas where it could cause glare or discomfort.
Model-specific realities inevitably surface during these checks. While the exact mounting sequences and bracket designs vary across models and fairing families, the principle remains the same: follow the official service manual for your exact configuration. The manual will tailor torque ranges, sequence, and any special locking clips or fasteners that a general guide cannot anticipate. If your installation was guided by a pre-fabricated bracket system, remember that sometimes a minor adjustment—like a slight shift in a clip position or a minor repositioning of a bracket—can dramatically improve both fit and stability. The aim is a clean, integrated look where the fairing complements the bike’s lines, does not press against moving parts, and holds fast under the stress of real riding conditions. For riders who want to explore model-specific aesthetics and fit, a curated collection of fairings can be a helpful resource; you can explore options for specific brands and models with a reliable, category-based browse like the Yamaha fairings collection. This helps you assess how others have balanced looks with function and may highlight small adjustments that improve clearance or airflow without altering the core mounting system.
As these checks unfold, the importance of a measured, documented approach becomes clear. Take a few moments to note any anomalies you find, the steps you took to address them, and the exact torque values used for each fastener. Documentation isn’t a badge of pedantry; it’s a practical safeguard. If you ever need to revisit the installation due to a vibration or a loose panel, you’ll have a precise map of what was done and what needs rechecking. Finally, remember that safety is the foremost consideration. The fairing plays a role in aero efficiency and rider comfort, but only when its installation preserves the bike’s structural integrity and control fidelity. If at any point the checks reveal uncertainty or risk, pause and consult a professional mechanic or the official service manual. A second pair of experienced eyes can catch subtleties that even careful hands may miss.
For riders seeking additional pointers that echo practical, field-tested wisdom, a broad source of installation tips emphasizes the same core habits: verify torque, confirm alignment, ensure free movement of controls, route wiring securely, perform a cautious test ride, and be prepared to rework mounting points if anything feels off. The philosophy is simple and repeatable: precision, patience, and respect for the bike’s original design. If you want a quick route to model-focused guidance and a broader catalog of fairing options that might influence how you approach mounting and final checks, the Yamaha fairings section can be a helpful reference as you compare fitment across models. Finally, for readers who want to cross-validate these steps with additional hands-on insights and troubleshooting tips, a trusted external resource offers a consolidated set of tips and checks that you can revisit after your install is complete: https://www.bikeandride.co.uk/motorcycle-fairing-installation-tips
Final thoughts
Installing a motorcycle fairing is not just about improving aesthetics; it plays a crucial role in the bike’s performance and rider safety. By mastering the preparation, hardware installation, and securing of the fairing, business owners can provide exceptional service to their customers, ensuring they enjoy the full benefits of their motorcycles. Following the detailed steps outlined in this guide will equip you with the knowledge and confidence to handle installations efficiently, benefiting both your business and your clients.