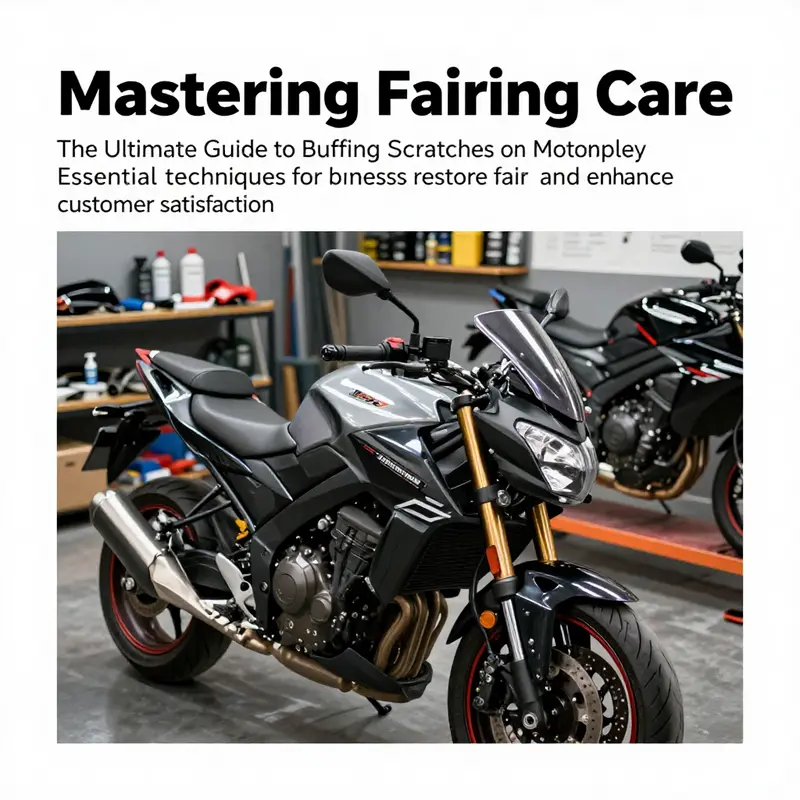
Buffing out scratches on motorcycle fairings is a crucial skill for business owners catering to motorcycle enthusiasts. Fairings protect motorcycles while adding to their aesthetic appeal, but scratches can diminish the visual impact and value of these vehicles. Understanding how to address different levels of scratch damage not only enhances your service offering but also builds trust and loyalty among customers. The following chapters will delve into effective techniques to treat minor surface scratches, manage deeper scratches that expose the base coat, and tackle severe scratches that leave bare metal. By mastering these methods, you can ensure that each motorcycle leaving your shop looks as good as new, directly impacting customer satisfaction and repeat business.
Buffing Clarity Back: Minor Scratches on Motorcycle Fairings
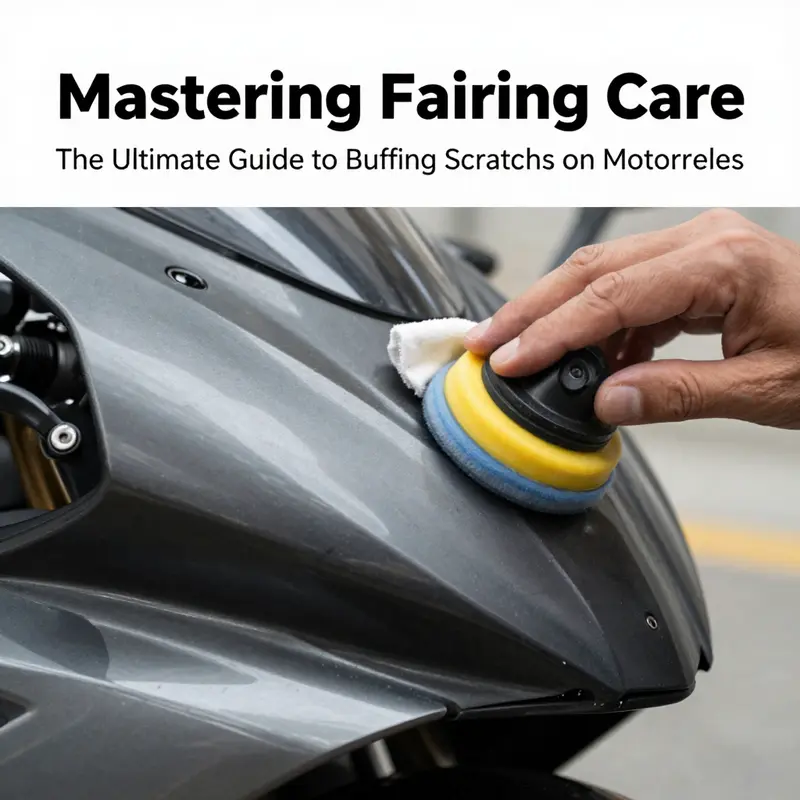
This chapter outlines a careful approach to minor scratches on plastic motorcycle fairings. When scratches remain only in the clear coat, you can restore gloss with gentle polishing. Start by cleaning the area, diagnosing whether it’s surface-level or deeper. Use non-gel toothpaste or a fine polishing compound with a soft cloth, working in small circles with light pressure. Wipe clean and re-evaluate. If haze remains, move to a finer compound and a soft pad, either by hand or with a dual-action polisher, keeping heat to a minimum. Stop if color shows through or if you see heat hazing. If the scratch penetrates the color layer, consult a professional for color matching or panel repair. Finish by applying wax or sealant and protecting against future blemishes. Practice in a small inconspicuous area first, keep surfaces clean, and avoid abrasive tools. When in doubt about depth or color, seek professional help to avoid compromising the finish. Regular maintenance and protective coatings help prevent future scratches. External resources for plastic fairing repair can provide additional guidance.
Repairing Deeper Scratches: Restoring Fairings That Have Cut Through the Clear Coat
When scratches go deeper than the clear coat, the approach changes from buffing to rebuilding. Deeper abrasions that expose the base coat — or worse, the primer or bare material beneath — demand careful preparation and a steady, methodical process to restore both appearance and protection. This chapter walks you through that process as a single, integrated workflow: cleaning and inspection, controlled sanding, filling and feathering, priming and painting, and the finishing buff that blends the repair into the surrounding fairing. The goal is a repair that resists weather and road debris while returning the original gloss and color as closely as possible.
Begin by evaluating the damage visually and by touch. Run a fingernail across the scratch. If the nail catches, the damage is likely deep enough to need filling or repainting. If the scratch is only visible but smooth to the nail, it may only require careful sanding and polishing. For anything that reaches the base coat or plastic substrate, treat the repair as a small refinishing job rather than a simple polish.
Start with a thorough clean. Remove grease, wax, dust, and road grime with a plastic-compatible cleaner or isopropyl alcohol. Cleaning is not just cosmetic: any residue trapped under filler, primer, or paint will produce fish eyes, uneven adhesion, or visible blemishes after painting. Allow the area to dry completely. If the scratch has exposed bare metal, immediately treat it with a rust inhibitor or zinc-rich primer; stopping corrosion early prevents the repair from failing and keeps the underlying structure sound.
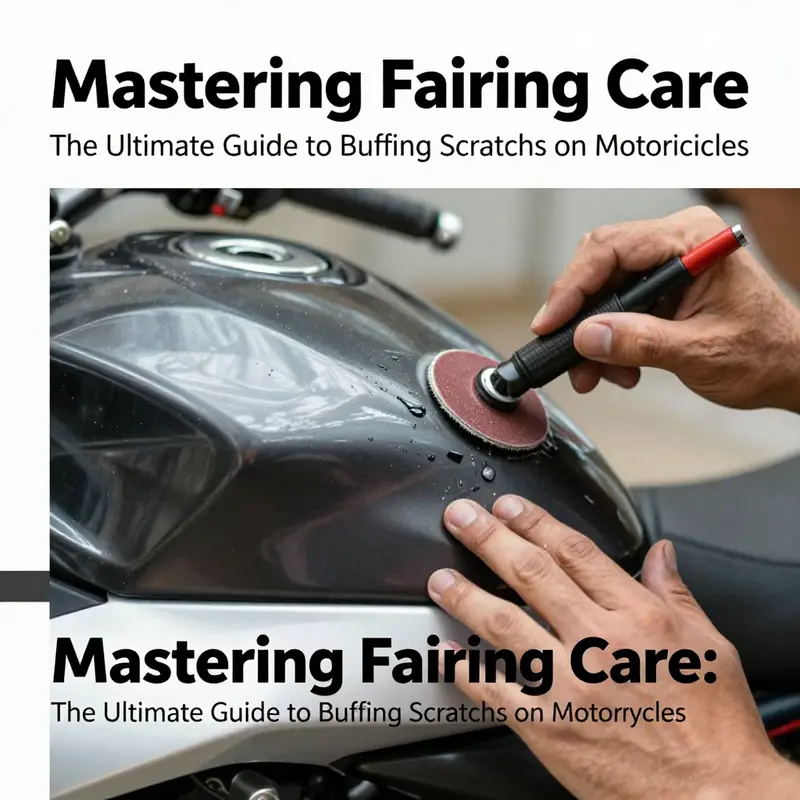
Sanding is the next critical step, and it must be done deliberately. Use wet sanding with progressively finer grits: begin around 800-grit to remove rough edges and feather the paint at the scratch margins, then move to 1500-grit and finally 2000-grit to smooth the surface. Keep the paper and surface wet to minimize heat buildup and to carry away sanding debris. Sand in consistent, single-direction strokes across the damaged area rather than random circular motions; this helps avoid cross-hatch marks and produces a predictable surface for filling and painting. Feather the edges of the damaged zone so the transition from repaired area to original paint is gradual; abrupt edges will telegraph through new paint.
If the scratch created a depression that sandpaper alone cannot eliminate, you will need a filler. Choose a filler suited to the fairing material — many motorcycle fairings use ABS or similar plastics, so a plastic body filler formulated for plastics is ideal. Work in small increments: apply the filler sparingly to slightly overfill the scratch, then allow it to cure fully as directed. Never try to sand filler while it is still tacky; incomplete cure leads to gummy sanding and poor adhesion. Once cured, sand the filler with the same progression of grits you used previously until the repaired spot is flush and indistinguishable in profile from the surrounding surface.
After sanding and filling, remove all dust with a clean, lint-free cloth dampened with a plastic-safe cleaner or isopropyl alcohol, and let it dry. At this point apply a primer that bonds to the fairing material. For plastic fairings, use a plastic-specific primer to promote adhesion between the substrate and your topcoat. Apply primer in thin, even layers rather than a single heavy coat; multiple light coats reduce runs and provide better control. Hold your spray can or gun at a steady distance — typically 6 to 12 inches — and use smooth, overlapping passes. Allow appropriate flash times between coats to let solvents evaporate. The primer creates a uniform base color and fills minor surface imperfections, making color matching and final coats easier.
Color application is next: select a color-matched paint and apply it in thin, controlled layers. Thin coats dry more evenly and blend better than heavy coats. Maintain the same steady sweeping motion you used for primer and keep consistent distance to avoid pooling or orange-peel texture. Allow each coat to flash off — usually a few minutes — before applying the next. Two to three light coats are often sufficient for full coverage; more may be needed for deep colors or metallic finishes. If you are matching a factory shade, work in a clean, well-lit area and compare your wet coats to the original finish at the same viewing angle to evaluate coverage.
When the base color has dried to the manufacturer-recommended time, apply a clear coat to protect the new paint and recreate the glossy finish of the surrounding fairing. Clear coats are what make buffing effective later, so applying them properly is essential. Use multiple thin clear coats rather than a heavy single layer. Thin coats reduce runs and allow solvents to evaporate, which helps the clear coat harden evenly. After the final clear coat, allow the paint to cure fully. Curing times vary with products and conditions; a full 24 to 48 hours is common, and some materials benefit from even longer before aggressive polishing.
Once fully cured, you can blend the new clear coat into the original surface with careful polishing. Start with a fine-grade polishing compound and a soft pad, working by hand or with a dual-action polisher set to a low speed. The goal is to remove any minor orange peel, dust nibs, or tiny imperfections in the clear coat and to equalize the gloss between repaired and original areas. Use overlapping passes and moderate pressure; avoid a rotary polisher unless you are experienced, as it can remove too much clear coat and create low spots. If the repaired area still stands out, progressively finer polishes can refine the finish until it visually matches the surrounding surface.
After polishing, protect your handiwork with a sealant or wax formulated for automotive finishes. A high-quality polymer sealant adds UV protection and helps keep the repaired area from degrading with sun and weather exposure. Apply the sealant sparingly and buff lightly for a consistent sheen. For long-term durability, reapply the protective layer periodically following manufacturer recommendations.
Throughout the process, control contamination. Dust, insects, and fingerprints will ruin a fresh finish. Work in a clean, low-dust environment and keep the repaired panel covered between steps. Use tack cloths to remove microscopic dust before priming and painting. If painting outside is unavoidable, choose a calm day, avoid peak pollen seasons, and try to work under a makeshift shelter to reduce airborne debris.
Safety and proper gear matter. Solvents, primers, fillers, and paints emit fumes that require ventilation and personal protection. Use respiratory protection rated for organic vapors, wear gloves, and protect your eyes. Keep a fire extinguisher nearby when working with flammable materials. Follow all safety instructions on product labels.
Recognize when to seek professional help. Large areas of damage, complex color-matching for factory two-tone or metallic finishes, structural cracks, or paint defects that persist despite careful technique are all reasons to consult a professional. Shops with proper spray booths and experience can reproduce factory finishes and address problems that are difficult to correct at home. That said, for many localized deeper scratches, following the steps above yields a durable, nearly invisible repair.
As an extra tip, when a scratch is beyond economical repair or if you prefer a replacement panel for a perfect factory finish, consider sourcing a replacement fairing specific to your make and model. If you ride a popular model, there are many aftermarket panels available that match fitment and finish closely, which can be a practical alternative to time-consuming spot repairs. For owners of certain sport models, you may find suitable replacement fairings tailored to your bike at a supplier specializing in that brand, such as fairings for CBR models.
When done carefully, the combined process of cleaning, sanding, filling, priming, painting, and finishing transforms a deep scratch into a resilient repair that blends visually with the fairing and restores protective function. Attention to detail at every stage prevents the common pitfalls that reveal repairs: runs in paint, orange peel in clear coat, poor adhesion, or visible edges. Take your time, use the right materials for plastic surfaces, and respect curing times. With patience and the right technique, you can return your motorcycle’s fairings to a condition that looks and performs well on the road.
For a clear step-by-step refresher and some visual guidance on repair sequencing, refer to this external resource on scratch repair methods: https://www.caranddriver.com/repair-and-maintenance/a39731188/how-to-repair-a-car-scratch/.
How to Buff Out Scratches on Motorcycle Fairings: Repairing Severe Scratches Exposing Bare Metal
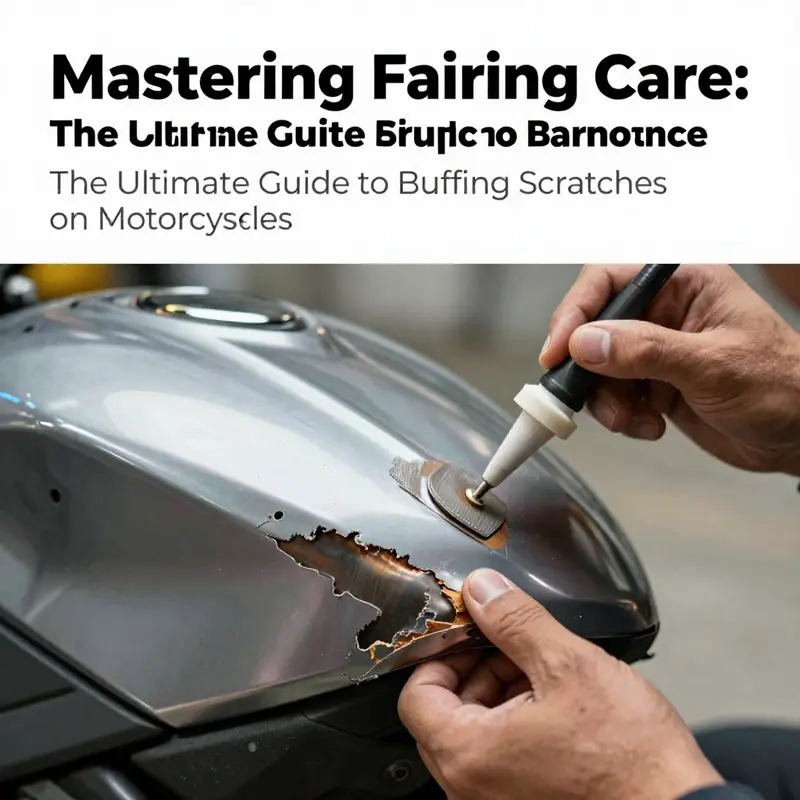
When a motorcycle fairing bears a severe scratch that penetrates the paint so deeply that bare metal or the underlying substrate is exposed, the repair process becomes a careful blend of restoration and reconstruction. This isn’t a quick polish or a quick fill—it’s a deliberate sequence that aims to restore both the appearance and the structural integrity of the panel. The challenge is not merely to hide the damage but to re-create a uniform surface that can stand up to the next ride, the next wash, and the next flurry of road grit that threatened the finish in the first place. In this context, the work sits at the intersection of aesthetics and durability, where attention to prep, material choice, and technique makes all the difference.
Preparation is the quiet engine that drives a successful repair. Start by giving the damaged area a thorough cleanse with a dedicated plastic or automotive cleaner to cut through any oil, wax, or fingerprint residues that could sabotage adhesion. A degreaser can be employed if there’s stubborn film or surface residue, but the key is to allow the area to dry completely before you touch it with abrasives or coatings. Residual moisture or cleaner residue can lift under paint, causing micro-blisters or a dull finish that undermines the effort you’re about to invest. This stage also serves as a dry run for the mind’s eye—seeing how the area looks after cleaning helps inform how aggressively you’ll need to work in the next steps.
Roughening the surface is where the repair begins to earn its grip. You’ll move to a coarse grit, typically in the 80-120 range, just enough to create a mechanical key for the new materials to latch onto. The aim isn’t to strip away everything surrounding the scratch but to create a uniform, slightly roughened canvas that can accept filler and primer without peeling later. It’s a fine balance: too aggressive, and you risk compromising good paint adjacent to the damaged spot; too gentle, and the filler and primer won’t adhere reliably. Wet sanding is optional at this stage but can help manage dust and heat buildup. Whatever method you choose, the goal remains the same—establishing a solid base that acknowledges the scratch without introducing new irregularities that will later become obvious under light.
Filling the scratch is the heart of the repair. A high-quality body filler designed for plastics or composites is spread with a plastic trowel or spreader. You want the filler to sit slightly above the surrounding surface to account for shrinkage as it cures. This is not the moment to be shy about going a hair high; you’ll sand it flush later. Allow the filler to cure fully according to the manufacturer’s instructions. Curing times can vary, and patience here pays off in a smoother final result. Once cured, you begin to transform the bump into a seamless plane by sanding with progressively finer grits. Start with 220 or 320, then move to 400, and finally 600. The aim is a near-perfect harmony between repaired area and surrounding paint, achieved through even, steady strokes. Wet sanding at this stage is highly recommended; it reduces dust and minimizes heat buildup that can cause the filler to erode or glaze.
Priming is the next crucial phase because it establishes adhesion for color and a barrier against future moisture intrusion. Clean the area again to remove all dust, and apply a primer appropriate for plastic or composite surfaces. A good primer will fill minor imperfections, even out the surface texture, and provide a predictable surface for color. Allow the primer to dry completely in a clean, dust-free environment. Sand lightly with very fine sandpaper after priming to ensure the topcoat has an even, non-porous surface to bond to. The type of primer matters here: it should be matched to the substrate of the fairing and be compatible with the chosen color system. The primer is your rehearsal for color—it’s where you begin to see how light interacts with the repaired area and how close you are to real uniformity.
Painting the base color is a delicate operation. You need to match the official color as closely as possible and apply it in a controlled environment to avoid dust nibs and orange-peel texture. Thin, even coats are the rule rather than the exception; multiple light coats are superior to one heavy, rushed layer. Between coats, allow adequate flash-off time so solvents can evaporate without creating runs or sags. This is the portion of the repair where attention to temperature and humidity pays dividends. A well-regulated environment reduces the likelihood of color drift, which can be noticeable under bright sun or direct stadium lighting at the track. Achieving color fidelity may require a professional mixture if the original color is complex or if the fairing uses a special finish within a broader palette.
Once the base color has dried to a solid, clear coating becomes the finishing touch that protects the repair and harmonizes it with the rest of the fairing. The clear coat provides depth, gloss, and a protective layer that resists UV exposure, moisture, and minor abrasion. Apply several light coats, allowing proper flash time between applications to avoid orange peel and microruns. The goal is a smooth, glassy surface that reflects light evenly and conceals any lingering textural differences from the repair beneath. After the clear coat cures, which may take days depending on the product and environmental conditions, you’ll begin the final stage of refinement: polishing.
Final polishing is the process that fuses the repaired area with the surrounding finish. A fine polishing compound, paired with a dual-action polisher or a careful hand technique, helps blur the edges and restore the uniform reflectivity of the fairing. The smoother and more consistent the surface, the less conspicuous the repair will be under inspection and in motion. This is also the moment to be mindful of swirl marks that can arise from aggressive buffing; the DA polisher with a soft pad and a light touch minimizes the risk of introducing new defects. The polish should be worked across the entire panel, not just the repaired spot, to maintain a uniform gloss and to prevent a telltale mismatch when the light hits the surface at a low angle.
In the broader context of severe repairs, color matching remains one of the most challenging aspects. Even small deviations in hue, saturation, or metallic flake orientation can reveal the repaired area, especially under direct sunlight or when viewed from certain angles. If the original color is a complex mix or if the panel has a metallic or pearlescent finish, some cures require professional equipment and color-matching tools that go beyond casual DIY practice. This is not to discourage the backyard tinkerer; it’s a practical acknowledgment that some finishes demand facilities, measurement, and calibration beyond a basic workshop setup. In cases where color matching proves stubborn, you may need to consider replacement panels that are designed to match the bike’s overall aesthetic. If you pursue a replacement, a catalog-based approach can help you identify the right OEM or aftermarket option with the correct shape and mounting geometry. For example, you might browse a category such as Honda fairings to locate a panel that matches the bike’s model and year, ensuring proper fitment and alignment. See the Honda fairings category for a starting point on replacement options: https://ultimatemotorx.net/product-category/honda-fairings/.
The decision between patch repair and replacement hinges on several factors: the depth of the damage, the panel’s market availability, and the budget and time you’re willing to invest. Replacement can be a practical choice when the scratch area is extensive or when color matching proves impractical. It’s also a faster route to a showroom-worthy finish when you consider the cumulative time required for multiple color attempts, re-clear, and re-buff. Yet, for many riders, a well-executed repair can deliver a nearly invisible result that preserves the original panel’s contour and fit. The key is to approach the project with a plan, patience, and a willingness to accept that imperfections from the repair stage can be mitigated by careful finishing work and a thoughtful reassembly.
In some installations, the exposed metal scenario described in the high-severity guide may translate to a need for rust prevention. While most fairings are plastic, certain areas or underlying hardware can be metal or have metal fasteners that become exposed if the scratch penetrates through to the substrate. If you do reveal metal, treat it with a rust-inhibiting primer before applying any further coatings. This step helps prevent corrosion and promotes long-term durability. From a practical standpoint, this means cleaning, deoxidizing, and priming the exposed metal as you would in a traditional metal repair, but with the added emphasis on keeping it compatible with the adjacent plastics and paint layers. It’s a reminder that even the most flawless-looking finish rests on the robust adhesion and longevity of the materials at work beneath the surface.
Throughout this process, environmental control and personal safety are not mere afterthoughts — they are essential elements of achieving a high-quality result. Work in a dust-free environment to reduce the risk of blemishes that can sabotage clear coats and polishing. Wear appropriate protective gear: a respirator or mask rated for paint fumes, gloves, and eye protection. Ventilation matters; even when using water-based products, solvent vapors can linger and mar the finish. Temperature and humidity influence drying times, color behavior, and the performance of primers and clear coats. Following the manufacturer’s guidelines for each product helps ensure predictable results and reduces the likelihood of rework.
If you’re unsure about a step or if the damage runs into more fragile regions such as edges, corners, or mounting tabs, it’s wise to consult a professional. A seasoned auto body shop or motorcycle specialist can assess whether a repair is within the realm of a DIY fix or if the panel should be replaced altogether. The professionals bring experience with color matching across different batches, the right equipment to deliver an even spray pattern, and the judgment to anticipate potential issues like heat marks, solvent creep, or peels that can accompany improper curing. In the end, the aim is to restore the fairing’s integrity and appearance without sacrificing the riding experience that motivated the repair in the first place.
As you close this repair journey, consider the long-term care that will keep your now-repaired fairing looking as good as new for as long as possible. After your final polish, apply a protective wax or sealant designed for plastic and composite surfaces, as these products form a barrier against UV exposure and environmental contaminants. Gentle washing and avoiding harsh brushes or brushes with stiff bristles will help preserve the gloss and reduce micro-scratching. If you ride in dusty environments or frequent wet, salty conditions, reapplying a protective layer on a regular cycle becomes part of the maintenance routine rather than a one-off event. The goal is not merely to restore beauty for the next ride but to maintain that beauty through many miles of road ahead.
In closing, the severe-scratch repair of a motorcycle fairing is one of those tasks that underscores the difference between a quick fix and a durable restoration. It invites you to balance technique, materials, and timing, with a clear eye toward safety and environmental considerations. The process rewards patience and a methodical mindset, where each step builds toward a final finish that looks poured from a single mold rather than patched together. If you’re drawn to this kind of meticulous, finish-focused work, you’ll likely find that the challenge is as satisfying as the ride itself. And when the glassy, even sheen finally returns to the fairing, the sense of accomplishment is not just about the look; it’s about knowing that you safeguarded your bike’s aesthetics and value through careful craft and disciplined care. For readers who want to explore additional replacement options or broader fairing configurations, exploring a dedicated catalog of fairings can be a practical step. If replacement becomes part of the plan, a targeted browse through a manufacturer’s or aftermarket category can help you locate the precise panel that matches your bike’s lineage and styling, while still maintaining the seamless continuity of the overall paint job. If you’d like to see a professional perspective on the broader repair landscape, professional resources and guidelines from established shops offer trusted validation and insight into best practices for severe scratch restoration. For more formal guidance, a reputable auto body resource like Penske Auto Body & Paint provides extensive information on vehicle paint repair techniques and the science behind color and finish, which can be a valuable reference as you plan the next steps in this repair journey: https://www.penskeauto.com/.
Final thoughts
In summary, mastering the art of buffing scratches on motorcycle fairings not only enhances the aesthetics of each bike but also fortifies the competitive edge of your motorcycle business. By implementing the techniques discussed for minor scratches, deeper damages, and severe cases, you ensure that your services remain top-tier, appealing to a broad customer base. Investing in skill development and offering meticulous repair work will distinguish your shop in the crowded market, leading to increased customer trust and satisfaction. This attention to detail can transform customers into repeat buyers, fostering lasting relationships and boosting your brand’s reputation.