Introduction
Repainting motorcycle fairings represents a high-impact service line for performance shops and aftermarket retailers. When done with discipline—combining thorough surface preparation, appropriate priming, and controlled, multi-thin coats—fairings can achieve professional durability, UV resistance, and a showroom gloss that earns repeat customers and referrals. For business owners, the payoff isn’t just a quality finish; it’s predictable workflow, reduced rework, and clearer pricing anchored in proven industry practices. This article translates the key steps from prep to final cure into a practical, shop-focused framework. Chapter 1 covers cleaning, sanding, and surface repair to establish a solid foundation. Chapter 2 covers priming, base color, and clear coats to build durable color and gloss. Chapter 3 covers finishing decisions, curing timelines, and the professional process that separates a good repaint from an industry-standard job. Taken together, the chapters present a holistic approach that aligns with OEM-quality expectations and scalable production in a professional setting.
Tables of Contents
Chapter 1: Chapter 1: How to Repaint Motorcycle Fairings — Preparation, Cleaning, Sanding, and Surface Repair
- Chapter 1: How to Repaint Motorcycle Fairings — Preparation, Cleaning, Sanding, and Surface Repair: Technological Foundations and Practical Techniques
- Chapter 1: How to Repaint Motorcycle Fairings — Preparation, Cleaning, Sanding, and Surface Repair: Economic Realities, Materials Sourcing, and Tooling
- From Prep to Paint: How Societal Values, Global Contexts, and Environmental Ethics Shape Repainting Motorcycle Fairings
Chapter 2: Chapter 2: Laying the Groundwork for a Pro Finish — Priming and Surface Preparation
- Priming and Surface Preparation: Building a Flexible, Durable Foundation for Your Fairing Repaint
- Base Coat Mastery: Building the Color Foundation for Durable, Glossy Fairings
- The Final Shield: Mastering Clear Coat, Finishing Touches, and Protective Layers for Long-Lasting Fairings
Chapter 3: Chapter 3: How to Repaint Motorcycle Fairings — Finishing, Curing, and The Professional Process
- Finishing with Precision: Innovations in Surface Preparation, Paint Systems, and Curing Methods
- Finishing with Foresight: The Final Surface in a Global Supply Chain
- Finishing and Curing as Craft: The Professional Process Behind Durable, Pristine Fairings and Its Social Footprint
Chapter 1: Chapter 1: How to Repaint Motorcycle Fairings — Preparation, Cleaning, Sanding, and Surface Repair

1. Chapter 1: How to Repaint Motorcycle Fairings — Preparation, Cleaning, Sanding, and Surface Repair: Technological Foundations and Practical Techniques
Repainting motorcycle fairings is not merely a color choice; it is a precise exercise in surface science and disciplined technique. The quality and durability of the finish rest on how well the substrate is prepared, how thoroughly it is cleaned, and how carefully the surface is created to accept the coatings that follow. Different fairing materials—ABS and other plastics, fiberglass, even carbon fiber composites—carry distinct surface energies and flex characteristics. That means the adhesion strategy must be tailored to the substrate. Cleanliness is more than cosmetics; it defines the very first bond between primer and plastic. Contaminants such as wax, oils, or silicone form a barrier that repels paint and invites micro-movements under temperature and sun. The goal is a surface with predictable energy and a micro-roughness that guides the coating to lay down evenly, without cracking or peeling in flex zones. The preparation phase, therefore, blends practical steps with an understanding of materials science, and it sets the stage for all that comes after.
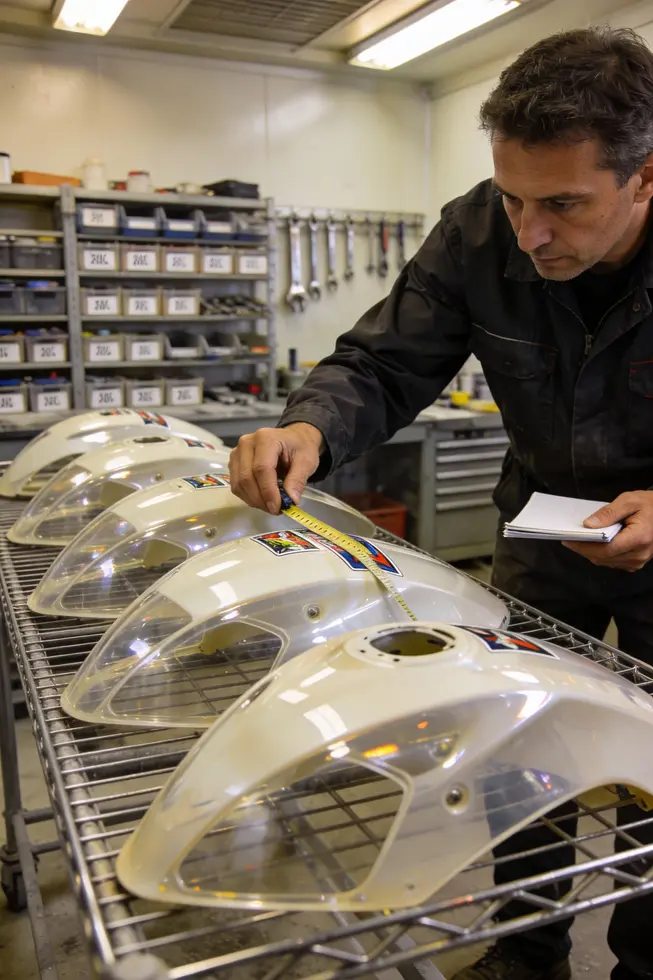
The cleaning and inspection step is more than scrubbing away grime. It is a diagnostic that determines whether the fairing needs only a refurbishment or a more invasive repair. A thorough wash with warm, soapy water removes road grime and oily residues. After drying, the surface is examined for scratches, chips, and any structural damage that would compromise adhesion or cause later failure. This is where the practical meets the preventive: identifying issues early prevents wasted effort on a finish that cannot hold. When damage is found, the repair approach—whether filling shallow imperfections or reinforcing deeper gouges—must be compatible with the substrate to maintain flex and integrity over time. For most plastics, flexible fillers or epoxy-based adhesives are used, followed by careful feathering to avoid ridges that will telegraph through the paint later.
Sanding is the bridge between surface condition and priming. A deliberate progression through grits—roughly from 240–600 for initial injury removal and smoothing, then through finer values to feather edges and blends—creates a mechanical key that allows primer to bite without creating feathered lines. The process benefits from wet sanding in most stages, which cools the surface and reduces dust while controlling dust and heat build-up that could deform delicate plastics. A tack cloth then wipes away the last micro-dust particles, ensuring the surface is clean, dry, and ready for primer. Special attention is paid to plastic-specific preparation; common primers alone may fail to bond without an adhesion promoter designed for plastic substrates. This is where the science meets the shop floor: adhesion promoters formulate a surface that accepts the next layer without cracking under flex.
Repair and surface restoration extend beyond aesthetics. Cosmetic chips are filled with flexible plastic-compatible fillers, while deeper gouges or damaged areas might require fiberglass repair or reinforced fillers. Each layer is cured, sanded flush, and feathered into the surrounding material to prevent visible boundaries after painting. For plastics, primers that promote adhesion and sealers to control micro-roughness play pivotal roles, and the choice of repair material directly influences the film build that follows. The aim is a consistent foundation where each subsequent coat can form a uniform, durable film rather than stacking on an uneven composite of repaired and original material. As preparation deepens, the conversation shifts from “how to cover” to “how to bind.”
With the surface prepped, the path to a showroom-like finish becomes clearer. Priming and sealing establish a uniform base that accommodates color and gloss while moderating porosity. Between coats, light sanding refines the surface and reduces the risk of orange peel. In plastics, the priming stage often determines the longevity of the final gloss and the resistance to UV attack. The economic dimension of these choices becomes evident when selecting primers, adhesion promoters, and fillers: higher-performance materials tend to cost more upfront but reduce rework and long-term maintenance. For readers seeking targeted material options, a representative range of adhesion-promoting products can be explored at the appropriate catalog section product-category/c63/.
Safety and workflow matter as much as technique. Work is performed in a well-ventilated area with controlled temperature and humidity, using proper PPE. The environment influences cure times, solvent evaporation, and surface defects that can arise during the build. The chapter that follows will connect these foundations to the broader economics of sourcing, tooling, and process optimization, guiding decisions that balance performance with cost. The practical workflow, once mastered, translates into faster turnarounds, fewer reworks, and consistently reliable results across different fairing substrates. This cohesion between science, technique, and resource management makes the initial preparation not just a prerequisite but an ongoing investment in the durability and appearance of painted motorcycle fairings.
2. Chapter 1: How to Repaint Motorcycle Fairings — Preparation, Cleaning, Sanding, and Surface Repair: Economic Realities, Materials Sourcing, and Tooling
Understanding the economics of repainting motorcycle fairings begins long before any spray hits the surface. The cost picture is shaped not only by the quality of the paints you choose but by how thoroughly you prepare, what you source, and the tooling you invest in. DIY projects typically come in well below professional resprays, yet the delta between saving money and ending with a compromised finish can be wide. Research across practical guides shows a DIY range hovering around the low hundreds, while professional resprays for motorcycles sit higher, with broader ranges that can extend into premium finishes. In broad terms, a DIY approach usually costs roughly one hundred to five hundred dollars for materials, tools, and consumables. In contrast, professional jobs can exceed the thousand-dollar mark, sometimes far beyond when special effects, decals, or flawless color matching are required. These figures reflect not only the paint itself but the entire chain of preparation—degrea sing, sanding, priming, multiple thin coats, clear coatings, and final polishing. The scale of the work also matters. A smaller, sportier fairing set demands less material and labor than a full cruiser shell, but the same preparation discipline applies to both. More important than the sticker price is the value of a meticulous process: proper degreasing, careful sanding, and the use of plastics-specific primers and adhesion promoters. These steps protect the investment by ensuring the paint bonds well and remains flexible enough to withstand the stresses of vibration, weather, and UV exposure. Skimping on adhesion can unlock a cascade of issues—peel, microcracking, and premature wear—that negate any savings. The choice of materials plays a decisive role in durability and long-term appearance. Plastics require primers and promoters designed for flexible substrates; traditional automotive primers often crack or peel when used on fairings. A thin, well-cured primer layer helps to establish a stable base and reduces the likelihood of orange-peel textures in the final finish. The next layer—base coats—should be selected with UV resistance in mind, especially for motorcycles exposed to sun and heat. When finishing with a clear coat, a minimum of three layers is commonly cited in professional workflows to achieve depth and protection, though the exact number depends on the system and the desired effect. In economic terms, this layering translates to material costs that reflect not only pigment but the quality of the resin system, UV blockers, and the compatibility of base and clear coats with plastics. The tooling required to translate these choices into a durable finish adds another dimension to the budget. A basic kit may include a spray gun, hoses, and a modest compressor, plus abrasives, masking materials, and respirator protection. Each of these items represents a reusable investment, reducing per-project costs over time, but they also require maintenance and safe storage. From a sourcing standpoint, a materials plan that emphasizes plastic-specific primers, adhesion promoters, and compatible clear coats can pay dividends in longevity and appearance. A staged purchasing strategy—start with primers and adhesion promoters, then add base coats, and finally clear coats—helps balance cash flow and reduces the risk of purchasing incompatible products. The long view favors finishes that offer superior UV resistance and gloss retention, since glossy, metallic, or pearl effects not only look striking but also tend to resist environmental wear better. As you map out materials and tools, keep in mind that cheaper options may save money upfront but demand more frequent rework. Thorough prep remains the most cost-effective defense against defects like orange peel or fish eyes, which are notoriously expensive to rectify after painting. For a consolidated view of paints options and sourcing, consult a paints catalog that emphasizes compatibility with plastics, as well as flexible primers and appropriate curing regimes. See https://www.eastwood.com/paints.html. The catalog can guide you in weighing bases, clears, and adhesion promoters while keeping your workflow focused on the essential prep steps that underwrite success. Finally, while the next subchapter will broaden the discussion to societal, geopolitical, and environmental considerations, the energy invested in preparation—clean workspaces, proper ventilation, and careful waste disposal—remains foundational. The balance among cost, quality, and effort is not just a matter of dollars; it is a disciplined approach to materials sourcing and tooling that underpins every durable, professional-looking finish.
3. From Prep to Paint: How Societal Values, Global Contexts, and Environmental Ethics Shape Repainting Motorcycle Fairings
The lane between cleaning, sanding, and priming is rarely a neutral one. In the preparation phase, decisions ripple outward, weaving together how riders express identity, how markets move, and how resources are stewarded. Cleaning and sanding are not just routines to remove dirt and create a mechanical key; they are moments where broader concerns enter the workshop. Societal expectations around safety, durability, and aesthetics influence choices about materials and methods. A rider who values high visibility may demand coatings that retain brightness over longer periods, while a community of enthusiasts who prize authenticity might favor approaches that preserve the fairing’s original age and patina rather than erasing it entirely. These social currents shape not only the pace of work but also the standards of quality. When a crew aligns with professional practices—careful surface inspection, targeted repairs, and meticulous feathering of edges—the result is a finish that stands up under shared expectations for reliability on the road and in public view. This social framework also underpins the transfer of skill. DIY trends can democratize repainting, yet they often reveal gaps in technique. Those gaps become opportunities: the more a maker understands the need for a stable substrate, the more likely they are to invest time in proper cleaning, appropriate sanding discipline, and compliant surface preparation. The surface itself, though technical, carries cultural meaning; a fairing’s color and gloss are a way to tell a rider’s story, and the preparation process becomes part of that narrative rather than a mere prelude to a coat of paint.
Geopolitically, the readiness of the workstation is shaped by how supply networks deliver materials and how regional markets price them. The availability of plastics designed for high-flex or UV-stable finishes, compatible sealers for carbon fiber surfaces, and the range of cleaners and solvents can shift with treaties, tariffs, and cross-border logistics. In practice, this means riders may adjust their plans to accommodate what is readily obtainable nearby, increasing the value of local expertise and nearby supply chains. Domestic capabilities to repair or replace components, as opposed to importing whole parts, can buffer a repaint project against disruption and cost volatility. These dynamics also influence the decision to source certain materials locally or regionally, which in turn affects the environmental footprint of the process. A broad, global perspective on prep thus becomes a practical guide to predictability and resilience in a workshop routine.
Environmental considerations sit at the core of every brushing stroke and tack cloth sweep. The push toward eco-conscious practices is not merely about complying with regulation; it is about extending the life of fairings and reducing waste. Choosing low-VOC primers and water-based cleaners, where compatible with the substrate, minimizes airborne emissions without sacrificing adhesion. Sustainable sanding practices—managing humidity to reduce dust, using appropriate grits to achieve mechanical key without overprocessing, and trapping residues for safe disposal—underscore a commitment to responsible workmanship. Durable finishes that resist UV degradation, when paired with proper sealing of exposed carbon fiber or thermoplastic surfaces, translate into longer intervals between touch-ups and fewer replacements, alleviating environmental strain from production and disposal cycles. In parallel, the environmental calculus favors strategies that repurpose or re-face rather than discard. Repairing, refinishing, and reimagining a fairing’s surface, rather than swapping components, embodies a stewardship mindset that aligns with broader efforts to reduce waste and conserve resources. Even the small details—tack cloths, masking films, and the waste stream from solvents—benefit from mindful disposal and recycling where facilities permit. Taken together, these environmental choices reinforce a philosophy of craft that respects both the riding community and the planet it shares.
In sum, the preparation stage emerges as a convergence point for social meaning, global supply realities, and ecological responsibility. The way a person cleans, sands, and preps a fairing is a reflection of lived values—how a rider wants to be seen, how a project fits within local economies, and how a workshop embodies sustainable practice. As you map out your repainting sequence, weigh not only the technical steps but also the broader implications of material selection, sourcing, and waste management. Consider the path that balances personal expression with practical reliability and environmental care. If you’re seeking materials and options that align with these principles, you can explore the related category on our site for thoughtful, compatible choices. product-category/c62
Chapter 2: Chapter 2: Laying the Groundwork for a Pro Finish — Priming and Surface Preparation

1. Priming and Surface Preparation: Building a Flexible, Durable Foundation for Your Fairing Repaint
Priming is the hinge that holds a repaint together. For motorcycle fairings—often made of plastic or fiberglass—the primer must be both adhesive and flexible. It creates a uniform base that accepts paint evenly and helps prevent cracks as the fairing flexes with road vibration and temperature changes. The last step of preparation is not just about a smooth look; it’s about lasting color and a finish that won’t peel or craze with time. Begin with the groundwork you already established: a thorough wash with warm, soapy water to remove dirt and oil, followed by careful inspection for scratches, cracks, or gouges. Any damage that could telegraph through the paint deserves attention. Repair those flaws before you prime, because primer will only magnify underlying irregularities if they’re left untouched. After repairs, the sanding stage resumes as a critical ally. Start with a grit in the 400–600 range on dry paper to remove gloss and loose material, then move to wet sanding with finer grits to feather repairs and blend them into the surrounding surface. The goal is a perfectly smooth canvas; a tack cloth sweep removes the last stubborn dust particles so nothing traps beneath the primer.
Choosing the right primer is more than a preference; it’s a material compatibility choice. Plastic fairings demand primers formulated specifically for plastic. Standard automotive primers often fail under the demands of flexible bodywork, leading to cracking, peeling, or loss of adhesion. If you’ve worked with fiberglass, you’ll likely rely on a filler to address deep scratches or small cracks before primer. Let the filler dry, then re-sand the area to a feathered edge, and proceed with priming. For ABS plastics, minor repairs can be stabilized with an ABS-specific repair approach before sanding and priming. These material considerations aren’t cosmetic; they keep the finish intact under UV exposure, heat, and rain.
The actual priming step benefits from a disciplined approach. Apply multiple thin coats rather than a single heavy layer. Light, even passes reduce the risk of runs and orange-peel texture. Allow drying between coats according to the product instructions—typically 10 to 30 minutes for tack-free dry, then another coat. The exact times depend on the primer system you’re using, so always follow the manufacturer’s guidance. After the final primer coat has dried, you’ll often perform a light wet-sand to knock down any orange peel and achieve a velvety finish. An 800-grit or finer paper is common for this stage, followed by a thorough tack-cloth wipe to ensure a dust-free surface ready for base coats.
Temperature and environment matter as much as technique. Work in a clean, dust-free area with steady temperature, ideally between 60 and 80 degrees Fahrenheit, to promote consistent cure and reduce the risk of moisture entrapment. Avoid rushing the primer; thin coats cure more predictably than thick layers. If you’ve seen professional references, they emphasize a methodical sequence—sanding, priming, sanding again, and then curing—because each layer builds a more durable bond for the subsequent color coats. In practice, this means allowing adequate time between coats and recognizing that a primer’s final cure may require a longer window before you proceed to base coat. Some sources advise a full cure window of 24 to 48 hours before topcoating, while others outline shorter intervals for tack-free surfaces, depending on the primer system used. The guiding principle remains the same: build a uniform, scratch-free foundation and avoid impatience.
Beyond timing, the surface you prime on matters. After initial sanding, if you’re repairing fragile areas, a light application of filler and subsequent feathering is essential before priming. This creates a seamless transition from repaired zones to the surrounding sheet and prevents obvious ridges under paint. After priming, a final smoothing pass with 800+ grit is recommended to eliminate any remaining texture while preserving the integrity of the primer. When in doubt, test your primer on a small scrap piece to verify adhesion and flexibility before applying it to the actual fairings.
A final note on practical guidance and learning from the field: the collective experience of seasoned painters underscores the benefit of learning from established methods and standards. For a consolidated overview of best practices, consult seasoned guidance on the best way to paint motorcycle fairings. Best way to paint motorcycle fairings. This resource reinforces the emphasis on thin coats, careful sanding, and proper cure times as the backbone of a durable, high-quality finish.
In summary, priming after meticulous surface preparation transforms a rough fairing into a stable foundation that breathes with the color and clear coats to follow. It is a precision step that determines adhesion, flexibility, and long-term durability, ensuring the final repaint resists wear and looks consistently smooth across the bike’s curves and contours.
2. Base Coat Mastery: Building the Color Foundation for Durable, Glossy Fairings
The base coat is more than a layer of color; it is the color foundation that determines depth, evenness, and the perceived richness of the final finish. When done with care, the base coat interacts with the clear layer to produce a durable, gloss-rich surface that can weather sun and road grime alike. For metallics, pearlescents, or candy shades, the orientation and consistency of the base coat become visible layers of depth, so maintaining steady technique and environment is essential. The choice between traditional solvent-based, waterborne, or one-component systems will steer your approach to viscosity, drying times, and spray technique, but the underlying principle remains the same: a clean, properly prepared surface, correct primer, and a well-executed color foundation set the stage for a flawless final look. A practical, real-world guide to this process can be found in experienced painters’ discussions on base coat application, including insights on consistency, spray patterns, and color control. Best Way to Paint Motorcycle Fairings. \n\nBefore any color is laid down, the substrate must be uniformly prepared and primed. The journey begins with a surface that is free of grease, wax, and debris, followed by a primer system designed for plastic fairings. A well-chosen epoxy or high-build filler primer improves adhesion and fills minor imperfections, while a compatible filler primer can address repairs without creating a texture that will telegraph through the base coat. After curing, a light scuff with 400–600 grit and a thorough dust-free wipe ensures a clean platform for color. The base coat then sits atop this foundation, and the handling of this layer is where technique translates into appearance. \n\nSelecting the base coat involves considering the color needs and the environmental realities of the paint shop. A solid color may benefit from a traditional base, while metallics, pearls, or candy shades demand careful pigment orientation to avoid blotching or uneven sheen. Waterborne bases offer lower odor and faster drying under proper ventilation, but require attention to temperature and humidity to prevent delays or appearance issues. Regardless of the system, maintain consistent reducer ratios and label each mix with color codes and lot numbers to minimize drift. The viscosity should permit a smooth, solvent-like flow from the gun without pooling; testing on a scrap panel is essential to confirm opacity, color depth, and leveling before touching the visible fairing. \n\nWhen it comes to application, the gun setup matters as much as the technique. A steady hand, a consistent distance—roughly six to twelve inches— and a perpendicular approach to the surface are crucial. Begin with light tack coats to establish color, then proceed with two to three additional wet coats to build opacity. Aim for about a 50 percent overlap on each pass to avoid streaks and ensure even coverage. For metallic and pearlescent colors, maintain a uniform spray direction and, if possible, complete the color application with the entire panel oriented to prevent reflections from revealing any halts in motion. Temperature and humidity should be controlled—65 to 75°F (18–24°C) and 40–60 percent relative humidity provide a predictable drying window and reduce the risk of solvent pop or texture defects. \n\nDrying and recoat times are not mere suggestions but essential constraints. Each coat should flash off within the product’s guidelines, and the next coat should be applied within the recommended recoat window. If a window is missed, scuff the surface lightly with 600–800 grit, re-clean, and proceed. After the final base coat, inspect for uniformity of color and depth across the entire panel. If shading or coverage is uneven, address it in the next coat or within the advised recoat window before moving to the protection of a clear coat. \n\nThe base coat sets the tone for everything that follows. It contributes to depth, helps control hue, and provides a reference for the final gloss and protection. Once the color foundation is satisfactory, and the panel is fully cured according to the product data sheet, you can proceed to the clear coat stage, where the true, chromatic life of the paint—brilliance, resilience, and depth—will emerge. In practice, meticulous color control, disciplined technique, and a clean work environment are as critical as any single spray pass. This foundation also supports future maintenance, dust resistance, and the long-term appearance of the fairings in everyday use. For further guidance on execution details and to compare practical approaches, consult the targeted guide linked above, which offers a grounded perspective on base coat application while maintaining a focus on durability and appearance.
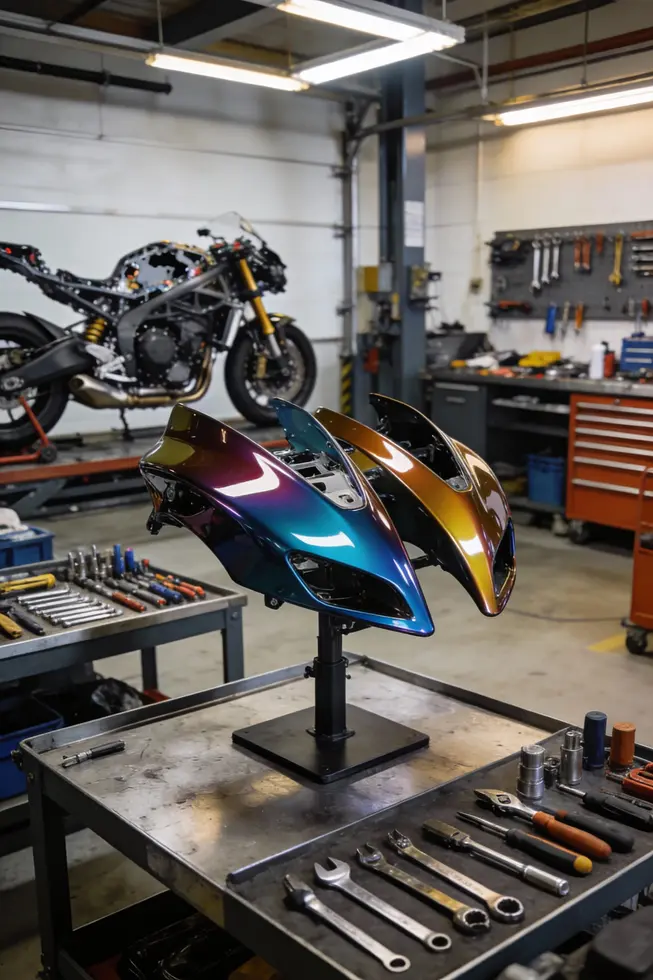
3. The Final Shield: Mastering Clear Coat, Finishing Touches, and Protective Layers for Long-Lasting Fairings
The repainting process comes to a close with the clear coat, finishing touches, and protective layers that determine whether a new paint job remains vibrant or fades under sun, rain, and road grit. This phase is less about color and more about durability, resilience, and practical beauty. The clear coat is not merely a glossy top layer; it is a critical shield that locks in the color, smooths imperfections, and guards against environmental onslaughts. When chosen and applied correctly, it adds depth, enhances the hue, and provides a forgiving surface that can absorb minor abrasions without revealing the underlying base. The key is to treat the clear coat as a performance layer. It should be formulated with UV absorbers to resist color fading, chemicals to resist humidity and ozone, and a formulation compatible with the resin system and the base coat underneath. A well-matched clear coat also contributes to durability on curved surfaces, where stress and stretching can otherwise lead to micro-cracks if the layer is too thick or poorly bonded. The practice of applying multiple, ultra-thin passes rather than a single heavy layer remains essential. Each sweep should be swift and even, with the spray head held at a consistent distance to minimize runs and sags. Between coats, a brief tack-time helps the solvent vapors escape and the surface to re-establish a uniform gloss. In this stage, attention to environmental conditions becomes crucible: a dust-free booth or a clean workspace, stable temperatures, and moderate humidity reduce the odds of dust nibs and solvent blushes that would mar the finish after curing. The result should be a surface that looks wet, yet never pooled or sagging, with an even gloss that flatters the fairing’s contours. Finishing is a broader craft than simply stacking coats. It involves deliberate management of the edge radii, corners, and joints where moisture can creep in and where color migration may occur over time. Here, edge sealing takes center stage. The idea is to seal the transition lines where panels meet and where fasteners tuck into the skin of the fairing. Without proper sealing, moisture can wick into seams, leading to micro-blistering, discoloration, or delamination as the paint ages. A common approach is to add a controlled, compliant layer over the edge, almost like a second skin, using an additional layer of clear or a dedicated edge-sealing compound that adheres to both the base coat and the clear coat. This technique helps maintain color integrity and abrasion resistance on corners and high-wear areas. A parallel strategy involves overlaminates or thin protective films that can be applied after the final clear coat cures. These laminates act as a sacrificial shield against abrasion from drag, wind-blown debris, and subtle scrapes from garage shelves or paddock contact. They also provide an extra barrier against moisture and chemical exposure, extending color retention and gloss. When choosing protective layers, compatibility matters. For carbon fiber components, UV-stable topcoats help prevent oxidation and yellowing, while thermoplastic fairings benefit from laminates that reinforce the surface against environmental stress. For every material, the goal is to maintain an even surface that keeps the color true and the finish resilient under temperature cycling. Finishing and protection demand consideration of long-term maintenance as well. Weatherable laminates and UV-stable chemistries minimize color drift and gloss loss over months to years. Yet, even with robust protection, regular care matters: gentle washing, avoiding harsh solvents, and periodic inspection for micro-scratches or edge lift. In race-oriented repaints, such as those designed for high-speed exposure, the finishing plan must balance aerodynamics with protection, ensuring that the glossy coat does not trap heat or trap abrasive particles on the leading edges. A practical takeaway is to treat the finishing stage as a layered defense strategy: the base color carries the depth, the clear coat provides the shield, edge sealing locks the seams, and protective laminates or films offer sustained resilience against the environment. For readers seeking a deeper dive into protective finishes and their installation, a focused resource on related coatings and compatibility can illuminate material-specific best practices. c64/c69 product category. As this chapter moves toward its practical conclusions, the emphasis should stay on integrating these protective steps with the earlier priming, base color, and finishing refinements, ensuring a coherent, durable, and aesthetically satisfying result across the fairing assembly.
Chapter 3: Chapter 3: How to Repaint Motorcycle Fairings — Finishing, Curing, and The Professional Process
1. Finishing with Precision: Innovations in Surface Preparation, Paint Systems, and Curing Methods
The finishing phase of repainting motorcycle fairings is where the promise of preparation and priming meets the science of coatings and the craft of application. This stage translates meticulous surface readiness into a durable, visually compelling result. Technological advances in surface preparation, paint systems, and curing methods have shifted the threshold between a good finish and a professional one. Today’s coatings economy hinges not only on the color chosen but on the fidelity of the underlying layers, the chemistry of the primers, and the conditions in which cure occurs. A modern approach treats finishing as an integrated system rather than a sequence of discrete steps. Every thin layer of color and clear coat depends on the previous ones behaving predictably under pressure from temperature, humidity, and the flex of plastic fairings. When these variables are managed with care, the paint system can achieve high gloss, excellent UV resistance, and long-term durability, even on the flexible substrates that fairings are built from.
The neutral starting point is a smooth, clean, and uniformly prepared surface. In the finishing mindset, this means more than removing dust; it means controlling texture, minimizing micro-m scratches, and ensuring the base is stable enough to accept a uniform reflection. Innovations in surface preparation emphasize precision feathering and controlled porosity. Fine sanding in the transition zone between repaired areas and surrounding paint creates an invisible seam that will disappear after priming and color layers. A tack cloth is not just a dust magnet; it is a diagnostic tool that helps verify that every fragment of lint is gone before primers are laid down. In this context, even moisture management and environmental stability become part of the finishing vocabulary. Temperature and humidity influence solvent evaporation and slow or accelerate cure times, so the workshop environment must be tuned to the coating system’s demands. This mindfulness ensures that the surface that finally receives color has the best chance to stay flat, smooth, and true to form over time.
Primer selection is another frontier where technology enhances outcomes. Plastic-specific primers are indispensable because they adapt to the flexibility of polymer fairings. These primers often include adhesion promoters and crosslinking chemistries that bridge the gap between plastic and paint. The idea is not merely to stick paint to plastic but to create a resilient, cohesive interface that resists micro-cracking during heat cycles and flexing under wind and rider stress. The primer’s job ends with a velvety finish after light wet-sanding, a preparation that helps subsequent color coats lay down evenly. The base coats are where color theory meets practical durability. Very light, even coats build a stable, uniform color field. The philosophy is to apply more thin coats rather than fewer thick ones, because each thin layer reduces the risk of runs, orange peel, and solvent bleed. In this context, the base coat’s pigment distribution matters as much as its adhesion to the primer. The result is a color that stays true under UV exposure and time, with a depth that reads correctly in natural light and urban fluorescence alike.
The painting itself follows a disciplined, multi-stage protocol. Each thin coat of color, guided by careful spray technique, contributes to a seamless visual field. The surface should appear evenly wet as it is applied, but never so liquid that gravity governs the flow. The subsequent clear coats do more than just add gloss; they seal in color and subtly improve scratch resistance and chemical resistance. A light tack coat precedes the first full wet coat, and a recommended cure window of 24 to 48 hours gives solvents and crosslinkers time to form robust chemical bonds. The number of clear coats is not arbitrary: three layers are a common threshold to achieve durability without sacrificing flexibility or clarity. Proper curing is a quiet, critical act. It demands patience, controlled airflow, and environmental consistency. Premature handling or exposure to dust, heat, or humidity fluctuations can compromise gloss and hardness, and even the best color can look dull if it hasn’t cured fully.
Beyond the craft, finishing embodies a spectrum of innovations that influence how professionals plan projects. UV-stable factors, lower-VOC formulations, and improved moisture resistance expand the conditions under which a fairing can be sealed and protected. The finish you see is the culmination of an integrated system: the surface that was carefully prepared, the primer that married plastic and pigment, the base coats that established color unity, and the clear coats that gave depth and resilience. The professional process is not solely about appearance; it’s about predictable performance, which reduces life-cycle costs and maintenance for the rider who depends on their machine. For those who want to explore compatible finishing tools and coatings, a practical starting point is to review the finishing tools category that aligns with the right substrate and curing approach: product-category/c63/c72/. This reference helps locate the equipment and materials that support the kind of meticulous control described here, keeping the project on budget without compromising quality.
As finishing becomes more technologically informed, the line between artisan work and scientific application grows thinner. The combination of precise surface preparation, plastic-specific primers, multi-thin coats of color, and deliberate curing creates a finish that resists wear, maintains gloss, and retains color over time. This is the essence of a professional repaint: a finish born from disciplined technique, modern chemistry, and patient timing. The discussion ahead in Chapter 1 will examine how these high-tech choices intersect with the economics of materials sourcing and tooling, grounding the finishing process in real-world considerations while still honoring its craft-rooted precision.
2. Finishing with Foresight: The Final Surface in a Global Supply Chain
Finishing is the final, visible shield of a motorcycle fairing, but it is far more than a cosmetic layer. It binds color to plastic and composite substrates, protects against UV exposure, chemicals, and abrasion, and demands a pace and precision that align with both craft and commerce. In this chapter, the finishing and curing phases are framed not as isolated steps, but as living parts of a broader system shaped by markets, regulation, and geopolitics. The choices painters make—from primers to clear coats—send ripple effects through cost, turnaround time, and risk exposure. A well-executed finish rests on the discipline of thin, even coats and the patience to respect drying and cure windows, yet those same decisions must be compatible with the availability of materials, the inequalities of global supply chains, and the regulatory environment that governs coatings use. Painters who master this balance can deliver durable, high-gloss results while maintaining reliability in the shop’s schedule and budget. For hands-on guidance that aligns with these principles, consider the practical walkthrough linked here: best way to paint motorcycle fairings.\n\nThe finishing workflow begins with the same meticulous surface preparation that underpins every professional repaint. After a thorough degrease and cleaning, the surface is inspected for pits, scratches, and texture irregularities. The goal is a uniform canvas that will not telegraph through the base color or clear. Priming and filling then build a smooth, gap-free foundation. When plastics are involved, primers chosen for adhesion to polymer substrates are essential. The primer layer is applied in multiple thin coats, each given time to flash off and cure enough to take the next without sagging or shrinking. Light, controlled wet sanding follows, smoothing any orange‑peel texture and ensuring a velvety base that accepts color evenly. The base coats are applied in very fine, successive layers. Rather than piling on pigment in a single pass, the painter builds depth and evenness, allowing the coat to dry between cycles so color consistency remains intact under varying lighting conditions. Metallics or special effects require added discipline; the spray technique must be calibrated to preserve particle distribution, depth, and the intended optical effect. The clear coat, often a multi-component system with UV inhibitors, crowns the color with a protective, high-gloss shield. A delicate tack coat helps reduce solvent pop and ensures gloss integrity once the full wet coats have cured. Depth, clarity, and scratch resistance hinge on the interplay of base and clear layers, making the sequence a critical determinant of long-term aesthetics.\n\nCuring completes the transformation. It can be air‑dry at ambient temperatures or accelerated through forced methods such as ovens or infrared systems. Each method carries its own demands: temperature and humidity must stay within manufacturer guidelines to avoid solvent entrapment, solvent evolution, or blush on the clear layer. The quality checks during and after curing are both mechanical and visual. Adhesion tests, hardness checks, and flexibility assessments guard against delamination, cracking, and brittleness. Post-cure finishing, including light wet sanding and polishing, reveals depth and removes any minor dust nibs that may have settled during the process. Importantly, curing is not merely a technical phase; it is a window into shop discipline. The environment—ventilation, temperature stability, and air quality—directly influences the final outcome and worker safety, especially when isocyanate-containing formulations or high‑VOC systems are in use.\n\nBeyond technique lies the professional process and shop operations that cradle finishing within a broader commercial frame. A seven-step workflow—prep, primer, color, effects, clear, cure, and finish check—encourages consistency across projects. Yet the real value emerges in standard operating procedures, meticulous masking, dust control, and a culture of inspection at every stage. Time and labor are cost levers shaped by the capacity to cure efficiently without compromising quality. The economics extend to material selection: primers and coatings are weighed not only for aesthetics but for compatibility with substrates, yield, and the tradeoffs between upfront cost and long-term durability. In this system, supply chains and regulation are not afterthoughts but guiding constraints. Regulatory regimes limit VOC content and dictate ventilation standards, while trade dynamics affect the availability and price of resins, pigments, and solvents. When disruptions occur, shops benefit from adaptable formulations, diversified supplier networks, and ready plans to requalify substitute materials without eroding finish integrity.\n\nGeopolitical risk further intensifies the need for resilience. Global dependencies mean a regional disruption can cascade into delayed shipments, price spikes, and tight turnarounds. Smart shops hedge against this by near‑shoring parts of the coating suite, maintaining strategic stockpiles of critical consumables, and developing test matrices to validate alternative systems quickly. The practical takeaway is clear: investing in robust curing capabilities, stringent surface prep, and diversified sourcing reduces rework, warranty risk, and downtime. And while premium finishes offer market differentiation, they also demand tighter QC and longer cycle times. In all, finishing and curing become a calibrated synthesis of craft, process discipline, and strategic foresight, where the pigment, the film, and the supply chain converge to deliver not just beauty, but durable performance in a shifting world.
3. Finishing and Curing as Craft: The Professional Process Behind Durable, Pristine Fairings and Its Social Footprint
Finishing marks the culmination of careful prep, color, and clear, turning a prepared surface into a durable, high-gloss shield for the fairing. After priming and light wet sanding, color coats are laid down in very thin, sweeping passes. Each coat should be allowed to flash for roughly 15 minutes; this pause lets solvents evaporate and the pigment settle, reducing texture and color bands. In metallics, technicians often introduce a low-pressure drop coat to align the flakes evenly, ensuring the light catches the surface uniformly. Between layers, a tack cloth removes fine dust and lint, leaving a surface that looks wet but won’t run. The clear coat then follows with equal care: a tack coat to seal the pigment, followed by two to three full wet coats, applied with a steady hand and a consistent distance to minimize runs, sags, and cratering. When these steps are executed with discipline, the finish emerges with depth, clarity, and resilience that lasts beyond a single riding season. The result is a surface that defies curb rash and UV degradation while maintaining a showroom-like likeness long after the ride leaves the lane.
Curing completes the transformation, and its importance cannot be overstated. The full cure typically spans 24 to 48 hours, dependent on the paint system and environmental conditions. A dust-free environment, stable temperature, and proper humidity are as critical as the application itself. Inadequate curing can leave soft spots, weak adhesion, or micro-runs that only reveal themselves under stress, such as vibration, heat, or sunlight. In professional settings, technicians tailor activator choices and cure temperatures to ambient conditions, maximizing cross-linking and hardness without sacrificing gloss or adhesion. This attentiveness to the cure is what separates a finish that looks good in a shop from one that endures through miles of road dust, rain, and cleaning rituals.
The professional process, though rooted in the DIY foundation, escalates precision through a structured sequence. Preparation extends beyond a simple wash and sand; it includes decal removal or protection, epoxy primers for plastics, and selective body filler where needed, all followed by block sanding to create a uniform canvas. Finishing relies on controlled base coats and multi-stage clear coats, often delivered with spray systems that yield uniform pigment distribution and controlled solvent evaporation. The spread of color and reflective depth hinges on consistent flash times, careful overlap, and a steady workflow that minimizes rework. These concerns extend beyond aesthetics: they govern durability and the fairing’s performance in the field. A good finish also conveys a professional ethos to clients and peers, signaling reliability and attention to detail that clients associate with value and safety.
This is where the social dimensions come into view. Finishing is as much about craft as it is about community expectations. The discipline required to apply thin layers, maintain dust-free work zones, and manage curing temperatures translates into transferable skills—surface craftsmanship, patience, and procedural rigor—that rally both hobbyists and professional technicians. Labor practices come into play through client collaboration, transparent timing, and a focus on quality rather than speed, ensuring that the final result honors the rider’s investment and the bike’s lineage. Sustainability considerations emerge from the choice of coatings, the efficiency of material use, and the responsibility of proper ventilation and waste disposal in the workshop. Thin coats minimize waste and exposure while maintaining UV protection and color stability. Public perception rewards finishes that stay true to color, clarity, and gloss despite exposure to the elements. A well-executed finish thus serves as both technical achievement and social signal—a point of pride for riders and a marker of skill within the broader community.
For readers who want to connect surface repair and finishing within the same skill spectrum, a practical companion reference is How to Repair Minor Bike Fairing, which offers approachable guidance on restoring a compromised shell before the final layers go on. How to Repair Minor Bike Fairing (link: https://bikeboxmt.com/blog/bike-repair/how-to-repair-minor-bike-fairing/) provides context that complements the finishing discipline described here. This subchapter, rooted in the finishing and curing sequence, reinforces how precision, patience, and stewardship—toward materials, environment, and community expectations—shape a fairing’s life on the road.
Final thoughts
A disciplined repaint process that starts with thorough cleaning and careful sanding, followed by targeted priming, controlled layering of base and color, and a deliberate curing regime, yields durable, showroom-ready fairings. For business owners, standardized steps translate into repeatable results, fewer returns, and clearer value for customers. The integration of a professional approach—from prep through curing—supports scalable production, aligns with OEM-quality expectations, and strengthens your shop’s reputation. By adopting the three-phase framework outlined in these chapters, owners can build a repeatable workflow that delivers consistent, high-margin results across multiple fairing projects.
Upgrade your ride with UltimateMotorX’s premium motorcycle fairings—durably crafted, precision-fitted, and stylish. Meeting OEM standards for easy installation, our collection suits upgrades or replacements. Shop now for fast shipping, secure checkout, and expert support. Give your bike the ultimate quality it deserves!
About us
At UltimateMotorX, we’re rider-founded experts in top-tier motorcycle fairings. We source premium materials, partnering with trusted manufacturers for perfect fits and durability. Enjoy expert advice, hassle-free returns, and seamless shopping. Ride with confidence—style and quality guaranteed!