
In the competitive landscape of motorcycle repairs and customizations, your painting services can define your business’s quality and reputation. Applying spray paint effectively to motorcycle fairings is not just an art; it’s a blend of preparation, technique, and high-quality materials that can lead to stunning results. Understanding the intricate process from proper preparation, selecting the right products, applying techniques, finishing touches, and safety measures lays a strong foundation for achieving a professional finish. As business owners in this niche, mastering these elements will significantly enhance the value you provide to your customers and set your services apart in the market. This guide will break down each crucial aspect of motorcycle fairing spray painting, providing you with comprehensive insights and actionable advice.
The Hidden Foundation: Precision Prep for a Pro-Grade Motorcycle Fairing Finish
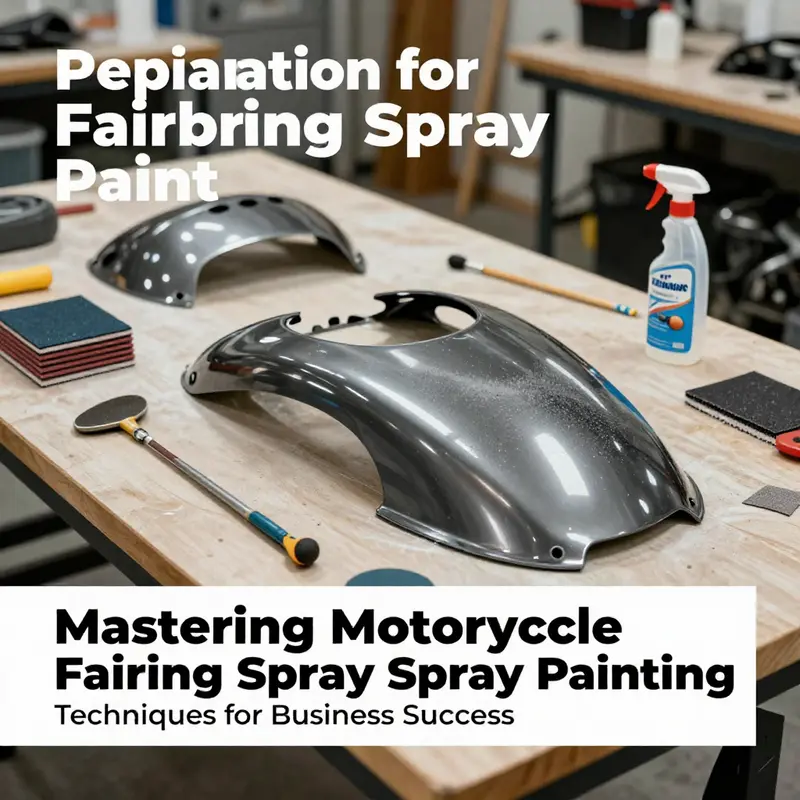
A motorcycle’s fairing can gleam as if carved from glass, yet the outcome hinges on what happens before a single drop of color meets the surface. The unseen work—the patient, methodical preparation—determines whether the final paint job resists chips, UV fade, and weathering, or falls prey to pinholes, runs, and orange-peel texture. Think of preparation as the quiet craftsman who prepares the stage for a show. When the stage is pristine, the color speaks with clarity, depth, and durability. In the world of motorcycle customization, preparation is not a step to rush; it is the discipline that separates a casual repaint from a pro-level transformation. The principles here are practical, repeatable, and outcome-driven, guiding the reader through a sequence of decisions that affect adhesion, finish quality, and long-term performance.
The journey begins with cleaning, but not with a casual wipe. A high-quality degreaser or automotive cleaner is applied to every inch of the fairing, and the surface is treated in small sections to avoid recontamination. Oils, waxes, and silicone residues are the villains here, capable of creating a barrier that repels primer and paint alike. A lint-free microfiber cloth becomes a trusted ally, moving in deliberate, overlapping strokes that minimize dust pickup and drag. The goal is to remove contaminants while preserving the underlying plastic or composite substrate. This initial step, if performed with care, clears the path for the subsequent bond between the surface and the coating system. In a sense, cleaning is not just preparation; it is the decision to let the coating system breathe and adhere as it should.
After the surface is clean, the next phase is abrasion. Light sanding with a fine grit, typically in the 400–600 range, creates a purposeful texture—what professionals call a tooth—that the primer can grip. It’s not about removing material; it’s about shaping the surface to receive the coating. The operator should keep the sanding uniform, moving with the curvature of the fairing rather than toward any rigid edge. Once the initial pass is complete, a careful inspection follows. If any deep scratches or glossy patches remain, a subsequent pass with a slightly finer grit—ranging to 800–1200—helps to smooth those imperfections and minimize visible sanding marks under paint. The finer the finish at this stage, the less sanding will be required after priming, reducing the risk of dulling the edge lines and compromising sharp color separation later in the process. After sanding, a tack cloth is used to remove the fine dust that can otherwise trap between layers. This step is small, almost austere, but it keeps the entire workflow honest and predictable.
Masking and protection form the next quiet pillar of the procedure. The objective is to isolate every area that should not receive color while preserving crisp edges and safe margins around lights, mounts, and trim. High-quality masking tape and protective sheeting are employed with care, applied along edges where paint could creep or bleed. Tape is laid down smoothly to prevent lift, and corners are double-checked for any potential gaps. The protection plan should extend beyond the obvious planes to cover small releasable components that could trap dust or contaminated air. This stage is less about courage and more about precision: a little extra tape here and a touch more plastic there pays off when the color glides on evenly and the final lines look sharp and defined.
Environmental control is the quiet factor that often determines whether the finish is flawless in practice, not just in theory. A clean, controlled space—free from direct sunlight, dust, and airflow disruptions—helps ensure that dust particles don’t settle into tacky paint. Temperature plays a pivotal role. The ideal range is roughly 20–25°C (68–77°F), with relative humidity between 40% and 60%. In such conditions, solvent evaporation proceeds at a steady rate, allowing the coating system to flow, level, and dry without stress. Large doors or windows should be managed to minimize drafts that can lift masking film or deposit new dust. In practice, this environment doesn’t just minimize defects; it also reduces the time spent waiting for coats to cure, since consistent conditions shorten the flash-off windows between passes. For hobbyists working in garages or sheds, a few simple environmental controls—such as a portable heater or fan-assisted filtration and a shielded work area—can make a tangible difference in the final result.
Before even loading color into a gun or can, a final surface check is essential. The surface is illuminated with bright, neutral light to reveal any missed dust fibers, tiny scratches, or fingerprint residues. The unseen will become visible under the glare of a work lamp, and those flaws must be addressed before any paint touches the surface. Wiping again with a tack cloth ensures the scene is clean and smooth. It’s this attention to the final inspection that keeps the process honest and predictable. Skipping this check can mean discovering a hidden flaw only after the color has been applied, which may require costly, time-consuming corrections later.
With the surface prepared, primer becomes the bridge between bare plastic or ABS and the color coat. The primer chosen should be compatible with plastic substrates, providing adhesion, a uniform base, and a slight bite that helps subsequent coats flow. The primer’s job is not merely to fill; it should also contribute to a uniform surface that yields consistent color saturation across the fairing. After spraying or brushing on primer, a light wait allows the film to become tack-free and cure to a touch-stable state. The decision to sand lightly between primer and color is nuanced and relies on the primer’s own instructions, but many professionals perform a gentle scuff with a very fine grit to smooth any fine irregularities and then wipe down with a tack cloth before color application. This not only improves the immediate color laydown but also reduces the risk of micro-scratches telegraphing through the paint in the clear coat stage.
The sequence described—clean, sand, mask, control the environment, inspect, prime—builds a foundation that supports predictable, repeatable results. It is tempting to rush from cleaning to color, chasing the glossy look of a new fairing, but the finish will be compromised if the surface does not present the right conditions for the paint to adhere and level. The beauty of a pro finish emerges not from a single flawless coat, but from the cumulative effect of meticulous steps that each contribute to a smooth, even film. When the preparation is sound, the color coats tend to apply with even coverage, minimizing the risk of sags and low spots that undermine the perceived depth of the color and the clarity of the lines. Even the choice of thinning—a factor that influences viscosity, atomization, and flow—benefits from the confidence that a well-prepared surface inspires. The painter who understands how the surface will respond to thinner or different spray pressures will achieve consistent results across all coats. In this sense, prep is a form of investment: a small, disciplined routine now yields a higher return in the final appearance and durability of the finish.
As the chapter draws toward its careful close, one practical note threads through every step. The preparation phase must be treated as a recurring ritual whenever a fairing is repainted or touched up. Even a minor rework can be made more straightforward if the new paint is laid on a surface that has not become powdery from neglect or contaminated by previous coatings. The habit of thorough cleaning, proper abrasion, and disciplined masking becomes part of the workflow, not a one-off effort imposed by necessity. For readers seeking to extend their study beyond these principles, the following resource provides a broader, visually guided approach to the entire painting process, from priming to finishing, and reinforces the idea that preparation anchors every successful paint job. fairings category.
In sum, preparation is the quiet architect of a superior finish. It shapes how color sits on the surface, how even the coat thickness remains across complex curves, and how well the paint resists the elements once the bike is back on the road. This is the foundation that supports every subsequent decision about color, clear coats, and edge definition. When done with care, it turns a routine spray into a durable, showroom-worthy finish that can withstand the rigors of riding, cleaning, and time. For readers who want a deeper, image-rich, step-by-step exploration of the entire process—priming, painting, and finishing—consider the comprehensive guidance offered by established automotive publications that illustrate the nuances of technique and bodywork compatibility. For further reading, see Car and Driver’s motorcycle fairing painting guide.
From Prep to Perfection: Mastering Spray Paint Application for Motorcycle Fairings

Spray painting motorcycle fairings blends science with craft. A pro finish emerges when preparation, masking, and controlled coating follow a disciplined rhythm. The aim is a durable, glossy surface that withstands wind and road debris. Key principles appear in every reliable guide and in hands-on practice: thorough prep, careful masking, and patient curing. When these align, a fairing’s color enhances its curves with depth, protection, and lasting gloss. This chapter walks a practical path from clean canvas to showroom gloss, tailored to modern plastics and home-shop realities.\n\nSurface preparation is the hinge of the process. Start with a clean surface—oil, grease, wax, and dirt must be removed. A professional degreaser helps break down residues that soap and water leave behind. After cleaning, lightly sand with 400–600 grit to give the primer a bite without rounding edges. Sand evenly, avoiding gouges, then wipe with a tack cloth to remove the dust. Skipping this step invites adhesion problems that show up early in the finish.\n\nMasking comes next. Protect frames, engine casings, wheels, mirrors, lights, and trim with high-quality masking tape and sheets. Clean tape edges and remove bleed with careful masking; this reduces post-paint touch-ups and yields crisper lines.\n\nPriming follows masking. The primer improves adhesion and guards against corrosion. Apply 2–3 thin coats, at 15–20 cm distance, letting each coat dry 15–30 minutes. Expect a matte, bite-like surface ready for color.\n\nColor application requires a steady hand and a light touch. Maintain 15–20 cm distance, use long overlapping passes, and avoid heavy coats. Between coats, allow 1–2 hours of drying time in typical shop conditions. Two or three light coats often yield the best depth and even color.\n\nClear coat adds gloss and UV protection. Apply 2–3 thin layers after the color has cured, allowing solvents to flash between coats. The final coat should be glossy, resilient, and smooth.\n\nCuring and finishing happen in a controlled space: around 20–25°C with 40–60% humidity. Full cure usually takes at least 24 hours. If minor imperfections linger after curing, a gentle dry sanding and polish can restore luster without tearing the clear coat.\n\nSafety matters: work in a well-ventilated area and wear PPE. Use a respirator, gloves, and eye protection. A dust-free booth or sheeted space reduces dust nibs and helps you achieve a showroom finish.
Choosing the Right Paint System for Motorcycle Fairings: Durable, Flexible Finishes for Real-World Riding

Choosing the right paint system for motorcycle fairings goes beyond color choice. It is a practical decision that blends chemistry, surface science, and the realities of riding. In 2026, riders expect finishes that resist sun, fuel, and abrasion while staying flexible enough to tolerate the constant flexing, vibrations, and temperature shifts of a high-performance bike. The goal is a finish that looks true, lasts, and can be touched up without a full repaint if a stone or a spill briefly disrupts the surface. This chapter unpacks how to choose the right product system—from resin chemistry to the final clear coat—and explains why the correct combination matters for a plastic fairing and a rider’s long-term satisfaction. It also weaves in practical work flow so the discussion remains grounded in what actually happens in a shop, a garage, or a dedicated paint booth on a weekend project.
Surface preparation anchors the entire process. No primer or topcoat can overcome a surface that has not been properly prepared. Begin with a thorough cleaning using a degreaser to remove oils, wax, and fingerprints. Oil residues and silicone from polishing compounds can sabotage adhesion, so spend extra time on difficult contours, fasteners, and edge lines where films tend to lift. After cleaning, lightly sand the surface with fine-grit paper, typically 400–600 grit, to create a micro-roughness that gives the primer something to bite into. A tack cloth then wipes away dust and lint, ensuring the primed layer sits down clean. For ABS and other plastics, selecting a primer designed for plastic substrates is essential. Primers for plastic not only improve adhesion but also bridge slight surface inconsistencies and heat cycling that occur when a fairing heats in the sun or during high-speed riding.
With the surface prepared, the paint system choice comes into sharper focus. Modern riders and technicians emphasize two-part polyurethane or epoxy-based paints for fairings rather than conventional single-component acrylics. Polyurethanes strike a balance between hardness and flexibility, helping to resist microcracking that can result from panel flex or impact. Epoxies deliver excellent adhesion and chemical resistance, which is valuable on surfaces subject to gasoline splashes, cleaning solvents, and road grime. The overarching message from 2026 is clear: standard acrylics age poorly under sun, heat, and fuel exposure and can fade or peel despite a perfect color match in a controlled setting. Two-part systems, when properly mixed and applied, provide the durability and forgiving characteristics that real-world riding demands.
Deciding between polyurethane and epoxy depends on how the bike will be used and how you plan to maintain the finish. A two-part polyurethane system paired with a robust clear coat typically offers the best all-around performance for street and track riders. It excels in UV resistance, impact resilience, and gloss retention while maintaining enough flexibility to endure long rides and weather changes. Epoxies, properly finished with compatible topcoats, can excel in environments with aggressive chemical exposure or where very high hardness is prioritized. Either option must be compatible with the primer and topcoat to prevent delamination, blushing, or gloss loss over time. The core rule remains: a mismatch between primer, base coat, and clear coat is the leading cause of late-stage failures, and it undermines even the strongest color or the most flexible resin.
Primer choice deserves equal attention. Plastic primers designed for ABS and other fairing plastics create a uniform base and improve adhesion for the color layer. They can help level minor surface imperfections and minimize texture differences across complex curves. After primer cure, a light sanding and a tack wipe are common before applying the color. This ensures the color coat has a consistent surface to grip and reduces the risk of texture differences showing through the final finish. The primer layer also serves as a moisture barrier and helps stabilize the surface against humidity when stored or transported, both of which matter for a fairing that might be painted in a non-ideal environment.
Mixing and thinning are more than routine steps; they shape the spray behavior and the final appearance. The recommended thinner amount, specified by the paint system you choose, governs cure speed, film thickness, and flow. Too much thinner dilutes the color film excessively, risking poor coverage and runs, while too little can cause clogging and stubborn orange peel in both air and pressure-driven spray systems. Whether you’re using an HVLP spray gun or a quality aerosol can, the aim is to achieve smooth, uniform atomization. Maintain a steady motion and keep the nozzle moving to prevent pooling. Typical practice involves light, overlapping passes from an eight- to twelve-inch distance, allowing each coat to flash for roughly ten to fifteen minutes before the next pass. The recommended approach is at least two to three slim coats rather than one heavy application; this yields deeper color with less risk of sagging and ensures a more uniform final gloss.
The topcoat is where color protection, UV resistance, and scratch resistance come together. After the color has fully cured—usually around twenty-four hours—a clear topcoat adds years of protection. The topcoat should be compatible with the base color system and designed for the same substrate. A proper clear layer protects against UV degradation and minor abrasions while preserving the color’s depth and clarity under sunlight. In many cases, a multi-coat clear system can deliver a deeper, glass-like finish, but it demands careful control of cure times, environmental conditions, and surface cleanliness. If any edge or seam shows a slight haze or micro-scratches in the clear, re-evaluate adhesion between layers and ensure that each stage performed under recommended conditions.
Environment plays a critical supporting role. A well-ventilated workspace with appropriate respiratory protection keeps fumes manageable and reduces exposure. Temperature and humidity influence solvent evaporation and cure behavior; too much humidity can cause solvent popping or blush on the clear coat, while excessive heat can accelerate cure to the point of reduced flow and poor leveling. A consistent workflow—clean surfaces, correct primer, matched base, and a well-timed clear coat—helps achieve predictable results across panels. The goal is a uniform film with consistent depth and a finish that remains smooth to the touch across the fairing’s curves and edges. The best results come not from a single trick but from disciplined adherence to the sequence and an attention to how the finish looks in natural light as it ages.
Beyond technique, the choice of products must be informed by understanding what each component does. The resin chemistry determines the finish’s flexibility and long-term resilience, the primer ensures adhesion and surface integrity, the base color provides the hue and depth, and the clear coat delivers protection and the final sheen. The interplay among these layers is what makes a finish look cohesive across all panels and lighting conditions. It is not enough to pick a color you love and a spray pattern that feels easy in the shop. A durable finish on a bike requires a compatible system that responds predictably to sun, rain, fuel, and the wear of the road. Attention to edge treatment—careful masking along panel joints and around fasteners—reduces the risk of overspray creating unintentional texture changes in visible seams. If you work on more than one fairing model, plan for minor adjustments in primer or topcoat compatibility to accommodate curvature and material thickness so that panels still blend visually when assembled on the bike.
For readers who want a deeper dive into product selection, datasheets, and how to interpret labeling for performance characteristics, industry guidelines offer a valuable frame of reference. The Motorcycle Mechanics Institute (MMI) Paint Application Guidelines for 2026 provide field-tested specifications, performance data, and practical notes from technicians who spray fairings in real workshop settings. These guidelines help translate the chemistry into actionable steps—cure times, recoating windows, and environmental controls—that align your choices with proven practices and reduce the need for trial and error. While the guide is technical, it reinforces the practical rule that preparation, primer compatibility, and topcoat selection determine the real-world durability of the finished paint job.
To connect this technical discussion to a practical starting point, consider browsing a relevant fairing category as a reference for fit and surface treatment behaviors across models. For instance, exploring the Honda fairings product category offers a sense of the variety of panels and surface finishes that professionals contend with when preparing for paint, and it provides a concrete example of how surface quality and consistent panel tolerances influence the final look. You can explore this category here: Honda fairings product category.
In summary, choosing the right paint system for motorcycle fairings in 2026 hinges on a disciplined approach: start with meticulous surface preparation, select a compatible two-part resin system suited to plastics, and finish with a compatible topcoat that provides UV and impact resistance while preserving flexibility. The finish that endures is not a matter of a single clever technique but the sum of careful decisions at every stage, from the initial degrease to the final gloss. When done well, a fairing’s color and depth will remain stable across seasons of riding, resists the elements, and remains reparable with a light touch-up or panel replacement should the need arise. This is the essence of a pro-level result that riders rely on as much as the performance of their machines. For further guidance on application timing and curing, consult the MMI Paint Application Guidelines 2026: https://www.mmi.edu/motorcycle-maintenance/paint-application-guidelines-2026
Polishing to Perfection: The Finishing Touches That Elevate Motorcycle Fairing Paint

The true measure of a professional paint job on motorcycle fairings is not only the color and coverage, but what happens after the last color coat when everything bends toward perfection. The finishing touches are the quiet, deliberate steps that transform a good result into a showroom-worthy finish that can stand up to UV, weather, and the inevitable daily ride. They require patience, attentiveness, and an understanding that curing, smoothing, and protection are not afterthoughts but essential parts of the process. When done correctly, these steps lock in the color, reveal depth and clarity, and create a surface that gleams with a glassy, almost liquid honesty that makes the eye linger rather than just glance away.
First comes the long, patient curing. The final clear coat is the guardian of your hard work. Immediately after application, the painted fairing should be allowed to dry in a well-ventilated space at a stable temperature. In practical terms, you’re looking at a surface that begins to set within 24 to 48 hours at room temperature, ideally around 20 to 25°C, with a humidity range that stays roughly between 40 and 60 percent. But true strength and hardness emerge only after the full chemical cure has run its course, which can take days to weeks. Rushing this stage is a common mistake. A premature touch risks imprinting fingerprints of heat, moisture, or oils that can compromise adhesion and gloss. The patience pays off with a surface that resists scratching, stands up to UV exposure, and holds color without chalking or fading. Consider this curing window not as a pause, but as the quiet foundation of longevity and resilience you’ll rely on long after the fairing leaves the spray booth.
Even with thorough curing, most finishes benefit from a careful refinement. Optional wet sanding between coats or after the clear coat has flashed can address minor imperfections that small dust nibs, micro orange peel, or faint runs might leave behind. If you decide to pursue this, prepare very fine abrasive paper in the 1500 to 2000 grit range, and work with a light touch. The goal is not to cut away the color or flatten the gloss, but to remove aberrations at the microscopic level while keeping the texture uniform. Soaked in clean water, keep the surface consistently wet, and use a soft hand and a gentle motion. The moment you sense the pad or sandpaper beginning to grind, stop. Check the surface under good lighting; if no flaws remain, proceed to the next stage. If you’re content to skip this step, that is a valid choice too, provided the prior coats delivered a uniform, smooth finish and the topcoat cured cleanly.
Polishing follows as the centerpiece of the final aesthetic. This is the stage where a dull or merely glossy surface becomes a true mirror. The sequence is deliberate and repeatable, designed to remove the last vestiges of imperfection while maximizing depth and clarity. Begin with a clay bar treatment to lift contaminants that linger in micro-pores or cling to the paint surface. Even minute residues from the environment, such as industrial fallout or tree sap, can質 hide within the finish and disrupt light reflection. Running a clay bar over the surface at low pressure yields a remarkably smooth canvas. After clay, switch to a cutting polish to aggressively erase any remaining fine scratches from wet sanding and to further refine the surface. The idea is to level the finish so that light can reflect evenly across every contour of the fairing.
Next comes the finishing polish, the gentler, precision step that extracts maximum depth and clarity from the color. This stage is where the gloss truly pops. A high-quality finishing polish removes micro-micro scratches and fosters a smooth, glass-like surface that is a joy to touch and behold. The polishing itself should be performed with a dual-action polisher or a careful hand technique, using appropriate pads and consistent, moderate pressure. The goal is uniform motion and even heat distribution to avoid heat spots that could create holograms or swirl marks. Throughout, monitor the surface under bright light to ensure there are no swirls or hazing left behind. If imperfections appear, rework the area with a light pass of the finishing polish rather than applying more aggressive compounds, which can transfer new scratches.
With the surface polished, the most visible sign of craftsmanship often arrives in the form of protection. A protective coating—whether a high-quality sealant or a wax layer—serves not just to enhance shine but to shield the paint from UV rays, water spots, and minor abrasions. A sealant fills the micro-pores of the cured paint, increasing surface slickness and making future cleaning easier. It bonds chemically or physically with the surface and provides extended gloss retention, particularly in humid or sun-rich environments. If you choose a wax, you gain a deeper, warmer glow and a sacrificial barrier that can be appealing for certain color tones, especially on darker schemes. However, waxes require more frequent reapplication than sealants and can be less durable against exposure. The choice between sealant and wax is less about right or wrong and more about climate, maintenance tolerance, and the aesthetic you want.
All these steps—from the initial cure to the final protective layer—are interconnected. The readiness of the surface for polishing depends on how clean the surface was prepared earlier in the process, how evenly the coats were applied, and how carefully the color and clear coats cured. The depth of color is a direct outcome of the polish strategy, and the final protection is only as strong as the surface’s readiness to accept it. The glossy look you chase is not a miracle of one single motion but the result of a series of well-executed steps that respect the physics of light and the chemistry of coatings. Achieving that showroom-like lustre demands discipline: maintain consistent temperature, keep your workspace free of dust, and manage humidity to avoid fogging or solvent issues that can cloud the finish.
The finishing touches also have practical implications for maintenance and longevity. A properly cured and polished surface resists micro-scratches more effectively and is easier to wash without introducing new marring. When cleaning, use mild cleaners and soft, non-abrasive cloths. Avoid aggressive scrubbers that can disrupt the protective layer or disrupt the smoothness you have worked so hard to achieve. Routine maintenance becomes a simple, satisfying ritual: a gentle wash, a quick dry, a light buff if needed, and a fresh coat of sealant or a wax layer on schedule to keep the gloss vibrant. This mindset shifts the finish from a fragile photograph to a durable, dynamic surface that stands up to the realities of riding, weather, and time.
For riders who are pursuing a tailored finish on specific fairing shapes or materials, it is worth acknowledging the potential variations in texture and adhesion across plastics such as ABS and other composites. The principles of curing, sanding, polishing, and sealing remain consistent, but the nuances—how a particular contour catches light, how a resin feels under a buffing pad, or how a given clear coat adheres to a certain substrate—can influence the exact technique and tools chosen. When you approach a fairing project, consider the shape, texture, and thermal exposure of the panels, and adapt your polishing technique to maintain even pressure and heat control along radii, curves, and edges. If you’re exploring options for different models and bodywork configurations, you may find it valuable to explore the broader category of Honda fairings to understand how color and finish interact with varied contours and mounting details on a representative range of models. The Honda fairings category can offer practical context for how finishes behave across a spectrum of popular shapes, helping you anticipate challenges you might face on your own build: Honda fairings.
The finishing cadence—cure, refine, protect, and maintain—turns a spray-painted surface into a durable, expressive statement. It is tempting to view the final steps as cosmetic, but in truth they are foundational. They determine how the paint behaves under sun and rain, how easily it can be cleaned, and how long its depth and clarity endure between sessions of love and use. The finish is a lasting signature of care, a testament to the craft of the ride’s most visible frame. When the work is done with care, the result is more than color on plastic; it is a tactile, visual, and protective layer that respects the fairing’s form and the rider’s pride. The eye catches the depth, the hand feels the smoothness, and the bike feels prepared for the road and for the moment when its paint catches the light just right.
For readers who want a more visual, step-by-step exploration of these finishing techniques, a comprehensive guide with demonstrations offers practical depth and real-world nuance. It complements the detailed cadence described here and illustrates how these principles translate into a pro-level finish across various fairing layouts and lighting conditions. See the GoMotoTrip guide for an illustrative walk-through of painting motorcycle fairings like a pro: https://www.gomototrip.com/how-to-paint-motorcycle-fairings-like-a-pro/.
Breathing Easy in the Workshop: Safety, Environment, and Skill in Motorcycle Fairing Spray Paint

Painting motorcycle fairings is a craft that blends artistry with chemistry, and the best results come only when safety and stewardship sit at the center of every step. The surface preparation and color work you read about in guide catalogs are important, but without a vigilant approach to health, safety, and the environment, a glossy finish can become a risk to you, your space, and the surrounding world. This chapter threads those concerns into a seamless narrative, showing how a pro-level paint job in 2026 can be both immaculate and responsible. It begins with the most basic premise: the air you breathe and the materials you handle matter every bit as much as the color you aim to achieve. When you follow the preparation steps—cleaning, degreasing, light sanding, and priming—you are setting the stage not just for adhesion but for safer work practices. Cleanliness reduces the amount of solvent evaporating into the air and diminishes the chance of recontaminating the surface, which in turn lowers the need for aggressive corrective actions later. Yet cleanliness is only the beginning. The environment where you spray and the gear you wear determine how clean the final result will be in both appearance and durability.
Ventilation is the first line of defense. A well-ventilated area or a spray booth equipped with a proper exhaust system is essential to carry away volatile compounds that are emitted during spraying. The risk of inhaling solvent-rich aerosols is not just a nuisance; it can lead to headaches, dizziness, and longer-term respiratory effects with repeated exposure. The goal is a steady, directional airflow that removes fumes without creating strong drafts that push overspray into unintended areas. In a workshop without a dedicated booth, opening doors and windows is not sufficient. You want controlled ventilation that includes filtration to reduce particulates and an exhaust path that directs air away from you and any nearby occupants.
Alongside ventilation, personal protective equipment forms the second pillar of safe practice. A respirator with organic vapor cartridges is a must when working with spray paints and solvents. The cartridges must be compatible with the specific solvents used, and you should replace them according to the manufacturer’s guidance or when you notice increased odor or fatigue. Safety goggles shield the eyes from fine paint particles and chemical splashes, while chemical-resistant gloves protect the skin from prolonged contact with solvents and primers. The hands in particular are a workhorse in this craft, and choosing gloves that balance dexterity with chemical resistance makes a big difference in the quality of your spray technique. PPE is not optional gear; it is a functional extension of your craft, helping you maintain steady hands and clear focus across each pass of the spray gun.
Environmental conditions in the workspace also demand discipline. Wind is the enemy of a controlled finish, since gusts can carry overspray to unintended surfaces and even into the surrounding environment. A sheltered area or a proper spray booth minimizes this risk. Temperature and humidity levels influence drying times and the behavior of coatings. If the air is too cold, the solvent may dry slowly, promoting runs and sags. If it’s too hot or dry, the surface can flash too quickly, leading to orange-peel texture. The rule is simple: maintain a stable, moderate environment to give each coat the chance to flatten and level before the next pass. This steadiness matters not only for aesthetics, but for the integrity of the adhesion between primer, color, and topcoat. You can feel the difference when you spray in a controlled environment versus an improvised corner where air currents do the work for you instead of your technique.
Waste management is the third core topic that often sits unseen until a spill or clog forces a pause in the workflow. Empty paint cans, used rags, solvent containers, and masking materials are all considered hazardous waste in many jurisdictions. The correct approach is to segregate waste streams, store them in labeled, sealed containers, and arrange for compliant disposal through local hazardous waste channels. A common mistake is to pour leftover paint or thinner down a drain or into regular trash. That practice contaminates water systems and soils and can lead to penalties or cleanup obligations far exceeding any savings from a hastily disposed batch. The responsible path is to keep waste organized, minimize the quantity of solvent used, and plan finishes in a way that reduces remnant materials. For those who take the craft seriously, part of the process is also about keeping the workspace clean as you work—drying racks for spray equipment, solvent-soaked rags placed in closed metal containers, and a tidy floor that prevents slips when solvents are present.
The environmental considerations extend beyond immediate safety to the broader impact of spray painting on air quality and ecosystems. Modern practice increasingly favors low-VOC and water-based paints because they dramatically reduce emissions of hazardous air pollutants without sacrificing performance. The shift toward these formulations translates into easier compliance with local environmental rules and, in many cases, less stringent ventilation demands than traditional solvent-based coatings. It also makes cleanup simpler when you are using water-based products, though it is not a license to become lax about containment. Water-based cleaners can still carry contaminants that must be treated responsibly, and even when using low-VOC formulations, you should minimize the generation of waste and ensure that waste streams are properly handled. The goal is a finish that holds up to UV exposure and weathering while keeping the surrounding air safer for you and your neighbors.
Cleanup practices, too, reflect a commitment to stewardship. After finishing, rinse brushes and spray equipment with the appropriate cleaner. If you are using water-based paints, water-based cleaners are preferred, reducing the need for harsh chemical solvents. If solvent-based paints are part of your toolkit, use the minimal amount of thinner necessary for a smooth spray pattern, and capture any runoff. Spent thinners and used solvent waste should never be poured down drains; they require proper collection and disposal. These practices protect the drain network, soil, and waterways and support long-term environmental health around your workshop.
The interconnectedness of these considerations becomes clearer when you view the process as a continuum rather than a sequence of isolated steps. The initial surface preparation you perform—degreasing, sanding, and tack-wiping—not only primes the fairing for adhesion but also reduces the likelihood that you will need to sand and repaint due to poor base cleanliness. A clean base coat adheres more reliably, reducing defect rates and by extension limiting the frequency of rework and solvent use. The exacting discipline you bring to each pass with your spray gun—light, even coats, appropriate distance, and mindful flash times—also correlates with material efficiency. Fewer runs, less waste, and a more uniform film all contribute to lower solvent consumption and a smaller environmental footprint over the life of a project. This integrative thinking marks a shift from merely painting to practicing sustainability within a craft that has traditionally depended on potent solvents and aggressive finishes.
In addition to the practical steps, it helps to bring into view a broader reference point for responsible painting: the way professionals balance performance with environmental responsibility. The field is moving toward formulations that maintain color fidelity, cure properties, and protective capabilities while reducing volatile emissions. The ethical aspect of painting is not simply about staying out of trouble with regulators; it is about sustaining the conditions that allow this craft to flourish for years to come. It means planning for efficient waste management, investing in proper PPE, and choosing materials that minimize emissions without compromising the look and durability you expect from a professional finish. It also means communicating these values to fellow riders and hobbyists, sharing how to achieve a pro-level result with a conscientious approach to air quality and waste.
For those who want practical inspiration that ties together gloss, texture, and ethical practice, consider exploring the broader world of fairing customization and the ways other builders approach compatibility and finish. A relevant reference point in this space is the BMW fairings category, which presents a broad spectrum of styling options that can be refreshed with careful color work while maintaining a disciplined approach to environmental safety. This resource can provide a sense of how different panels and shapes respond to variation in texture and gloss when you apply your chosen finishing scheme, all while staying mindful of the safety and environmental considerations discussed here. BMW fairings category.
Finally, the larger context of air quality and chemical safety is anchored in widely recognized guidelines and public resources. While the specifics of the exact coatings you choose will depend on your local regulations and the chemistry of your materials, the underlying principle remains consistent: protect your lungs, protect the environment, and layer your skills to achieve a durable, beautiful finish. For a deeper dive into air quality concerns, environmental impact, and safe handling of volatile chemicals, consult authoritative guidance from national agencies and environmental organizations. The U.S. Environmental Protection Agency offers accessible, practical information on air quality and pollution prevention that complements the hands-on techniques described in this chapter. External resources can broaden your awareness of the broader landscape of safe practice while you refine the craft in your own shop and on your own bike. For more guidance on air quality and safe handling of volatile chemicals, see the EPA resource at the end of this chapter: https://www.epa.gov/air-quality/air-pollution-and-you.
Final thoughts
Understanding and applying the principles outlined in this guide can significantly boost your performance in motorcycle fairing spray painting, providing a level of detail and professionalism that your business deserves. By mastering preparation techniques, proper application methods, product selection, effective finishing touches, and by prioritizing safety, you not only enhance your service quality but also foster customer loyalty. The motorcycle community values craftsmanship, and with these expert practices, you can establish your business as a leader in the field.