
Sanding motorcycle fairings is a critical skill that every business owner in the motorcycle repair niche should master. Proper sanding not only enhances the aesthetic appeal of the motorcycle but also extends the lifespan of the fairings themselves. This article delves into five key chapters that will provide you with a thorough understanding of the preparation steps needed for sanding, the selection of appropriate sandpaper, effective techniques for sanding, how to repair damages, and the finishing touches that perfect your work. Each chapter builds upon the last, ensuring that you grasp the complete process of sanding motorcycle fairings with confidence and precision.
From Clean Surface to Gloss: The Essential Prep for Sanding Motorcycle Fairings

Sanding motorcycle fairings is as much about discipline as it is about technique. The goal is not to grind away at plastic until it shines, but to establish a smooth, uniform canvas that can support paint, primer, or a clear coat. The fairings themselves are usually made from plastics or composite blends that respond to heat and pressure with sensitivity. A solid prep routine is the hinge that unlocks a flawless finish. When you take the time to prepare properly, you set up every subsequent step for success, from material preservation to achieving a glass-like surface. Preparation, in this sense, is the quiet, essential work that makes the difference between a repair that looks temporary and a finish that endures.
Begin with the simplest truth: cleanliness is the foundation. Dirt, grease, wax, and even minute dust particles can disguise flaws and then become ground into the surface as you sand. A dedicated automotive cleaner or a good soap-and-water wash will lift contaminants without leaving behind residues that can interfere with adhesion. After washing, rinse thoroughly and dry completely. Any lingering moisture or soap film can create tiny halos once you begin to abrade, and those halos can translate into visible imperfections after paint or polish. A dry, clean surface also helps you gauge the true state of the plastic, so you know exactly where the problem areas lie.
A careful inspection follows the cleaning. Light scratches and swirl marks are one thing, but cracks, deep gouges, or dents tell a different story. A cracked area may require a targeted repair before you even think about sanding. A deep scratch or nick can demand a slightly more aggressive approach initially to be sure you do not simply rub the imperfection deeper into the surface. The inspection step is not a formality; it defines your sanding strategy and, if needed, the type of filler or adhesive you choose to stabilize damaged sections before moving to the smoothing stage. You should also note any soft edges around seams and joints where heat can cause distortion if you rush the process.
With a clear surface and a plan in mind, you assemble the right toolkit. Begin with a progression of sandpapers: a coarse starting point around 800 to 1000 grit to remove larger imperfections, followed by 1200 grit to refine the texture, then a fine finish at 2000 grit to prepare for polishing. This progression matters because it minimizes the risk of leaving deep scratches, which would be much harder to remove later. Wet-sanding becomes essential as you move beyond 1000 grit. Water acts as a lubricant, reducing heat buildup and preventing clogging in the paper’s abrasive grains. It also helps reveal how effective your abrasion is, because the surface will show a uniform, slightly hazy appearance when it is ready for the next step.
Pressure distribution is another critical factor. A soft backing pad or foam sanding block is far more forgiving than bare hands, especially on curved surfaces. The fairing’s contours mean pressure can concentrate in one spot, generating flat spots or gouges if not managed. A flexible backing pad helps distribute pressure evenly across complex curves, guiding you toward a consistent texture across subtle transitions like the edge of a fairing or around a contour line. The aim is a uniform matte feel that tells you the surface has been scrubbed clean of imperfections without overworking any single area.
Safety must be woven into every moment you work. Plastic dust is not something to breathe lightly. Wear safety goggles to protect the eyes from fine particles, a dust mask or respirator to monitor inhalation, and nitrile gloves to keep the skin clean and shielded. Ventilation is more than a courtesy; it is a practical safeguard. If you work in a garage, open doors or use a fan to move air across the workspace, not directly toward you. If you are using equipment like a sander, set it to low speed and apply only light pressure. A slow, patient approach prevents heat buildup that can soften the plastic, distort edges, or introduce new imperfections.
When it is time to secure the fairing, remove it from the motorcycle if possible. Clamping the piece to a stable work surface eliminates the wobbles that come from keeping it in your hands and helps you work more accurately along lines and curves. A well-secured panel also feels less intimidating, allowing you to focus on the texture and uniformity rather than fighting the piece’s movement. The combination of a stable surface, even pressure, and a steady rhythm is what yields a consistent, professional result.
Now, the sanding technique itself—how you apply the steps above—needs to be deliberate yet simple. Always sand in a single direction, not in circles. This practice keeps the texture linear and predictable, so you can identify and correct any deviations quickly. Begin with the coarse grit to flatten the most obvious imperfections, then move to the mid-grits to refine the surface, and finish with the finest grit to prep for polishing. If the surface feels warm at any point, slow down, pause, or take a brief break. Heat is the instinct killer here; it can soften the plastic and cause waviness or distortion that defeats the purpose of your effort.
When you discover damage that requires repair, you adjust your approach but stay within the same disciplined framework. Stabilize cracks or breaks with a suitable adhesive and allow it to cure according to its instructions. After the adhesive has set, use a 1500-grit flexible sanding disc to gently level the repaired region with the surrounding surface. The flexible disc accommodates curves while maintaining a flush plane with the rest of the fairing. This step is subtle but essential; a repair left with a slight height difference will catch your eye once paint and clear coat are applied, even if the texture feels smooth to the touch.
Finishing the sanding stage leads naturally into polishing. A microfiber cloth can wipe away dust, but polishing compounds and a proper pad are what truly bring back the surface’s life. After cleaning, apply a plastic polish or wax that can deliver a protective layer and a reflective shine. For a professional touch, a dual-action polisher paired with a foam pad helps evenly distribute the polishing compound and minimizes swirl marks. The goal is not to burnish the surface with brute force but to coax the plastic to reveal its depth and clarity through gentle, controlled motion. In practice, many technicians find that a well-executed polish can make repairs look almost factory-finished, with color and texture harmonized across repaired and original areas.
The narrative of preparation would be incomplete without acknowledging how the finished result connects to broader restoration work. Proper prep makes subsequent steps like priming, painting, or applying a protective coating far easier and more predictable. The surface becomes the canvas that sets the tone for the entire refinishing project. If you want to explore variations in replacement parts or OEM-style configurations as you plan your color and finish, a category like Honda fairings offers a practical reference for compatible options and styling cues. Honda fairings provides an accessible overview of what to expect when aligning repaired components with original aesthetics.
Real-world experience reinforces why this disciplined approach matters. In a tail wing repair case, technicians used careful sanding to blend the patched region with the surrounding surface, then refined the texture with additional grits before moving to color-matching paint and a final polish. The result was a repair that looked seamless and felt uniform to the touch, with the gloss returning and the contours maintained. This example illustrates that sanding is not merely about removing material; it is about creating a unified surface where previous damage no longer stands out. The same mindset applies whether you are addressing a minor scratch or a larger area that required filler. The patience you invest in preparation translates directly into the quality of the finish you achieve.
As you proceed through preparation, you stitch together technique, materials, and a mindset focused on precision. Your workspace becomes a workshop of small, deliberate decisions: the choice of grit, the pressure you apply, the direction you sand, the moment you decide a surface is ready for the next phase. Your safety gear becomes part of the process rather than a hindrance, ensuring you can work longer, more comfortably, and with less risk. And your end goal—an even, consistent texture that accepts paint or clear coat without rebellion—remains within reach as long as you respect the material’s sensitivities and the steps that guard against overheating, gouging, or missed areas.
To support the learning curve, keep in mind a broader reference that visualizes these steps in a process video. External demonstration resources can provide a tangible sense of texture, motion, and sequence that words alone cannot fully convey. For further visual context, you can consult an illustrative repair demonstration here: https://www.youtube.com/watch?v=examplevideoid. This independent resource complements the written guide by showing the layering of sanding, priming, and polishing in a real-world scenario, while reinforcing the idea that preparation underpins the final results.
Precision in Grit: Selecting the Right Sandpaper for a Flawless Motorcycle Fairing Finish
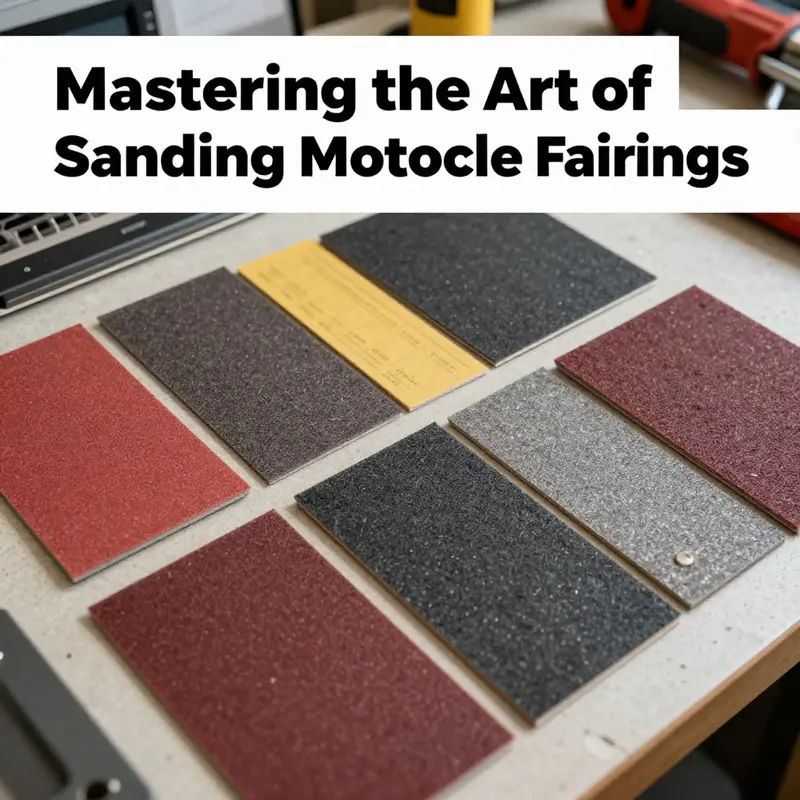
Sanding a motorcycle fairing demands more than a casual hand with a sheet of paper. The fairing is usually molded from plastic or composite materials that respond sensitively to heat, friction, and pressure. The choice of sandpaper, more than any other single step, sets the tone for how smoothly the surface will accept primer, color, and gloss. Getting this right means understanding how grit, texture, and technique work together to hide flaws, preserve original contours, and create a finish that looks factory-fresh once the process is complete. The journey from rough to refined begins with a clear assessment of the surface: are there deep gouges, old paint that must be removed, or only light swirls that need to be erased? Each scenario calls for a different starting point, and the grit progression you choose should be dictated by the level of material you need to remove and the final texture you want to achieve.
Coarse grits, in the range of 80 to 120, serve as the workhorse when dramatic reshaping is required. They are the most aggressive option and should be reserved for stubborn imperfections or substantial layer removal. When you find chipped edges, thick filler, or mismatched patches, coarse paper can level the field quickly. The risk, however, is clear: coarse paper can etch deep scratches that show up later beneath paint or clear coat. This is why the subsequent steps, and the diligent inspection between them, are essential. After a coarse pass, you must step down to finer grits to begin the smoothing process and to minimize the risk of undercoating with visible gouges.
Moving to mid-range grits, typically 180 to 220, marks the transition from material removal to texture refinement. These papers are designed to erase the scratches left by the coarse work while still offering enough bite to inspire a truly uniform base. When the fairing surface has settled into a more even profile, mid grits help eliminate ridges, fill-in high spots, and prepare the texture for the finer layers that follow. The goal at this stage is not to flatten the surface into a dull matte, but to achieve a consistent, paintable canvas where light reflections travel evenly across the contours.
Finishing grits, in the 320 to 400 range, are the final touch before primer or paint. At this stage you are chasing only the last micro-imperfections and cross-hatch patterns that could interrupt the gloss later. A smooth, uniform surface at this level is crucial because it determines how evenly primer seats and how the final color will appear. It’s here that you begin to see whether your earlier decisions about pressure, direction, and speed paid off. The surface should feel almost silky to the touch and reflect light in a soft, diffuse way rather than showing scratches or uneven texture.
The clarity of your results also hinges on how you apply the sandpaper. The directionality of sanding matters far more than the specific grit mix you choose. Always work in a single direction across a small area, then move methodically to the next, maintaining consistent pressure. The goal is to create uniform micro-scratches that the primer can grip while avoiding cross-hatching patterns that may later become obvious under paint. A foam backing pad or a soft sanding block helps distribute pressure evenly and reduces the risk of gouging the curves of the fairing. When you move from one grit to the next, you should feel the surface transition from rough to smooth under your fingers, with each pass removing the scratches left by the previous grit.
Wet sanding becomes especially important as you approach higher grits. Water acts as a lubricant, reduces heat buildup, and carries away particulates that could abrade the surface. This is not merely a comfort measure; it’s a protective habit for plastic fairings that can warp or soften under high friction. For grits above 1000, wet sanding is often essential to prevent heat-induced distortion and to maintain a consistent texture across the surface. If you ever notice the surface turning warm or you feel the paper loading with plastic dust, pause to dip the area and continue with a gentler touch. The goal is to keep the process cool, controlled, and controlled in pressure.
Beyond the basic grit ladder, you must tailor your approach to the health of the fairing itself. A fairing with a crack, deep gouge, or repaired section—such as areas where carbon fiber or reinforced patches exist—begins with stabilization before any sanding begins. In practice, this means addressing the damage with a suitable adhesive or filler and allowing it to cure fully before you re-enter the sanding sequence. A careful, deliberate approach helps prevent the repair from telegraphing through the finish. Once the repair is solid, you can use a 1500-grit flexible sanding disc to blend the repaired area flush with the surrounding surface. The flexible wheel keeps contact even across contoured areas, helping to avoid edge rounding or soft transitions that could compromise paint adhesion.
As the surface evolves through these grit stages, your mind should stay focused on what the finish will demand next. If the fairing is to be repainted, you want a surface free of deep scratches and with a texture that will hold primer evenly. If you’re preserving the original clear coat and aiming for a polished, glossy look, your attention turns to achieving micro-scratches that can be polished out to a high gloss. In either case, the final step before coating is a thorough wipe-down with a microfiber cloth to remove any residual dust, followed by the application of a plastic polish or wax. This last step helps close the surface and can reveal tiny imperfections you may wish to address with an additional light pass of 2000-grit or a paint-safe polishing compound. In a real-world context, technicians who manage fairing repairs understand the value of this methodical finish. A tail wing repair on a high-end sport bike, where sanding is carefully sequenced and then color-matched, demonstrates how attention to grit progression translates into a seamless, factory-like restoration.
The practical takeaway is simple, yet powerful: choose grits to match the job, not the convenience. If you’re removing substantial material or repairing deep damage, start with coarser grits and follow with progressively finer ones. If you’re refining a surface that is already close to its final form, you may begin with mid or fine grits and move upward, always verifying the texture with your finger and a clean, dry cloth before advancing. This approach keeps heat in check, protects the plastic from deformation, and ensures you aren’t fighting the finish later in the process.
For those who want to explore a more visual, step-by-step reference, a well-documented repair case demonstrates the full arc—from sand, to prime, to paint, to polish. While the example focuses on a specific tail wing repair, the underlying principles apply broadly: careful grit selection, controlled technique, and disciplined inspection at each stage. If you’re working specifically with a Honda fairing, you can explore the relevant product category for components and aftermarket options that align with standard repair workflows, which can simplify sourcing and testing during the sanding and refinishing process: Honda fairings.
As you finalize the sanding plan for your project, keep a simple, repeatable cadence in mind. Sand for texture, not for speed. Let the grit do the heavy lifting of material removal, and let your technique carry you toward a uniform, paint-ready surface. The balance between pressure, direction, and wet-dust management is the shield that prevents overheating and prevents the kind of micro-damage that would undermine your finish. When you maintain that balance, your fairing surfaces reveal a depth and clarity that invite primer to bite evenly, color to sit true, and gloss to reflect light with crisp, showroom-worthy precision.
External resources can provide additional context and visual demonstrations of these techniques. For a detailed, practical guide that complements this discussion, see the Autocar manual on how to sand a motorcycle fairing. It reinforces the same core ideas—progressive grit, careful control, and mindful maintenance of the material’s integrity: https://www.autocar.com.au/repair-and-maintenance/how-to-sand-a-motorcycle-fairing-165271.
From Rough to Gloss: Mastering the Art and Science of Sanding Motorcycle Fairings

Sanding motorcycle fairings is less about rote motions and more about guiding a surface from harsh, undefined texture to a controlled, glassy finish that can accept primer and paint without hesitation. The fairings themselves are usually plastic or composite blends and respond to heat and pressure in telling ways. When you touch them with the wrong grit, the wrong speed, or without a steady hand, you can wipe away strength and introduce a new set of flaws. But with disciplined preparation, careful material choices, and a method that respects the delicate nature of the plastic, you can transform a dull, scratched shell into a surface that looks factory-fresh and holds paint with confidence. The practice blends science with craft, a balance of abrasion, temperature control, and an eye for the final curvature that defines a motorcycle’s face.
The journey begins with preparation that has its own quiet precision. Before a single particle of abrasive touches the fairing, you must clean thoroughly. Grease, wax, diesel grime, and road dust form a barrier that undermines adhesion and creates new micro-scratches as soon as you start to abrade. A dedicated plastic cleaner, or a simple sudsy wash followed by a careful rinse, ensures the surface is neutral and free of lubricants. After cleaning, dry completely and inspect the area under good light. Look for cracks, chips, or deep scratches that will determine not only how aggressively you sand but whether you need to reinforce or rebuild sections before proceeding. This is not a cosmetic prep alone; the structural integrity of the repair and the long-term durability of the finish depend on this early, honest assessment.
Materials and techniques must be chosen with care. The most common fairings are ABS, polycarbonate blends, or lightweight composites. These respond differently to heat and friction, so you should approach sanding with a respectful mindset toward the plastic. As a general rule, begin with a coarser stage to establish a level surface and then progress to finer grits for a glassy finish. A practical sequence often begins with 400 to 600 grit when there are notable imperfections, deep scratches, or chips that need flattening. You may then move to 800 or 1000 grit to deburr and remove the more evident micro-scratches. For a finish that invites polishing or painting, progress to 1200-1500 grit and finally to 2000 grit or higher. A crucial note from seasoned technicians is to wet-sand once you pass 1000 grit. Water acts as a lubricant, reduces heat buildup, and prevents the abrasive from loading with plastic particles, which can clone swirl marks or embed scratches into the surface.
The technique itself deserves a quiet, methodical approach. Always sand in a single direction. Circular motions are a trap that can leave telltale swirl patterns and irregularities that mar the final finish. Let the weight of your hand and the backing pad do the work; a foam backing pad or a soft sanding block helps distribute pressure evenly so you don’t create gouges in thin sections or along tight curves. If you’re using a power sander, keep the RPM low and apply only light pressure. The plastic’s resistance should guide your pace rather than forcing the abrasive through the surface. When you cool a panel by pausing or by light continuous strokes, you reduce heat buildup. A critical factor that minimizes the risk of softening or warping the plastic. The goal is a uniformly muted texture, not a rough, patchy foundation.
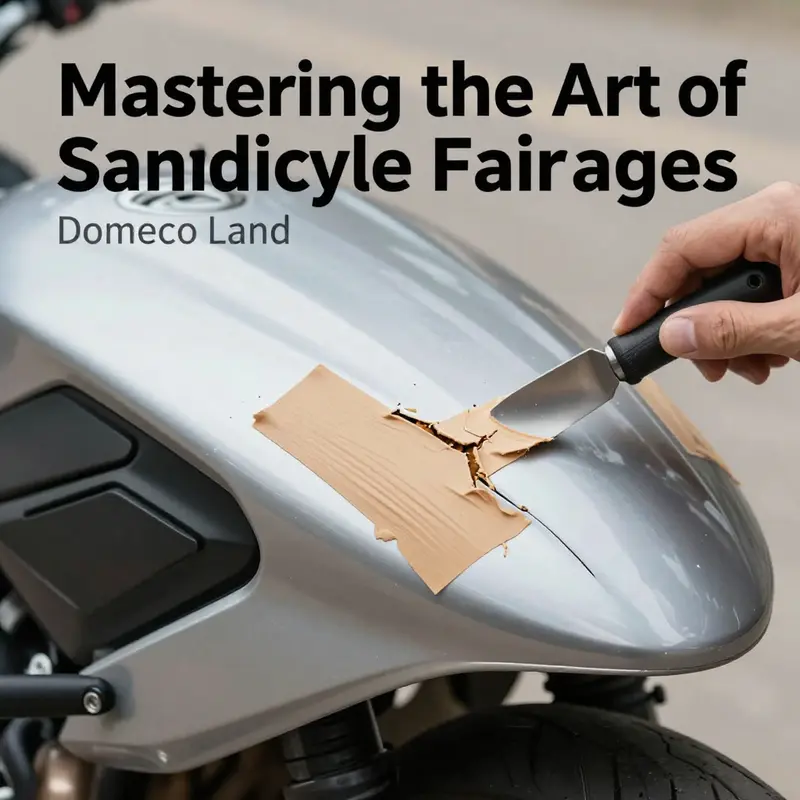
When you encounter damage beyond surface scratches—cracks that require more than sanding—address it with care. A stabilizing adhesive, like a general-purpose plastic glue or a suitable bonding agent, can stiffen a crack or a small fracture so that sanding won’t propagate a fault through the surface. After the adhesive cures, a 1500-grit flexible sanding disc or a similar flexible wheel is ideal for smoothing the repair flush with the surrounding area. The key is to keep the repair just below the plane of the existing surface; you’re aiming for a seamless transition that will disappear under primer and paint. This is where the line between repair and artistry is drawn: you’re shaping not just the look, but the tactile continuity you expect when the fairing is touched or viewed from close range.
Beyond flat expanses, many fairings present tight curves, recessed panels, and hard-to-reach nooks. For these, flexible sanding sponges or curved templates help maintain control without marring edges. The soft, compliant nature of these tools lets you follow contours, feather in transitions, and avoid introducing edge-induced rounding that would require more material removal later. In practice, this means slowing down in curvy sections, using multiple passes with light pressure, and continually stepping back to inspect under bright light. A final pass with a very fine grit, kept wet, helps reveal any remaining imperfections and ensures the surface responds evenly to subsequent steps, whether that’s primer, color, or protection.
A proper finish ties directly to how you clean and polish before applying anything permanent. After you’ve achieved the desired smoothness, wipe the surface with a microfiber cloth to remove all dust and debris. A light application of a plastic polish or wax seals the surface and accentuates the gloss that will ultimately show through the paint. For a professional level of refinement, a dual-action polisher with a foam pad and quality polishing compound can produce a finish that looks almost factory. The polishing step is not merely cosmetic; it also closes the tiny micro-pores created by sanding, which helps subsequent coatings adhere more evenly and resist micro-dust intrusion. The narrative from real-world repairs echoes this: careful sanding, followed by precise color matching and polishing, can restore a tail wing to factory-like aesthetics while preserving the function of the structure.
A practical, real-world example beyond the theoretical arc can anchor this method. In a recent tail-wing repair scenario, a technician started with meticulous sanding to flatten the repair area, used a color-matched paint for seamless integration, and finished with careful polishing to achieve a reflective, uniform surface. The result wasn’t just a cosmetic improvement; it demonstrated how a disciplined approach to sanding, sealing, and finishing can restore both form and function. This kind of outcome is the reward of a patient, informed process where every step supports the next, from the initial clean to the final gloss.
For those who want to explore compatible options or broader product selections as they practice these techniques, a ride-along with a catalog of fairings can be useful. You can browse the Honda fairings category to see how different shapes and curves respond to the same sanding regimen and to visualize how the final gloss might look on various models. This internal resource can help you anticipate how your own project will translate across different fairing geometries: Honda fairings.
As you prepare to paint or recoat, the last mile of sanding is about cleaning again to ensure optimal adhesion. Wipe down one final time with a prep solvent or isopropyl alcohol to remove fine particles and residues that could otherwise trap air or create pinholes in the finish. This step may seem repetitive, but it is essential to prevent paint defects that would undermine your hard work. If you’re seeking a more visual guide to the overall process, a detailed repair demonstration can provide a practical, step-by-step perspective that complements the tactile practice described here. External resources that walk through sanding, priming, and polishing can deepen your understanding and give you a clearer sense of the progression from rough to glossy. For a detailed, practical walkthrough, see the external guide at this resource: https://www.motorcycle-riding.com/sanding-motorcycle-fairings/. This reference offers additional context on the sequential approach and reinforces the discipline needed to achieve consistent, repeatable results across different panels and motorcycles.
Ultimately, sanding fairings is about protecting the investment you have made in your bike and preserving the aesthetic that defines its character. The process, when done with attention to prep, controlled abrasion, careful repair, and thorough finishing, yields a durable, high-quality appearance that both looks great and primes the surface for paint, primer, or protective coatings. It’s a craft that rewards patience and precision as surely as it rewards consistency and gentle technique. The steps—cleaning, careful grit progression, directional sanding, thoughtful handling of repairs, and a measured finish—are not merely a pathway to better looks. They are the essential habits that guard against heat damage, gouging, and poor adhesion. With the right mindset, the effort pays off in a smoother surface, a longer-lasting finish, and a finish that stands up to the road’s punishment while keeping the fairing’s profile true and appealing.
From Cracks to a Mirror Finish: Repairing Damaged Fairings While Learning the Art of Sanding Motorcycle Plastics
Learning how to sand motorcycle fairings is a skill built on precision, patience, and a steady eye for detail. When damage appears on plastic or composite shell, the temptation is to rush to a quick fix. Yet the real craft lies in guiding the repair from the first assessment to a finish that can accept paint or a protective coat without wavering under the sun or the road debris of daily riding. This chapter weaves together the practical steps of sanding with the equally important task of repairing damage, showing how each decision shapes the final result. It is a narrative of turning imperfections into a surface that reads as if it were never touched, a surface that stands up to both aesthetics and function. In the end, the smoother the path from damaged to repaired, the cleaner the transition to a flawless finish.
The journey begins with an honest assessment. Before any tool touches the fairing, you clean it thoroughly. Dirt, oil, and old wax act like sandpaper for the wrong reasons: they embed into the surface and can trap grit that gouges the plastic when you work. A dedicated plastic cleaner does a better job than water alone, but a mild soap solution will work if you rinse and dry meticulously. This stage isn’t just about cleanliness; it’s about recognizing the extent of the harm. Small swirls and micro-scratches are not the same as deeper gouges or cracks. If you can feel a defect with your fingernail, or see a crack that runs along the structure, you know the level of repair you’ll face and the amount of sanding that will be required to feather the edges smoothly into the surrounding color and contour.
Sanding is the bridge between a repaired surface and a finish that looks pristine. You start with a grit that can flatten the roughest irregularities without introducing new ones. A common approach is to begin with 600–800 grit when the area has deeper scratches, minor gouges, or old paint that must be removed for a clean feather edge. The goal at this stage is not to create a perfect surface, but to establish a baseline that will allow subsequent grits to refine without chasing hard edges. As you progress, you move to finer grits—1000, then 1500, and finally 2000 or higher. The philosophy here is straightforward: the rougher the starting point, the more you rely on the later grits to erase the prior work. A well-tuned palate for texture becomes essential, and the tool you choose matters just as much as the grit you select. Wet-sanding beyond 1000 grit reduces heat buildup and minimizes clogging. Water acts as a lubricant, preventing the plastic from softening under friction and smoothing the path forward toward a uniform sheen.
Direction matters as much as grit. Always sand in a uniform direction, using a foam backing pad or a soft block so the pressure is distributed evenly. Circular motions can create patterns or rings that survive polishing and paint. This is a subtle discipline, but it pays off in the long run. The fairing’s geometry can guide your hand; wide flat panels respond to long, even strokes, while curves may require gentle, controlled pressure to avoid digging into the plastic. When the surface heats, slow your motion, pause to cool, and resume with a light touch. If you’re using a power sander, reduce speed and apply minimal force. The aim is a light, even abrading that acclimates the damaged area to the surrounding finish rather than forcing a mask of material to cling where it won’t belong.
Damage that travels beyond surface texture demands more than sanding. A crack or a broken section calls for stabilization before smoothing. In practical terms, you’ll want to introduce a suitable plastic filler or an adhesive repair method that can harden and bond well with the base material. A generic, compatible repair adhesive is suitable for the initial stabilization, followed by a curing period. Once secure, you’ll sand the repaired region with a flexible sanding disc, allowing the wheel to glide flush with the surrounding contour. The objective is to make the repaired area flush with the adjacent surface so that the feathered transition remains invisible after repainting. The feather edge is the heart of a good repair; it’s the point where the repair becomes indistinguishable from the rest of the fairing, not merely a patch.
Some repairs require more structural reinforcement. For extensive damage, you may choose a combination of techniques—plastic welding for ABS or other thermoplastics, epoxy putty for gaps or rebuilds, and, in high-end applications, carbon fiber reinforcement for added stiffness. The decision depends on the material, the location on the fairing, and the intended use of the bike. After any filler, weld, or reinforcement cures, you’ll re-sand with progressively finer grits until the repair blends with the surrounding surface. It’s an iterative loop: fill, cure, sand, inspect, repeat. You should always recheck the area under good light; the room’s lighting can reveal subtle inconsistencies that aren’t obvious in ordinary daylight.
Once the surface texture is uniform and the feathered edge has disappeared into the panel’s contour, priming becomes the next decisive moment. Priming seals the repaired area, provides a uniform base for paint, and helps identify any remaining imperfections that sanding must address. The primer must be compatible with the plastic and with the final paint system you intend to apply. A light coat is often enough to highlight pinpricks or uneven patches that still exist. If you see pinholes or texture that doesn’t match the rest of the panel, sand lightly and re-prime. Two light coats are usually better than one heavy coat, because too much primer can fill in the texture of the surface in a way that makes guide marks hard to remove and creates an uneven final finish.
Paint preparation follows a careful interval of drying and inspection. Color matching can be the decisive factor in whether a repair looks factory-fresh or merely “fixed.” In many cases, painters will use a spray gun to lay down coats that replicate the original tone and depth, with attention paid to the way the color shifts with light and angle. The process benefits from patience: several light coats with careful drying time often yield far better results than a single heavy application. The goal is to achieve a surface that reflects light uniformly, with no obvious lines where repair work ends. When you reach this level of uniformity, it’s a strong signal that you’re ready for clear coat and final polishing. Although the final choices about clear coats and finishes will depend on the environment and the bike’s usage, a clear layer can deepen color depth and add a protective shield against road grime and UV exposure.
The narrative is not complete without a nod to practical demonstrations and how they translate to real-world outcomes. A recent repair example, conducted on a high-visibility tail wing, showed how disciplined sanding, precise color matching, and careful polishing can restore a part to a nearly factory appearance. The technician’s approach underscored that success comes from combining method with a practiced touch: measure, sand, assess, and refine. Even when faced with a challenging shape or a stubborn blemish, the sequence remains the same. A well-prepared surface invites a finish that looks deliberate rather than improvised. This is the essence of sanding as a craft: it’s not merely removing material; it’s shaping perception by controlling texture, reflection, and color depth.
For riders who worry about compatibility and repair options, there is value in examining how different fairings respond to the process. If you’re curious about how a particular CBR-style fairing might react to these steps, consider exploring the broader context of compatible panels. For context on CBR-specific fairings, see the following example: fairings for CBR-600RR. This reference helps frame expectations about thickness, resin content, and how a given repair approach may translate across similar shapes and materials. The moral remains clear: consistency in technique matters as much as the material itself. You want the feather edge to be invisible and the surface to respond to polish as a mirror would.
The finishing touch is the polish, which seals the work and returns the surface to its former luster. After sanding, wipe the area with a clean microfiber cloth to remove residue, then apply a plastic polish or wax. A final pass with a dual-action polisher, equipped with a soft foam pad and the right polishing compound, can render the surface with a glassy depth. The polishing step is not merely cosmetic; it reinforces the repair’s longevity by removing micro-scratches and creating a protective barrier that resists minor abrasions. It’s the last act in the choreography of repair, where patience and precision converge to deliver a surface that feels as smooth to the touch as it looks to the eye.
In the broader arc of mastering fairing sanding, the chapter’s throughline holds: preparation, restraint, and refinement. Start with a clean canvas, embrace a measured sanding plan that respects the material, and be honest about the level of damage before choosing fixative methods. The tools—the grit sequence, the backing pad, the moisture for wet sanding—are instruments that must be used with care. The result is a surface that not only looks repaired but reads as if it belongs to the bike in the moment you ride it. For readers who seek further visualization of sanding, priming, and polishing techniques in a repair context, a comprehensive demonstration video offers a useful reference that aligns with these principles.
External resource: https://www.youtube.com/watch?v=examplevideoid
From Sand to Showroom: The Finishing Touches that Complete Motorcycle Fairings

When you finish sanding motorcycle fairings, you are not done yet. The surface you see after a final pass will determine how the paint or clear coat settles, how the color reads in daylight, and how durable the finish will be under sun, rain, and road debris. The finishing touches are what separate a good repair from a showroom look, and they require the same careful discipline you showed while you sanded. The goal is a surface that is uniformly smooth, perfectly clean, and ready to receive a coating that adheres without peeling, wrinkling, or dulling. If you approach this next phase with patience and precision, the results will not just look better; they will last longer and resist the small insults of riding through wind, gravel, and sunlight.
First comes thorough cleaning, the foundation upon which every subsequent step depends. Sanding leaves fine dust, microchips, oils, and tiny grit trapped in the pores of plastic and composite surfaces. Even microscopic residues can cause adhesion failures or micro imperfections once paint or clear coat is applied. Use a dedicated plastic or paint prep cleaner to wipe away dust and oils, and consider a follow up with a degreaser if the surface carried any heavy waxes or silicone residues before you started. Pay attention to edges and recesses where dust can settle. A clean surface is not just a preference; it is a requirement for a flawless finish. After cleaning, let the panel dry completely in a dust-free area. This moment matters because any trapped moisture or residue will show up as blemishes when you paint or clear coat later.
Next, recheck the texture. If you have not already done a final pass with very fine grit, now is the time for a light, controlled pass at 1500 to 2000 grit. The aim is to erase the last hint of sanding scratches and to create a micro-smooth base that will accept the topcoat evenly. Use a sanding block to maintain uniform pressure and avoid creating new high spots. This step is especially important if the fairing has been repaired or if you had to blend in a repaired area. Even a small irregularity will be magnified under a glossy clear coat. Wet sanding is essential at this stage. Keep the surface and the paper wet, and wipe away the slurry frequently so you can clearly see the texture of the plastic. A steady hand here pays dividends when you move into primer and color.
If your plan is to repaint the fairing, priming becomes the bridge between your sanded surface and the final color. Primer does more than just provide color adhesion. It seals the surface, fills in micro-scratches, and creates a uniform base that helps the topcoat lay down evenly. Apply thin coats according to the manufacturer’s instructions, typically with a spray technique that keeps the spray pattern even and reduces the risk of runs. Allow each coat to flash off as directed and then sand lightly again with a finer grit if the surface shows any texture or dust nibs. A well-applied primer layer reduces the chance of paint peeling or chipping in vulnerable areas like around mounting points and seams. Do not rush this step, because the primer sets the tone for the entire finish.
When you move to the topcoat or to restoring a clear finish, polishing becomes the star. If you are working to restore a factory gloss over a repaired area or on a surface that has already received a clear coat, use a plastic-safe polish or compound. A dual-action polisher with a soft pad can bring out depth and remove minor haziness, while hand polishing with a soft cloth can achieve an almost showroom-like gleam. The key is to avoid heating the plastic. Excess heat during polishing can soften the resin and create new scratches or deformations. Work in small sections, move the pad or cloth in overlapping passes, and keep the pressure light. The aim is to fill micro-scratches and to bring the surface to a high gloss that reflects light evenly. If you observe halos of swirl marks, rework those areas with a finer polish and a clean pad. The result should be a depth and clarity that makes the color pop while staying true to the shape and contours of the fairing.
Clear coat after polishing is the protective armor that seals the work and guards against UV damage, chemical exposure, and minor abrasion. Apply the clear coat in thin, even layers with a spray technique that avoids heavy buildup. It is better to lay several light coats than one thick coat, as the latter can sag or run and create a clouded finish. Allow sufficient flash time between coats, and keep the environment clean and free of dust specks. The curing interval is not to be rushed. Temperature and humidity influence cure times, so create a controlled space if possible. Rushing cure times or exposing the fresh finish to rapid temperature changes will invite microcracks or hazing, which defeats the purpose of this step. When in doubt, extend the cure window by a few extra hours if the ambient conditions are outside ideal ranges.
Curing is not the end of the process but a vital part of it. A fully cured finish will feel hard to the touch and sound slightly dull when tapped with a clean cloth. During this time, resist the urge to handle the fairing excessively, especially around joints and newly painted areas. Any contact or flexing can imprint marks that will show up once the surface is fully finished. After curing, inspect the entire area under bright, natural light. Look for runs, orange peel texture, sags, or dust inclusions. Small flaws are not uncommon, but they can be corrected with careful touch-ups. Lightly scuff the affected area with a fine grit and reapply a touch of clear or color coat, followed by a brief polish to blend it in. A well-executed touch-up will be nearly invisible and will maintain the integrity of the original panel.
Real-world experience, even in high-end repair contexts, confirms that the finishing stage can be the most nuanced part of the job. A recent tail wing repair, carried out with meticulous sanding, then careful priming and color-matched topcoat, demonstrated that attention to the sequence and the quality of each layer yields results that look and feel factory-new. The same approach translates to any fairing, whether you are tidying up a carbon fiber wing or smoothing a plastic nose piece. It is not just about the appearance; the durability of the repair hinges on adhesion and chemical compatibility between layers, which begin with a clean, well-prepared base and continue through careful polishing and controlled curing.
For riders who want to keep a wide range of fairings looking their best, exploring compatible options can be part of the ongoing maintenance and customization plan. If you are working on a specific fairing family, you can explore options in the Honda fairings category. This provides access to panels and accessories that maintain consistency in finish and fit, helping you preserve the aesthetic unity of your bike while still performing the necessary repairs and refinishing tasks. The goal is not merely to restore a surface but to ensure it integrates with the bike’s lines and the rider’s expectations for durability and style.
As you wrap up the finishing touches, safety remains a constant companion. Wear safety goggles, a mask, and gloves when sanding and handling ready-to-sand primers or coatings. Work in a well-ventilated area to minimize inhalation of dust or fumes. The quiet discipline of steady, patient work pays off with a surface that looks professional and performs well under real-world conditions. The end result should be a seamless transition from the base material to the final gloss, with a finish that resists yellowing, cracking, and dulling under sunlight and heat. With the steps laid out and the sequence respected, the bike will not only look sharp but also wear through miles of riding with confidence.
External resource for deeper techniques on polishing plastics and achieving showroom gloss can be found here: How to Polish Motorcycle Fairings. For ongoing inspiration and to see a broad range of fairing styles and assemblies, you can browse the Honda fairings category at the internal link: Honda fairings category.
Final thoughts
In conclusion, sanding motorcycle fairings is a meticulous and essential process that requires proper preparation, technique, and finishing. By following the guidelines provided in this article—from preparation to execution and finally finishing touches—you can ensure high-quality results that not only enhance the appearance of the motorcycle but also meet the expectations of your customers. Mastering these skills will undoubtedly set your business apart in the competitive motorcycle repair industry.