Introduction
Painting motorcycle fairings is not just about altering aesthetics; it’s about preserving and enhancing the life of your bikes. For business owners in the motorcycle industry, understanding the intricacies of this process can be crucial in providing top-notch service to customers. This guide delves into a detailed step-by-step procedure for painting motorcycle fairings, including the necessary tools and materials, techniques for achieving professional finishes, and common pitfalls to avoid. With this information, you’ll be equipped to deliver outstanding results that exceed customer expectations.
Tables of Contents
Chapter 1: Mastering the Art of Painting Motorcycle Fairings: A Detailed Prep Guide
- Essential Materials and Preparation Steps for Painting Motorcycle Fairings
- Application Techniques and Best Practices for a Flawless Finish
- Essential Finalization and Maintenance Strategies for Perfectly Painted Motorcycle Fairings
Chapter 1: Mastering the Art of Painting Motorcycle Fairings: A Detailed Prep Guide
1. Essential Materials and Preparation Steps for Painting Motorcycle Fairings
To embark on the journey of painting motorcycle fairings with precision and a professional finish, understanding the essential materials and thorough preparation steps is critical. The quality of the end result hinges not just on the paint and techniques used but significantly on how well the fairings are prepared before the application begins.
First, gather the right materials. You will need sandpaper ranging from 80 to 400 grit to manage the surface imperfections effectively. It’s crucial to use a plastic-safe primer along with high-build primer to fill minor defects. When selecting the basecoat, choose an automotive paint such as single-stage enamel or acrylic urethane, known for their compatibility with plastic surfaces. Finally, a high-quality clear coat (preferably 2K or urethane) will provide the finish you desire. Essential cleaning supplies like isopropyl alcohol or wax-and-grease removers; tack cloths to eliminate dust; and proper safety gear like respirators and gloves are also necessary.
Preparation begins with removing the fairings from the motorcycle. Be meticulous during this stage; document the location of all fasteners either through labeling or photographs. Once disassembled, it’s imperative to clean the fairings thoroughly. Start by washing them with a mild detergent, followed by wiping every panel with isopropyl alcohol to eradicate any oils or contaminants. This allows for optimal paint adhesion, as any residue present can compromise the painting process.
After the panels are clean, address any damages. Fill cracks or gouges with a plastic-compatible epoxy or repair kit and follow up with sanding to even the surfaces. Start with coarse sandpaper (80-120 grit) on the repaired areas, then progress to finer grits to create a smooth surface. Ensure dust is removed using compressed air and tack cloths to prevent imperfections in the paint.
Before progressing to painting, apply a plastic adhesion promoter. This first coat guarantees that your paint adheres well to the fairings, significantly impacting the durability of your finish. Following this step, a high-build primer may be applied for additional surface refinement. Once these steps are executed with care, you can proceed confidently to the painting phase, equipped with a well-prepared canvas that is ready to shine. Mastering these preliminary tasks sets the stage for a successful painting experience and ensures that your motorcycle fairings receive the attention they deserve.
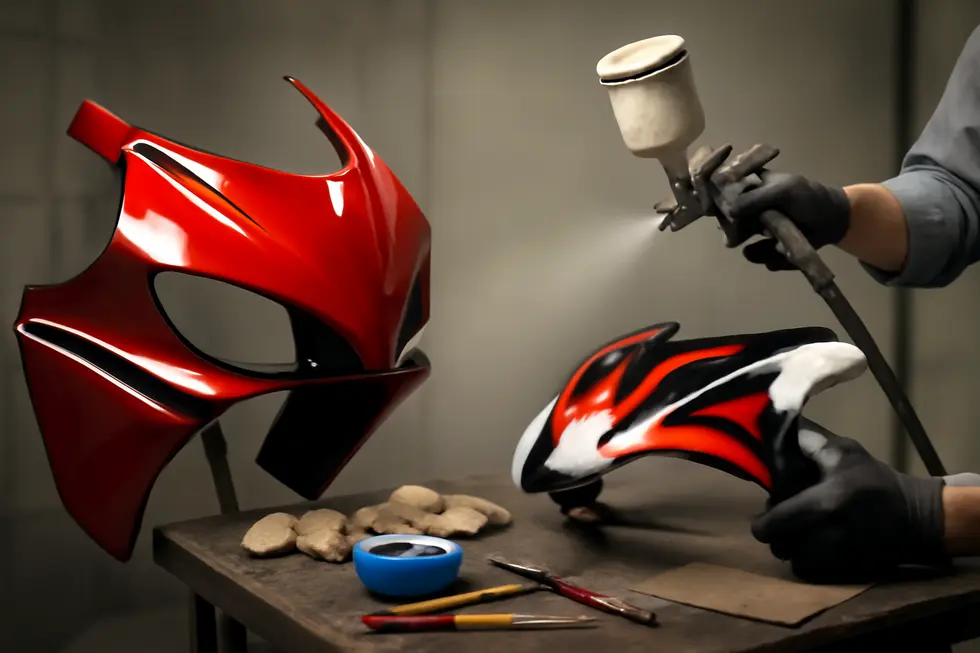
2. Application Techniques and Best Practices for a Flawless Finish
Painting motorcycle fairings is an art that requires attention to detail and adherence to various techniques to achieve a professional quality finish. Beginning with the surface preparation, it is crucial to remove the fairings from the motorcycle frame. This facilitates thorough cleaning without the risk of contaminating other components. Clean the fairings using a degreaser and follow up with isopropyl alcohol to eliminate any dirt, oils, or wax residues that could hinder paint adhesion. Once clean, inspect the surfaces under good lighting for any cracks or imperfections that may require repair.
If cracks are present, employing plastic welding or using fiberglass bonds can restore integrity to the fairings. After repairs are complete, move on to sanding; commence with coarse sandpaper (120-grit) to take away the old finish and level any deep scratches. Follow with finer grit sandpaper to ensure a smooth surface. This is vital for achieving optimal paint adhesion and creating an even substrate upon which to spray primer and paint.
Applying a plastic-specific primer is essential. Initially, a thin coat acts as an adhesion promoter; several high-build primer coats (3-4) will help mask any minor imperfections. Utilize a guide coat after the primer dries to identify low spots that need further sanding with finer grit sands. The meticulous work done during this phase will pay dividends later, resulting in a smoother final appearance.
When it’s time for the basecoat, apply multiple thin, even coats of a high-quality automotive paint formulated for plastics. Specialized techniques such as laying the spray gun at the correct distance (12-18 inches) and utilizing overlapping passes can prevent runs and ensure even coverage. Cure times between coats should be strictly followed to allow the paint to set properly.
Once the base is cured, detailing with decals or custom graphics can breathe life into the fairing. Finally, cap the project with several layers of high-quality clear coat. This not only enhances the aesthetic appeal but also provides protection from UV damage, scratches, and road debris. After a proper curing period, wet-sanding with progressively finer grit and polishing can yield a lustrous finish.
Achieving a flawless paint job requires controlled conditions, including low humidity and temperatures between 60-80°F. Investing in the right tools, such as quality spray guns and sandpaper, can make a significant impact. For further advancements in finishes, ceramic coatings post-paint can also enhance durability and longevity. For those looking to refine their skills, it’s advisable to practice on smaller parts to build confidence before tackling the more visible areas of the motorcycle. For comprehensive materials and tools, you might explore various options here.
3. Essential Finalization and Maintenance Strategies for Perfectly Painted Motorcycle Fairings
Completing the painting of motorcycle fairings requires meticulous attention to finalization and long-term maintenance strategies to ensure a flawless appearance and durability of the paint job. Curing time is crucial; allowing the paint and clear coat to cure fully is necessary before any handling. Manufacturers typically recommend a period of 24 to 72 hours for initial handling and even longer—up to 7 days—for a complete cure. It’s vital to adhere to these guidelines to enable the best results.
Once the paint has cured, perform a thorough inspection for defects. Use bright, raking light to effectively spot any runs, orange peel, or dust particles trapped in the finish. Mark these areas clearly for correction and ensure to reference forums and community advice that provide sanding strategies tailored to motorcycle fairings.
Next, wet-sanding comes into play. Use clean water mixed with mild dish soap and a soft sanding block alongside progressively finer sandpaper. Starting with a 1000 to 1500 grit paper, address moderate imperfections and gradually work your way up to 2000 or 3000 grit for a smooth, refined surface. This technique helps eliminate any remaining defects without compromising the integrity of the clear coat.
Following wet-sanding, the stage of polishing and compounding can significantly elevate the quality of the finish. Utilize a medium-cut compound first, applied with a dual-action polisher, and follow it up with a fine finish polish to enhance clarity. Aim for a polished look that eradicates holograms, ensuring your fairings gleam under any lighting.
Sometimes, a light re-clear coat may be necessary if previous steps have exposed the base coat. Spot application of a thin “gloss coat,” if done correctly, can enhance the overall finish without the risk of runs.
After the painting process, remove any masking tape—preferably when the clear coat is tacky yet not fully cured. This prevents the risk of tearing the paint. Finally, reattach hardware and perform a final inspection, ensuring all parts fit correctly and documenting the finish with photographs for your records. Long-term maintenance should involve regular cleaning free from harsh chemicals and pH-neutral products, particularly after rides to preserve the paint’s pristine look. Following these strategies will keep your motorcycle fairings looking exceptional for years to come. For more supplies tailored for your motorcycle painting project, check out products available at Ultimate MotorX.
Final thoughts
Understanding the complete process of painting motorcycle fairings can unlock new opportunities for business owners. By mastering the essential steps, tools, and techniques, you can ensure higher satisfaction and better results for your clients. Common mistakes can not only affect the quality of the job but also customer perception. By avoiding these pitfalls, you can establish your reputation as a reliable service provider dedicated to excellent workmanship. Embrace these insights and elevate your motorcycle fairing painting services.
Upgrade your ride with UltimateMotorX’s premium motorcycle fairings—durably crafted, precision-fitted, and stylish. Meeting OEM standards for easy installation, our collection suits upgrades or replacements. Shop now for fast shipping, secure checkout, and expert support. Give your bike the ultimate quality it deserves!
About us
At UltimateMotorX, we’re rider-founded experts in top-tier motorcycle fairings. We source premium materials, partnering with trusted manufacturers for perfect fits and durability. Enjoy expert advice, hassle-free returns, and seamless shopping. Ride with confidence—style and quality guaranteed!