The production of motorcycle fairings requires precision and expertise in mold making. A comprehensive understanding of the processes involved—from designing and prototyping to mastering injection molding techniques—is crucial for business owners aiming to produce top-quality fairings. This guide provides insights into the integral stages of mold creation, including the design phase, selection of materials, injection molding processes, and critical quality control measures. Each chapter will explore these areas in detail, empowering you to enhance your manufacturing capabilities and improve product offerings.
From CAD to Cast: Crafting a Durable Mold for Motorcycle Fairings

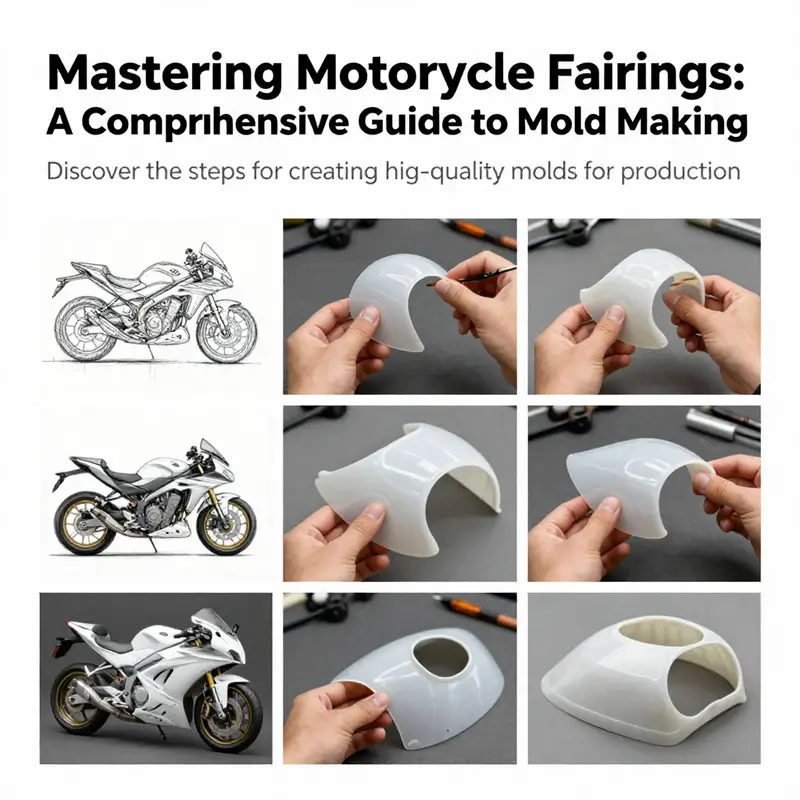
The journey from concept to a production-ready motorcycle fairing mold winds through a carefully choreographed sequence that blends digital design, hands-on craftsmanship, and materials science. It begins with a clear aerodynamic brief and a precise visual language, then moves into a virtual realm where every line, curve, and rib is interrogated for performance, manufacturability, and repeatability. In this first phase, engineers and designers translate concept art into a three-dimensional model using robust CAD tools. The goal is not only to capture the silhouette of a fairing but to embed within the model the practical realities of molding, such as wall thickness uniformity, draft angles, and attachment features. The digital model must anticipate how the part will release from a mold, how cooling will affect dimensions, and how surface finish will translate from mold to part. Draft angles, typically a modest 1 to 3 degrees, are embedded into the geometry to enable reliable part removal without compromising the aesthetic or structural integrity of the final product. Wall thickness is balanced to ensure that the part remains light enough for performance while resisting warpage and sink marks during cooling. Venting paths and air-exhaust routes are designed into the model so that molten material can flow and air can escape, preventing burn-through and ensuring a smooth surface on the finished fairing. These considerations are not abstract; they are the practical consequences of years of molding experience and the physics of heat, flow, and surface energy. The digital stage, therefore, is not a cosmetic exercise but a rigorous validation of form and function before any tangible work begins. Once the CAD model is locked, the process shifts toward preparing a physical representation that can become the master pattern for the mold itself. For many teams, the path forward starts with a foam-based master pattern carved to near-net shape. A large block of polystyrene or polyurethane foam is CNC-machined according to the CAD file, producing a full-scale surrogate of the final fairing. This foam pattern is not the finished artifact; it is a sacrificial form that captures the geometry while remaining easily reshaped. The subsequent smoothing, sanding, and hand refinements are where the designer’s eye narrows the tolerance window and eliminates micro-imperfections that could translate into blemishes on the molded part. The quality of this master pattern sets the tone for everything that follows, because any flaw in the foam can be carried through into the mold and propagated across hundreds or thousands of parts in production. At this stage, the temptation to push faster can be strong, but the discipline of precision must remain the core discipline. For teams seeking higher fidelity and longer runs, the foam master can be used to produce a positive mold via resin casting or vacuum forming. A positive mold, built off the foam pattern, provides a more rigid, durable intermediary that preserves the fine detail captured in the master. Resin casting allows a robust surface that can be machined and finished with relative ease, while vacuum forming over the foam yields a stiff, tradeable form that can be used to laminate a more durable production mold. Both approaches lead to a subsequent step that often determines the overall durability and repeatability of the tooling: composite molds. In many modern practices, the master pattern is enveloped with layers of fiberglass or carbon fiber-reinforced epoxy. The layup must be uniform, free of air voids, and cured under controlled conditions to minimize differential shrinkage and surface distortions. Each ply contributes strength, stiffness, and resistance to heat, while maintaining a weight that keeps the tooling economically viable. The curing environment, temperature, humidity, and vacuum integrity all play a role in the final surface quality. Once the composite mold is cured and removed from the master, it is typically finished with careful sanding and polishing to achieve a near-zero surface roughness that will directly influence the gloss and flow of the injected plastic. This internal finishing acts as the handshake between the mold and the part; a rough or inconsistent surface will imprint into the final fairing, undermining both appearance and performance. The transition from a master pattern to a functional mold also necessitates thoughtful design around core features and ejection systems. Fairings rarely sit as single, simple shells; they are assemblies with internal channels, ducts, and sometimes integrated features such as air intakes, vent paths, or even housing for lighting components. Where such features intersect the internal geometry, the mold often demands removable cores or slide mechanisms that can retract during part ejection. These movable elements must operate with precision, resisting wear and sticking while remaining synchronized across the mold halves. The alignment of core components becomes a discipline of its own, because any misalignment translates into misfit parts, mismatched mating surfaces, or uneven wall thickness at the part level. The mold itself then becomes a three-dimensional assembly whose tolerances cascade to the finished product. The design intent behind these features is to enable smooth automation in production, where two mold halves close, the resin or thermoplastic is injected under pressure, and the part freezes into shape. The choice of molding technology—whether it is high-pressure injection or a gas-assisted approach for more complex geometries—drives material selection, surface finish, and mold maintenance schedules. In this context, precision tooling is not a luxury but a prerequisite. Modern injection molding relies on tooling that can endure countless cycles without dimension drift. Aluminum and steel are common mold materials, selected for their machinability, thermal conductivity, and durability. Aluminum molds offer speed and lower cost for low-to-mid-volume runs, while steel molds withstand higher volumes and more aggressive resins. In either case, the cavity and core must fit together with exacting tolerance, because the final fairing surface quality often hinges on the micro-surface finish of the mold. The inner surface of the mold is typically polished to achieve a high-quality appearance on the plastic part, and occasionally coated or treated to reduce wear or facilitate part release. The surface finish is a cycle the machinist and mold-maker iterate through, sometimes employing advanced coatings or texturing for aesthetic effects while preserving the optical clarity of the outer skin. A successful mold design integrates venting paths and ejection systems so the molding cycle can proceed without air entrapment and with reliable part release. Venting alleviates pressure buildup during injection, prevents air traps that could mar the surface, and reduces the risk of foreign material being drawn into the mold. Ejection mechanisms, including springs, stripper plates, and air or mechanical ejectors, push the finished part from the cavity once it has cooled. The reliability of these movements is essential for high-volume production: any hesitation or mis-timing can cause scratches, deformation, or misalignment of features such as mounting points that need to align with other assembly parts downstream. As the mold nears readiness for production, the conversation naturally shifts to how these tooling investments align with the broader manufacturing strategy. A factory may prefer modular, multi-cavity molds to maximize throughput, and may even explore multi-material approaches where different resins or composites are introduced in sequence or in nested cavities. These choices reflect a balance between upfront tooling costs, run length, cycle times, and the end-user requirements for performance and aesthetics. Throughout this transformation—from digital concept to master pattern, to positive or composite mold, to final production-ready tooling—the underlying thread remains consistent: precision at every stage yields repeatability, which in turn yields reliable part quality across large volumes. The literature and industry practice also emphasize that collaboration across disciplines—CAD/CAM, materials engineering, process engineering, and production management—is essential to avoid bottlenecks and to harmonize the design intent with manufacturing realities. In this sense, the mold is not merely a tool; it is the physical embodiment of the design brief, the interface where aerodynamic ambition meets material discipline, and the bridge between concept art and the real-world performance of a motorcycle’s bodywork. For designers who want to study the deployment of similar tooling concepts in related fairing programs, a broader catalog of motorcycle fairing offerings can provide contextual reference for how shapes translate into manufacturable tooling and consistent parts over time. See Honda fairings for a representative catalog of how styling cues, attachment geometry, and surface handling converge in a production ecosystem that relies on disciplined mold design. Honda fairings. The practical takeaway is that the mold is a product of its design decisions, and those decisions reverberate through every subsequent yield—surface, fit, paint, and ultimately rider experience. Returning to the broader arc of mold design, the literature also points to external sources that illuminate the digital thread connecting design and manufacturing. A modern treatment of digital technologies in die design and manufacturing provides a foundational framework for understanding how CAD, CAM, and process control coalesce to deliver reliable tooling and high-quality plastic components. In this regard, the integration of digital design methods with rigorous materials processing remains central to achieving both performance and scale. External reading on this topic can deepen the reader’s understanding of how the digital-to-physical pipeline operates in automotive and motorcycle manufacturing, offering a structured lens through which to view mold design decisions. For those who want to explore the technical foundations behind these practices, see Digital Technologies in Die Design and Manufacturing. Further reading: https://www.mdpi.com/2076-3417/13/21/11985.
From Master Pattern to Metal Mold: Crafting Durable, Detail-Perfect Motorcycle Fairing Molds
Crafting a mold for motorcycle fairings begins long before the first chip falls away from a finished tool. It starts with a careful mental image of the final curve, the way light plays across a swept edge, and the aerodynamics that demand a precise balance between drag, lift, and cooling air. The journey from that mental image to a production-ready mold unfolds through a sequence of disciplined steps, each designed to preserve fidelity to the design while enabling repeatable, scalable manufacturing. The centerpiece of this journey is the master pattern, the physical twin of the fairing’s exterior that anchors every subsequent tool that shapes plastic into its final form. Master patterns demand a blend of artistry and measurement, because any imperfection in the pattern inevitably ripples through to the molded part. In practice, craftsmen construct these patterns from foam, wood, or high-density plastics, choosing the material not for show but for how it will respond to shaping, filling, and smoothing over the long course of refinement. Foam, with its forgiving nature, allows rapid shaping and iterative changes to the contour; wood provides a stiffer backbone for longer, straighter runs and gives predictable feedback when sanding. High-density plastics resist warping and can stand up to the rigors of repeated pattern use, while offering a stable surface that translates well to the next stage of tooling. What matters most is a pattern that captures every subtle sweep of the fairing’s lines and every contour line where a panel edge will meet another, because those are the edges that ultimately define the silhouette seen by riders at high speed and in close-up inspection alike. The pattern is not the final word, but it is the map that guides every subsequent operation. Once shape and smoothness are secured on the master pattern, the next key decision is how to translate that pattern into a mold with the durability to withstand countless injections or layups. For small runs or prototype work, the pattern often sits atop a supporting form and is used to create a flexible mold, such as a silicone mold. Silicone offers superb detail reproduction and easy release, which makes it ideal for prototyping fairings with complex features such as integrated air intakes or irregular vents. It is, however, a temporary solution. Silicone’s flexibility, while an asset for replication, limits how many cycles a part can endure before the mold begins to show wear or the surface peters out. As production grows, the mold strategy shifts toward stiffer, more durable materials that can survive the heat and pressure of production processes and still deliver the same high-quality surface finish. The next tier of mold materials commonly shifts toward fiberglass-reinforced resins and, for truly high-volume manufacturing, metal molds—usually aluminum or steel. Each material brings a different mix of strength, thermal stability, surface fidelity, and cost, and the selection is guided not only by the intended volume but by the shape complexity and the finish the final fairing must achieve. The fiberglass-reinforced resin approach sits in that middle ground, offering a robust, heat-tolerant shell that can faithfully reproduce the subtle curvature of a fairing’s surface while resisting the softening that can come with repeated cycles of heat buildup during molding. It also gives designers the flexibility to build a cavity with precise features, such as internal radii that guide the material and draft angles that ease part ejection. When a project envisions higher throughput or deeper undercuts, metal molds come into play. Aluminum, in particular, is favored for its light weight and excellent heat transfer, which contribute to shorter cycle times in injection molding. Steel, although heavier, finds its place in situations where the mold must endure even more aggressive duty cycles or where extreme precision is required over millions of cycles. The decision to adopt metal molds reflects a clear commitment to durability and repeatability; it also signals a substantial upfront investment in tooling, precision machining, and mold maintenance. The design phase must account for every junction, every seam, and every edge where parts will come apart. This is where the principle of matched mold halves comes into focus. In many production molds, the cavity and core must align with exquisite accuracy so that the hot, molten plastic—or, in some cases, composite layups—fills the space uniformly, with consistent wall thickness and a surface that remains glossy after cooling. A practical nod to this principle is found in dual-cavity designs where two halves careen toward closure in tightly controlled alignment, producing two parts per cycle while preserving symmetry and fit. Although the cited patent example concerns tail-light assemblies, the underlying logic—precise alignment, modular construction, and predictable demolding—applies equally to full fairings. The mold’s internal topology then demands careful attention to surface finish. The inner surface that directly contacts the plastic must be polished to a level that translates into a high-quality exterior on the finished fairing. Any micro-blemish on the mold surface becomes a macro imperfection on the part, visible under sunlight and magnified in showroom photos. Therefore, mold finishing is not an afterthought but a core production step. It often involves multi-stage polishing, meticulous deburring, and, in some cases, a chemical or mechanical treatment to improve release characteristics or fine-tune the surface texture. The texture you achieve on a mold can be deliberate, imparting a satin finish or a near-perfect gloss, depending on the aesthetic and functional goals of the final fairing. In practice, this level of surface control requires collaboration across disciplines. CAD designers translate the aerodynamic intent into a digital model with tolerances that anticipate how the mold will be built and how the final part will release. CAM specialists convert those models into precise tool paths for CNC machining, which carve the cavity and core from solid blocks of aluminum or steel with tolerances tight enough to hold consistent wall sections across thousands of parts. The mastery of CNC milling for mold components is not merely about cutting shapes; it is about maintaining a disciplined approach to tolerance accumulation, where each dimension is a potential source of drift if not carefully managed. The master pattern, in essence, anchors the whole process. Its geometry sets the stage for the subsequent steps: a carefully prepared pattern is used to create an accurate master from which the mold is built, either as a direct negative formed by the silicone or fiberglass housing or as the basis for a metal insert that defines the final cavity. This relationship between pattern and mold means that even minute deviations in the pattern will propagate through to the mold and ultimately to the final part. Consequently, quality control rocks the boat here: measurements are not an afterthought but a daily discipline. Operators verify contours against the digital model, confirm radii and draft angles, and test-fit prototypes to confirm alignment with the bike’s frame, headstock geometry, and exhaust routing. They do not wait for the first injection to reveal an issue; they catch discrepancies in the patterns, in the interface planes, and in the alignment features long before heat is introduced into the process. Beyond the technicalities of patterning and material choice lies a broader, practical truth: in the world of motorcycle fairings, time to market and volume influence the economics of molding as much as the physics of heat and pressure. A small, bespoke project might justify a fiberglass mold built over a foam master pattern and used repeatedly for a handful of parts with minimal lead times. A mass-produced fairing, by contrast, relies on aluminum or steel molds that can deliver hundreds of thousands of cycles with consistent surface quality and predictable cycle times. The tooling is expensive, but the per-part cost drops dramatically as volume climbs. The choice of materials must, therefore, reflect the business reality as well as the technical demands. For hobbyists and small shops, additive manufacturing has reshaped how master patterns are created. 3D printing, using materials like PLA or ABS, has accelerated iteration and enabled rapid refinement of the master before it is used to generate a silicone mold or a fiberglass shell. The pattern’s plastic avatar can be tested for fit against a digital platform, mocked up against a rider’s view, and adjusted without the cost of traditional woodwork or foam shaping. This interplay between digital design, rapid prototyping, and traditional tooling underlines a modern truth: the mold is both a physical object and a design artifact, a living interface between concept and production that must endure as long as the business intends to produce. The practical upshot is that the mold must be designed with foresight. Draft angles, venting paths, and ejection systems are not decorative add-ons; they are essential to a smooth, repeatable cycle. Draft angles minimize adhesion between the plastic and the mold surface, enabling easy ejection after cooling without shelling or tearing. Venting channels prevent air traps that would create voids or surface defects. Ejection systems—pins, side actions, or collapsible cores—must be calibrated to release the part without distortion at every cycle. In the realm of fairings, where the surface presentation is everything, these features demand exacting attention. The mold’s life is measured not only in cycles but in the ability to reproduce the same optical quality across years of service. A well-made mold preserves the sharp definition of panel edges, the graceful taper of a belly fairing, and the subtle swelling around the air ducts that keep the engine bay ventilated without sacrificing silhouette. The craft thus becomes a study in translating a three-dimensional ideal into a repeatable, manufacturable tool. The operator must keep in mind not just the current project but the potential for adaptation: the same pattern and mold frame might be tweaked to accommodate a new paint finish, a revised air-inlet geometry, or a different rider silhouette, all without starting from scratch. This is where modularity enters the conversation. Modern mold design often embraces modular inserts that can be swapped or re-cut to reflect evolving product lines while preserving the integrity of the core tooling. Such flexibility is particularly valuable when a brand aims to offer fairings for multiple bike models sharing common architecture or when an aftermarket line must interpolate across several manufacturers’ platforms. The narrative of mold-making, in this sense, reaffirms a simple principle: the mold is not just a reproductive aid; it is a strategic asset. The best molds marry precision with resilience, enabling consistent reproduction while staying cost-effective in the face of design changes and production ramp-ups. To a designer steeped in the physics of plastics and the aesthetics of the ride, the mold is the crucible where intent becomes tangible. And yet, even as the mold serves its function with machine-like reliability, it remains an artist’s tool. The sheen of the final fairing, the way light reveals the contour, and the tactile impression of a panel edge are the music that the mold must help produce. For designers and engineers who navigate the intersection of performance, form, and manufacturability, the path from master pattern to metal mold is the art of balancing ambition with practicality. In the end, the choice of master pattern materials, the spectrum of mold materials, and the intricacies of pattern-to-mold translation converge to deliver a tool that can faithfully reproduce the desired form while withstanding the rigors of production. The result is a reliable, repeatable process that turns a visionary fairing into a tangible product—skimming through air with the rider’s silhouette defined by line, contour, and finish. For readers seeking a tangible touchstone in this journey, consider exploring the broader landscape of bike fairings and the dedicated collections that showcase how compatibility with different bike models is reflected in tooling choices. For example, if your project centers on Honda fairings, you can explore options and compatibility through the Honda fairings collection linked here: Honda fairings. External sources also illuminate the underlying mold-making principles used across composites and plastics. A comprehensive guide from The Fabricator discusses the methods and considerations involved in creating molds for composite parts, offering a technical backbone to the narrative outlined here: https://www.thefabricator.com/mold-making/creating-molds-for-composite-parts.
From CAD to Cavity: Crafting Precision Molds for Motorcycle Fairings Through Injection Molding

In the spectrum of motorcycle engineering, the fairing sits at the intersection of form and function. It must slice through air with minimal drag while offering rider protection, housing lights, and presenting a visual signature that defines a brand. Turning that burden into a reliable production reality starts long before the first part leaves the mold. It begins with a deliberate journey from digital design to a physical cavity, a journey that blends CAD prowess, material science, and precision machining into a single, repeatable process. The mold is not merely a negative of the final part; it is an engineered system that governs flow, cooling, ejection, and surface fidelity. The steps that unfold from here are a careful choreography where geometry, metallurgy, and process parameters converge to deliver consistent parts at scale.
The design phase sets the tone for manufacturability. Engineers begin with a detailed 3D model that accounts for aerodynamic goals, structural support, and aesthetic cues. Beyond simple shape, this digital model encodes practical realities: draft angles to ensure part removal without damage, uniform wall thickness to avoid warping, and potential undercuts that may require slides or side actions in the mold. The software may simulate resin flow, cooling, and shrinkage, forecasting where sink marks or weld lines might appear. The result is more than a pretty surface; it is a blueprint for a tolerance-driven production tool. Draft angles, typically on the order of 1–2 degrees for fairings, help parts release cleanly while still presenting the glossy exterior that customers expect. Wall thickness uniformity, often in the 3–6 millimeter range, ensures consistent cooling and a predictable weight distribution, critical for both ride comfort and handling.
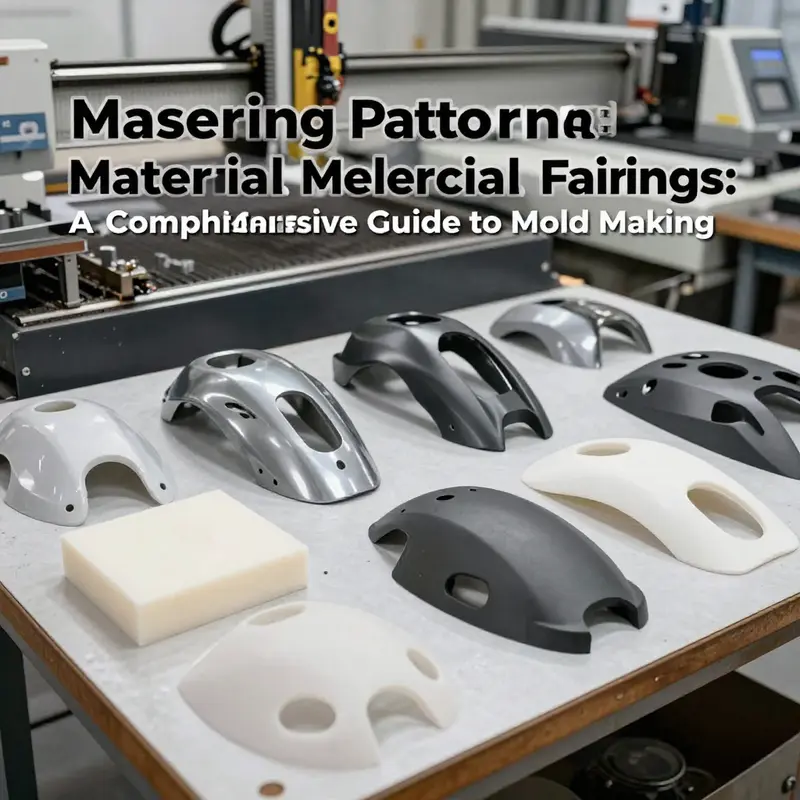
From this digital blueprint, a master pattern is created. The pattern serves as the bridge between virtual geometry and the physical world of tooling. For fairings, foam, wood, or composite materials are commonly used to sculpt the shape with millimeter-level fidelity. In high-volume contexts, engineers may rely on CNC machines to translate the 3D model into a physical form that becomes the reference for the final metal mold. The master pattern must capture the subtle curvature of airfoils, the sculpted contours around vents and intakes, and the intersections where the fairing meets other chassis components. Any deviation at this stage propagates into every part produced from the mold, so precision is non-negotiable.
With a proven master pattern in hand, the next phase is the mold itself. The mold typically splits into two halves, commonly referred to as A-side and B-side, and often includes core and cavity inserts that define the exact negative of the fairing’s interior geometry. The choice of mold material is crucial. High-grade tool steel is the backbone of durability and dimensional stability. In practical terms, designers might specify a progression of steels according to expected volume and wear. P20 steel, for instance, offers a cost-effective option for lower-volume runs, while premium pre-hardened steels with higher hardness and polishability provide the durability needed for hundreds of thousands of cycles. For applications demanding superior surface finish and corrosion resistance—particularly when producing clear or glossy elements—materials like Nak80 or S136 are favored for their combination of polishability and wear resistance. The selection is not cosmetic; it directly affects the life cycle cost of the tool, the surface quality of the molded part, and the feasibility of achieving tight tolerances over time.
The mechanical heart of the mold is a carefully engineered assembly. The cavity and core halves must mate with exacting alignment, and each half is studded with features that enable reliable production. Inserted core and cavity sections shape the fairing’s features, while ejector pins provide controlled part release without damage to delicate surfaces. Cooling channels are machined throughout the mold to ensure uniform temperature distribution. Consistent cooling reduces cycle times and minimizes residual stresses that can manifest as warps or distortions after ejection. Where the fairing design includes undercuts—such as around mirrors, air intake ducts, or complex ribbing—side actions or slides become essential. These devices extend the mold’s capability to reproduce intricate geometry, but they also add complexity in synchronization and maintenance. The overall mold design must balance precision with practicality: robust alignment features, dependable venting, and a reliable ejection system that preserves the surface finish of every panel.
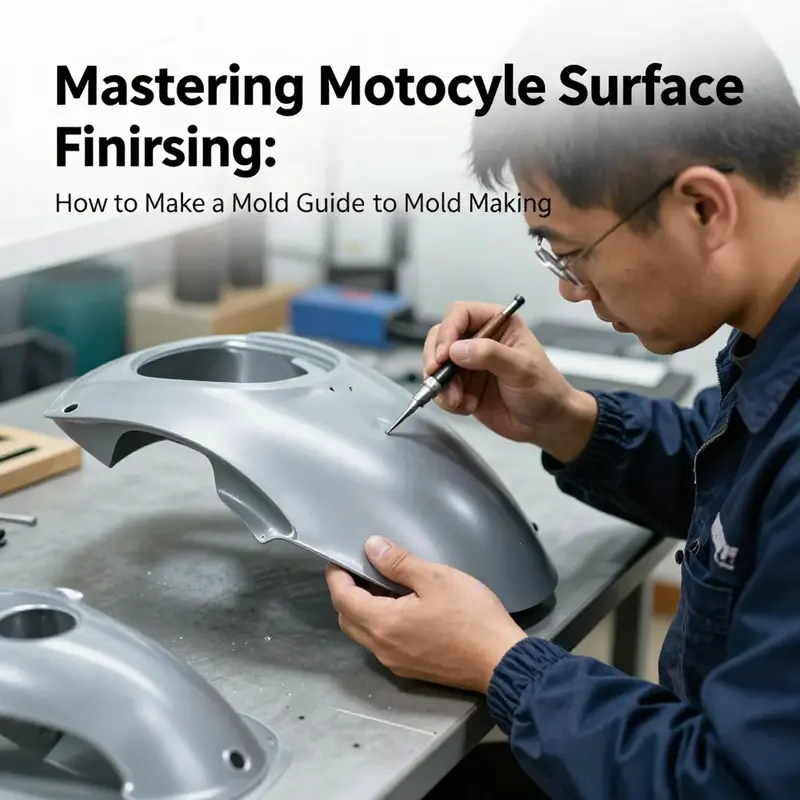
The inner surface of the mold is a canvas that dictates the visible quality of the final part. Achieving a mirror-like internal finish, often with a target surface roughness Ra well below 0.1 micrometers, requires meticulous polishing and sometimes decorative texturing that must transfer cleanly to the plastic. The surface finish is not merely aesthetic; it also affects paint adhesion, UV resistance, and longevity in a rider’s environment. The mold’s surface finish, combined with the chosen polymer, determines how the final part will respond to post-molding processes such as primer, coating, and clear finishing. The polishing work is complemented by precise surface engineering: radii and edge breaks must be executed with care to prevent stress concentrations that could compromise durability under vibration and temperature cycling.
The injection molding step is where the mold’s perfection is tested by heat, pressure, and time. The selected polymer—ABS or PC/ABS blends dominate the motorcycle fairing realm for their impact resistance, thermal stability, and compatibility with challenging cosmetic requirements. The material is heated to its molten state in the barrel of the injection machine and then injected into the mold under high pressure. Standard process windows often place injection pressures from 50 to 150 megapascals and temperatures from roughly 230 to 280 degrees Celsius, depending on the material and part wall thickness. The cooling phase, which can last from about 15 to 60 seconds, solidifies the part while the mold remains closed. The balance here is critical: too rapid cooling can induce internal stresses or distortion, while too slow a cycle linearly extends the plant’s throughput and can invite warping. In tandem with precise control of temperature and pressure, venting plays a vital role. Effective vents allow trapped air to escape, preventing air traps that create surface defects or incomplete fills. The ejection stage must be gentle enough to preserve crisp edges and glossy faces while delivering the part to downstream finishing stations.
The chain does not end with ejection. Post-molding finishing ensures that the part is ready for paint, assembly, and customer use. Deburring removes the fine flashes that often appear at parting lines. Surface treatment steps might include UV-resistant coatings or primers that improve adhesion and color retention under sun exposure. Quality assurance steps frequently deploy coordinate measuring machines (CMMs) to verify that the part’s dimensions conform to the design. The mold’s tolerances must be tighter than the finished part’s final tolerances because subsequent assembly and paint layers can introduce small deviations. In practice, achieving a precise match between digital intent and physical output requires disciplined process control: regular mold maintenance, scrubbed cooling line temperatures, and consistent material batches. The synergy between design tolerances and production realities defines the part’s repeatability, a cornerstone of any mass-produced fairing family.
The broader ecosystem surrounding mold making also shapes how a given project moves from idea to part. Regions with dense industrial clusters, such as those that host polymer injection molding, painting, and coating facilities, can compress lead times and stabilize supply chains. A vertically integrated environment reduces the distance between mold production and post-molding finishing, enabling shorter cycle times and tighter quality control. When designers contemplate the eventual scale of production, they must weigh the cost of tooling against expected volumes. Aluminum or steel molds may serve long-margin, high-volume production, but the upfront investment is substantial. The decision often comes down to anticipated shot counts, maintenance costs, and the need for consistent, high-precision replication of a complex geometry across thousands or hundreds of thousands of parts.
In practice, the industry has learned to adapt standard mold concepts to the particular demands of motorcycle fairings. A typical workflow may begin with a digital product development cycle that includes CFD-driven iterations to optimize drag and lift, followed by rapid prototyping using master patterns and quick-turn tooling. This iterative loop helps identify potential issues early, such as local thickness variations or undercut complications, before committing to a full production mold. The toolkit expands to include advanced machining and EDM for fine features, as well as careful material selection to ensure that the interior surfaces, where color or texture might be visible through the skin, remain pristine after many cycles. Modularity in mold design also emerges as a practical advantage. By deploying modular inserts and slides, tooling engineers can adapt a core mold to evolving fairing variants without reconstructing the entire cavity system, preserving both capital and cycle time.
The story of molding for motorcycle fairings is not complete without acknowledging the supply chain realities that shape project feasibility. Globalization and regional specialization intersect in places where automotive components are produced. For example, certain regions have established ecosystems that support the full spectrum of needs—from raw material supply and polymer compounding to precision machining and high-quality painting lines. This integrated network reduces risk, shortens lead times, and improves consistency in part quality. In this broader picture, a well-designed mold is more than a tool; it is a strategic asset that aligns engineering ambition with manufacturing reality. To illustrate, a manufacturer might source a complete suite of services—from master pattern creation using CNC technology to final painting and UV coating—within a single region, enabling a tightly synchronized production cadence that keeps fairing programs on schedule and within budget. As with any complex, high-stakes production, mitigation of defects, scrap, and downtime becomes central to the design philosophy. The mold, the plastic, and the post-mold handling are not isolated steps; they form a continuous feedback loop that informs design refinements and process improvements at every cycle.
For readers who want to explore specific market contexts or supplier capabilities without losing sight of the core engineering, the experience of looking at established categories and supplier networks can be instructive. For instance, reference material from broader sourcing guides highlights how diverse yet connected the ecosystem is, and it reminds designers to consider compatibility with downstream services such as painting and finishing. In the realm of consumer aftermarket parts or OEM components, understanding a supplier’s capabilities helps ensure that the initiating design can translate into a manufacturable, durable, and high-gloss finish that stands up to weather, abrasion, and long-term exposure. When this understanding is anchored in the mold design, countless decisions—such as choosing a steel grade, selecting an appropriate cooling strategy, or deciding whether side actions are warranted—become part of a rational, documented process rather than ad hoc improvisation.
Within this narrative, a practical touchstone emerges: the mold is a living system built to endure. Its durability translates into predictable cycle times, stable dimensions, and repeatable surface finishes across thousands of parts. The result is not simply a single fairing; it is a family of parts that can be produced with consistent quality, allowing designers to explore colors, textures, and variants with confidence. The discipline of mold making—grounded in CAD accuracy, material science, and machining precision—creates a reliable platform from which creative expression can flourish. It is the quiet engineering backbone of the motorcycle’s aesthetic, the thing that makes a stand-out design manufacturable at scale rather than merely aspirational.
For those who want to dig deeper into the practicalities of sourcing and capabilities within large-scale fairing production, regional hubs play a crucial role. Guangdong’s manufacturing clusters in Guangzhou and Foshan, for example, have cultivated a robust ecosystem of polymer injection molding, automated painting, and UV-resistant coatings. This integrated environment can reduce lead times and simplify logistics for global buyers, offering a model of how to align design intent with production realities. The overarching lesson is clear: successful mold making for motorcycle fairings is as much about systems thinking as it is about precision geometry. The parts you see on the road are the culmination of a tightly choreographed sequence of decisions, each tuned to deliver a product that is both fast and beautiful. In that sense, the mold is the true instrument of speed—a device that translates aerodynamic requirements and aesthetic goals into tangible, repeatable performance on every ride.
To connect the technical thread with practical avenues for builders and buyers alike, consider the broader ecosystem that supports these capabilities. Within the realm of online resources and supplier directories, several platforms provide guidance on sourcing high-quality injection-molded motorcycle fairings from verified suppliers, outlining technical capabilities, quality standards, and supply chain advantages. For readers curious about how to navigate the market and assess potential partners, a curated reference in the industry highlights the critical factors to weigh when selecting a supplier, from process controls to post-maintenance support. This perspective complements the technical core of mold making by offering a pragmatic lens on how to translate a design into a reliable supply chain while maintaining the integrity of the final product. If you’re exploring a specific category or brand variant, you can start by looking at related product lines such as those in the Honda fairings category to understand standard fits, common attachment points, and cosmetic expectations as you map your mold’s tolerances to real-world installation.
Honda fairings provide a representative touchstone for examining how design intent translates into compatible, repeatable production across variants. Beyond aesthetics, this reference helps frame the practical challenges of mating fairings to components, wiring, and airflow, all of which cycle back to the mold’s ability to reproduce consistent, high-precision surfaces. As you progress through design iterations and tooling refinements, the core lessons stay the same: embrace precise geometry, select materials with the right balance of toughness and polishability, and design the mold to accommodate efficient manufacturing while preserving fidelity to the envisioned surface.
External resource: https://www.made-in-china.com/products?keyword=Motorcycle+Fairing+Supplier+Guide
From CAD to Gloss: Mastering Quality Control and Surface Finishing in Motorcycle Fairing Molds
A motorcycle fairing mold is more than a tool; it is the hinge between a designer’s aerodynamic vision and the disciplined physics of mass production. It must reproduce complex curves with micro-sculpted precision, support high-volume cycles under demanding heat and pressure, and deliver a surface that riders instinctively trust with their eyes and hands. When quality control and surface finishing work in harmony, the mold becomes a reliable storyteller: each batch of panels reads the same from every angle, glints with a controlled brightness, and resist wear in the long, vibrating hours of the road. The path from digital concept to a finished, glossy shell is not a single leap; it is a sequence of carefully calibrated decisions, each subject to verification, refinement, and confirmation. The outcome is a mold that not only shapes plastic but also shapes the experience of riding—an experience defined by dimensional integrity, flawless release, and a surface that holds its allure under sun, rain, and decades of use.
Quality control in mold making begins at the design table and travels through every subsequent stage. The first decisive move is precision design and CAD validation. A digital model carries more than geometry; it encodes how the part will breathe under heat and how it will release from the mold without compromise. Draft angles, wall thickness, radii, and undercuts must be embedded with tolerances that align with the chosen molding process. In many cases, drafts are modest but essential, typically a few degrees, chosen to balance easy ejection with the desired surface fidelity. The CAD model is not only checked for interference between mold halves but also for interactions with the inject stream. Proper gating, runner design, and runner balance influence how the resin flows, cools, and fills every contour evenly. A misstep here would propagate into trim lines that show up as seams or cosmetic flaws on the finished fairing.
Material selection for the mold itself compounds the complexity of quality control. Hardened steel and aluminum alloys are favored for durability and thermal stability, yet each material brings its own set of process sensitivities. Harder steels can wear less but demand more aggressive finishing; aluminum offers easier machining but may require more aggressive heat management. QC must confirm the material’s hardness, thermal conductivity, and microstructure, because these properties determine how the mold behaves under repeated cycles of high-pressure injection and rapid cooling. Material certification and traceability provide a defense against drift across production runs. Any deviation in alloy composition, surface treatment, or heat history can translate into micro-geometries on the cavity that push the part out of spec or alter its surface quality.
Machining tolerances hold the mold to astonishing precision. Cavity features, gate locations, and core-pillar alignments are typically controlled to the micron level, with tolerances often around ±0.01 mm for critical surfaces. In-process inspections with coordinate measuring machines (CMMs) verify that each cavity mirrors the CAD geometry. The process is iterative: roughing yields, finishing passes, and final gauging—each step paired with a measurement checkpoint. When a tolerance slips, the response must be swift and exact, whether it is a small re-cut of a datum surface, a re-polish of a high-winish area, or a realignment of the ejector system. The goal is not only dimensional fidelity but repeatable reproducibility across dozens or hundreds of cavities. A well-run facility uses statistical process control to watch trends, ensuring that a creeping deviation never reaches production.
Prototype testing and first-article inspections are the bridge between planning and production. A dry run confirms the mechanical harmony of mold closure, alignment, cooling flow, and ejection. It is during these trials that engineers observe how the mold behaves with real tooling temperatures and how the part’s geometry translates into the surface and edge quality. Common defects identified early—flash, sink marks caused by nonuniform cooling, or misalignment that creates visible seams—signal where adjustments are needed. For fairings, the scale compounds the stakes: a slight mismatch in a panel edge can disrupt the aesthetic line or the fit against neighboring parts. The trial also tests the ejection system’s gentleness and reliability, because aggressive ejection can mar the surface or introduce micro-scratches that become visible after painting and assembly.
A central design concern during these QC activities is the mold’s release behavior. Air needs to escape without creating gas traps, and the plastic must part cleanly from the surface without dragging or tearing. Venting strategies are designed into the cavity with attention to how the resin will flow and compress, particularly at sharp corners or along long curves. Ejection mechanisms—whether simple stripper plates or more elaborate pull-back systems—must coordinate with the resin’s shrinkage profile so that every panel leaves the mold with consistent surface orientation. In multi-cavity tools, symmetric halves and balanced clamping are not cosmetic touches but essential for maintaining even pressure and preventing misalignment between cavities. The craft here is in anticipating where a panel’s surface might be sensitive to tiny shifts in closing force or thermal gradients and designing the tool to neutralize those risks.
The surface finish of the mold is the canvas on which the final appearance rests. Polish and texture decisions are not afterthoughts; they are embedded in the mold’s life expectancy and the resin’s behavior. Mirror polishing yields a high-gloss interior that enables dazzling reflections and a premium look on the finished fairing. Achieving this finish requires a disciplined hand with progressive grits, meticulous removing of any micro-scratches, and a controlled buffing regime. Conversely, matte textures or carbon-fiber-like patterns require controlled texturing processes. Sandblasting with precise media, laser etching for consistent micro-patterns, or chemical treatments create a repeatable surface that the resin can take on uniformly. The critical point is consistency: the texture or gloss must be identical across all cavities to avoid a visible mismatch on the production line. Surface integrity audits—magnified inspections for pits, micro-scratches, and waviness—are standard practice, because even tiny flaws translate into visible defects after part demolding and cooling.
Durability and release performance are intertwined with surface choices. In some high-end applications, protective coatings such as physical vapor deposition (PVD) or diamond-like carbon (DLC) layers are applied to reduce wear and improve release, but these coatings demand compatibility with polishing and with the resin’s chemical interaction. The coatings should be thin enough not to alter critical dimensions and should be tempered to withstand the frictional contact of the melt during injection. After finishing, the mold undergoes thorough cleaning and careful storage. Contaminants carried into the mold or carried over from previous runs can seed first-batch defects, so a disciplined cleaning protocol—solvent wipe-downs, lint-free inspection, and dust control—keeps the surface pristine for the first shots and reduces the risk of early cycle variation.
The life of a mold in production is a testbed for quality control. Even with a perfect initial setup, the running process will exert its own pressure. Melt temperature, mold temperature, injection speed, packing pressure, and shot size all become data points that feed back into the control system. Modern lines often implement closed-loop control where the inspection results from the part are used to adjust processing parameters on the fly. This dynamic tightening of tolerance helps ensure that the same surface quality, the same edge sharpness, and the same cosmetic appearance persist over many thousands of cycles. In this sense, QC is not merely a gate at the start of production; it is a continuous, data-driven discipline that sustains consistency and reduces waste.
To translate these practices into a practical workflow for a new mold, teams begin with a robust handoff: from a precise master pattern—often produced by CNC—from the CAD geometry to a two-part mold with matched cavities and robust alignment features. The initial setup includes validating the cooling layout and ensuring the gating strategy distributes the resin evenly to all surfaces. The first-run parts are inspected with a blend of metrology and surface inspection tools, and any deviations are traced back to the root cause, whether it is a slight misalignment, a drafting error, or a texture irregularity. Over time, process data accumulates, enabling refined tolerances and refined surface specs for subsequent production ramps. The objective is a repeatable recipe in which a single part’s gloss, texture, or bright reflection is not a one-off incident but a guaranteed outcome across the entire family of fairings being produced.
For readers who want to visualize how these principles apply in industry practice, it helps to consider how a patent example—focused on a modular, symmetric mold design with integrated alignment platforms—illustrates the underlying concepts of precision and surface consistency. This approach—where matched mold halves align precisely to produce parts that fit together cleanly—embodies the same logic that governs full fairing molds: repeatability, ease of maintenance, and high surface quality across a production run. While the patent in question concerns a tail light mold, the same principles of symmetry, alignment, and modularity directly inform full-fairing mold construction, where the same demands on finish and fit apply across a larger, more intricate geometry.
The reader who looks at this process from a broader design perspective will recognize how the mold’s life circles back to the rider’s perception. The fairing’s curvature, its transition lines, and its attachment features must resonate with light and with tactile sense. A defect that seems minor in a cubic centimeter of mold can become a conspicuous seam on a panel as large as a helmet when viewed in showroom lighting or during a sunny highway pass. That is why the discipline of QC and surface finishing is not a set of rigid rules but a disciplined mindset: to anticipate, detect, and correct at every stage so that the final product, in the end, looks and feels like it was designed as a single, coherent piece. The mold becomes an instrument that translates a two-dimensional concept into a three-dimensional, durable reality that a rider can trust every time they lean into a corner and every time they glance at the reflected sky on a gloss surface.
The internal reference that follows this chapter can serve as a practical touchstone for readers who want to explore how existing fairing families shape new mold projects. For a broader view of compatible shapes and styling references, see the Honda fairings catalog. Honda fairings catalog
In closing, the dual emphasis on quality control and surface finishing is what elevates a mold from a functional tool to a dependable production resource. It ensures that every injection cycle returns repeatable, inspectable results, and that the skin of the final fairing carries a surface that is at once beautiful and durable. The combination of meticulous CAD validation, precise cavity machining, carefully designed venting and ejection, controlled texture or gloss, and disciplined maintenance creates a chain of reliability from the first design sketch to the last part of the run. For manufacturers, cultivating this discipline is not optional; it is essential for competing in a market where the premium feel of a fairing is as important as its aero performance.
External reference: https://www.zj-jinggong.com/en/technology/injection-molding.html
Final thoughts
Creating a mold for motorcycle fairings is a meticulous process that integrates design, material selection, injection technology, and rigorous quality control. By implementing the knowledge and techniques discussed in each chapter, business owners can optimize their manufacturing processes and ensure the production of consistent, high-quality fairings. Embrace these practices to not only enhance your product offerings but also strengthen your position in the competitive motorcycle industry.