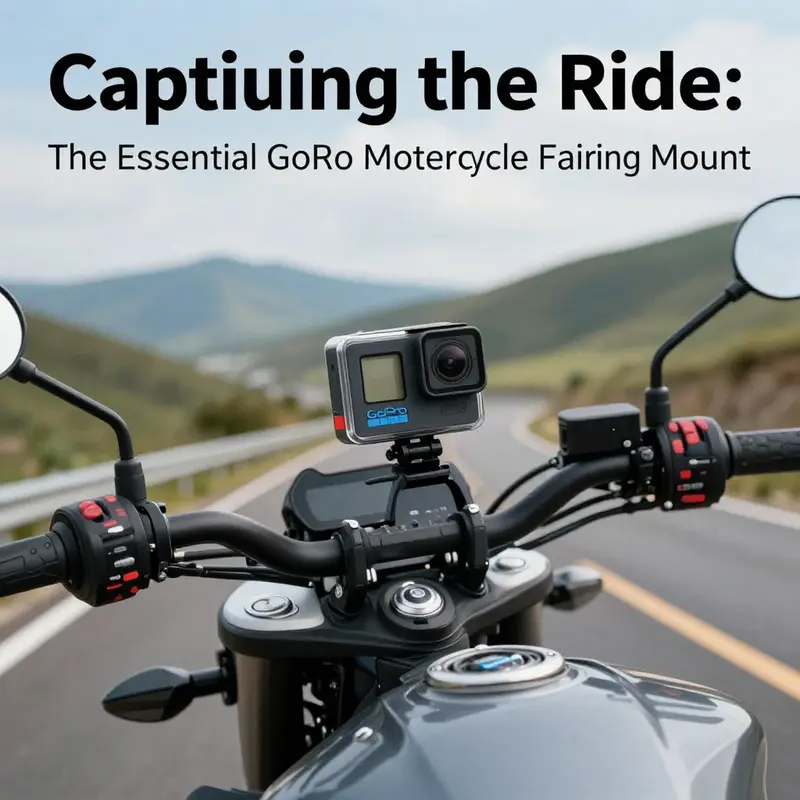
As motorcycle riding continues to surge in popularity, enthusiasts increasingly yearn to document their thrilling journeys with high-quality footage. The GoPro motorcycle fairing mount has emerged as a critical accessory for both amateur and professional riders, allowing them to capture every curve and stretch of the open road in spectacular detail. This article delves into the essential features and specifications, installation guidelines, advantages of this innovative mount, and its compatibility with various motorcycle models. By understanding these aspects, business owners in the motorcycle accessory market can better appreciate the potential that the GoPro motorcycle fairing mount offers to their customers, enhancing both their riding experience and their ability to create breathtaking visual narratives of their adventures.
Framing the Ride: The Anatomy and Capabilities of the Bat-Wing Motorcycle Fairing Mount
When a rider seeks to translate the energy of a ride into a cinematic memory, the question of where to place the camera becomes as important as the camera itself. The bat-wing fairing, with its expansive planes and forward-leaning profile, offers more than aesthetic appeal; it provides a natural stage for storytelling on two wheels. A well-designed fairing mount is not just a bracket; it is a bridge between intent and image, an interface that must endure a constant stream of vibration, wind pressure, and the rider’s own micro-movements while remaining unobtrusive and quickly interchangeable. The design philosophy behind these mounts centers on stability in the face of chaos, ease of use in real-world riding conditions, and the flexibility to frame shots across changing speeds, road textures, and riding styles. This triad—stability, simplicity, and versatility—shapes every detail of the system, from the choice of materials to the geometry of the clamp, the articulation of the joint, and the seals that protect the camera from the elements. The result is footage that feels immersive rather than engineered, a window into the ride that remains reliable day after day, mile after mile, through sun, rain, and gusty crosswinds. The bat-wing’s size and contour invite a wide, cinematic view, but the mount must tame that space to serve the shot rather than the ego of the rider; it must disappear into the bike’s lines while still delivering a precise, stable frame that can be trusted in the most demanding riding scenarios. A properly considered setup recognises that the images will travel far beyond the moment of capture: they become the source material for tutorials, ride reports, and shared narratives that connect riders across brands, skill levels, and road conditions. In practice, the best fairing mounts strike a balance between a compact footprint and a robust interface, ensuring that the camera’s mass does not upset the bike’s steering feel or compromise the rider’s control. They achieve this by spreading load across a broad contact area, using protective cushioning where the fairing meets metal, and employing clamps or magnets that grip firmly without marring the paint or interfering with access to the bike’s controls. The user experience matters as much as the technical specs: quick installation, a confident grip, and intuitive adjustment during a ride are what turn a good mount into a reliable storytelling tool rather than a fragile afterthought. The narrative of a ride relies on continuity—the camera should maintain its course without creeping out of frame or acquiring new vibrations mid-chapter. In this sense, the mount is a facilitator of craft, allowing the rider to focus on speed lines, braking technique, line choice, and the texture of the road rather than wrestling with hardware. Every choice, from the damping system to the locking mechanism, is aimed at preserving frame integrity under real-world conditions while maintaining a lightweight stance that respects the bike’s balance and handling. The bat-wing’s sweeping geometry can magnify even small misalignments, making precise setup a prerequisite for successful footage. A thoughtful design will anticipate this by enabling repeatable positioning, lockable angles, and predictable friction at joints, so the rider can reproduce a shot with confidence or adapt it quickly to a new route without reworking the entire rig. In the end, the mount should feel almost invisible when riding—an invisible collaborator that keeps the camera oriented toward the scene and the rider’s interaction with it, rather than a visible gadget that competes for attention. This is how a fairing-mount system becomes more than hardware: it becomes a storytelling instrument, capable of capturing the rider’s momentum, the tire’s grip on the road, the arc of a bend, and the character of the environment in a single continuous sequence that holds together in the edit. The result is footage that communicates not only speed but presence—the sense that the bike, the rider, and the road are in continuous dialogue rather than a succession of isolated frames. The following discussion explores the core attributes that make this possible: vibration management, installation practicality, vantage and framing, adaptability, materials and weather resilience, and the daily realities of field use that separate a good mount from a great one. And while the specifics may vary across manufacturers and fairing designs, the underlying priorities stay constant: secure attachment, predictable performance, and a setup that respects the rider’s craft as much as the camera’s needs. For riders who want to explore how a mount integrates with bikes that feature Honda fairings, for example, a dedicated category showcases options designed to sit cleanly within the bike’s lines while preserving the fairing’s aerodynamic silhouette. Honda fairings This kind of alignment—between bike geometry, mounting interface, and the camera’s footprint—transforms a simple accessory into a capable tool for visual storytelling, enabling riders to document technique, terrain, and tempo with clarity, stability, and a sense of place that only a well-conceived mount can provide. In practice, users begin with a quick assessment of their bike’s fairing profile: is there a broad, flat surface to anchor a clamp, or is the fairing curved and ribbed in a way that invites a magnet or a clamp with adaptive teeth? The answer informs not only the choice of base but the overall approach to damping, position, and travel-ready flexibility. A high-quality mount will align with a rider’s goals—whether those goals center on a cinematic wide shot that includes a generous portion of the road ahead, a more intimate view that foregrounds rider technique and hand positions, or a mix of both achieved through targeted re-framing. In all cases, the practicalities of field use matter: tool-free installation saves precious time in the paddock, and a quick-release or snap-fit mechanism makes transitions between bikes or different camera configurations straightforward. The geometry of the bat-wing fairing itself can be forgiving or exacting; some designs offer a broad, nearly flat surface that accepts a range of clamp sizes, while others require more customized contact pads to avoid scrubbing paint or bending under load. In either case, the mount’s primary responsibility remains unchanged: to anchor a camera in a way that preserves both image quality and rider safety, to resist the torque of a high-speed sprint or a rough surface without letting the shot wander, and to be capable of quick re-framing as the ride unfolds. The practical reality is that this balance is achieved through a careful blend of three factors: material resilience, mechanical design, and user-centric usability. Materials chosen for fairing mounts must withstand constant vibration and environmental exposure while keeping weight to a minimum. The most common combinations pair reinforced polymer housings with an aluminum substructure to deliver rigidity without adding bulk. The base often features a clamp or magnet system with rubberized contact surfaces to protect the fairing and to secure the interface against wind pressure. The profile of the mount is engineered to minimize protrusion, reducing snag risks in traffic or during dynamic line changes. The performance personified by these design choices translates into a camera that remains oriented toward the scene—capturing the road, the bike’s silhouette, and the rider’s subtle interactions with the controls—while the environment flows around it in a smooth, coherent sequence. As frame rates rise and horizons stay level under the influence of wind, the importance of a dependable damping strategy becomes even clearer. The damping system, whether integrated into the base via silicone cushions or configured as dual-layer grommet supports, aims to isolate the camera’s mass from the fairing’s structure and to attenuate high-frequency vibrations before they reach the lens. The aim is not to eliminate motion but to prevent it from morphing into a distracting shimmer or a rolling-jelly effect. In practice, riders can expect the mount to maintain framing through sudden changes in road texture, through gusts that buffet the bike’s profile, and through engine-induced vibrations that would otherwise travel directly up the fairing and into the camera housing. Each ride becomes an opportunity to evaluate and iterate. A rider may discover that a slightly higher tilt emphasizes the line of sight on an upcoming bend, or that a shallower angle keeps the horizon in check during a high-speed stretch. The beauty of a well-made mount is that these refinements can be made quickly without sacrificing stability or requiring a degree in mechanical engineering. Film-quality results demand attention to even small details: a clean lens surface, shielded wiring that does not tug at the camera during body shifts, and a balanced weight distribution that keeps the bike behaving as it should when the rider shifts weight for a corner. The mount’s role extends beyond image capture to influence how a ride is understood and remembered. It is the difference between footage that feels static and footage that breathes with the rider’s momentum. It is the difference between a sequence that stutters and a sequence that flows, with the shutter and the framing working in concert with the rider’s rhythm. The practical takeaway for riders is to approach installation as a design exercise rather than a one-size-fits-all task: assess the fairing’s geometry, select a base that distributes load, ensure vibration dampening is appropriate for the bike’s rpm range and chassis behavior, and tune the camera angle to align with the narrative you want to tell. A mount that is too rigid can transmit micro-vibrations, while one that is too loose invites drift and drift costs. The sweet spot is a deliberate, tested balance—one that leaves room for the rider to adapt on the road without compromising the shot. Importantly, this approach respects other riders and road users by maintaining unobstructed visibility and not interfering with the bike’s signaling or lighting systems. In addition, universal-fit designs should be compatible with a range of camera generations and protective housings, ensuring that the investment remains viable as gear evolves. The ultimate payoff is a mounting system that feels almost invisible during a ride: it remains secure, it remains adjustable, and it remains faithful to the moment’s truth—the rider’s control, the bike’s response, and the road’s texture unfolding in real time. External validation and field testing often highlight how particular design choices translate into real-world benefits: a clamp that grips more securely as wind loads increase, a damping assembly that remains quiet under a wide throttle range, or a joint that preserves framing despite aggressive body movement. Riders who value control over their footage typically favor mounts that offer repeatable alignment and a predictable friction profile at the joints, enabling quick re-creations of a preferred shot after a quick route change. The dialog between bike, rider, and camera is continuous, and the best mounts become the quiet, reliable partners that let this dialogue flourish without distraction. As you consider the next steps—choosing the right base, confirming compatibility with your bike’s fairing, and preparing the camera for action—keep in mind that the ultimate goal is footage that communicates momentum, focus, and narrative intent rather than gadgetry. To sum up, the core features to evaluate are (1) vibration dampening that speaks to image clarity, (2) secure, tool-free installation that respects the bike’s bodywork, (3) a wide but controllable field of view that frames the road and rider with clarity, and (4) robust materials and weather-sealing that survive the inevitable storms and sunlit rides. When these elements align with your riding style, the fairing mount becomes a trusted extension of your technique and your storytelling ethos, enabling you to document the road ahead with a level of precision and artistry that would be hard to achieve from other mounting locations. External resource: https://www.amazon.com/RICKRAK-360-Deluxe-Go-Pro-Motorcycle/dp/B0CQWZLX9J
Secure Angles at Speed: A Comprehensive Guide to Mounting an Action Camera on Motorcycle Fairings

The appeal of capturing a rider’s perspective is almost as old as motorcycling itself, yet the art of mounting an action camera on a motorcycle fairing remains a precise craft. A well-chosen mount, installed with care, can turn a ride into a vivid narrative of speed, texture, and motion—without compromising safety or the machine’s integrity. The goal is not just to attach a camera, but to align a camera with the bike’s most stable, least intrusive plane of operation. It is a blend of physics, materials science, and practical know‑how, stitched together by experience and a respect for what the road can throw at a rider. In this chapter, the emphasis is on a practical, integrated approach to selecting, locating, securing, and validating a fairing-mount system that can sustain the demands of real-world riding while delivering smooth, cinematic footage that remains faithful to the moment it records.
The first decision in this process concerns the mounting philosophy itself. Fairing surfaces are diverse in texture, curvature, and material. Some bikes feature rigid, molded plastics with clean, flat planes ideal for adhesion; others present contoured contours, obvious seams, or slight ridges that can trap air or transmit vibrations. The choice between an adhesive-based base, a clamp system that grips the edge of the fairing, or a hybrid solution hinges on a few non-negotiables: your bike’s fairing material, its vibration profile, and the kind of footage you intend to capture. A mount that portals more than one attachment technique—such as a low-profile base that can sit flush with the fairing when the surface is smooth—offers both flexibility and a margin of safety. In all cases, durability matters. A mount fabricated from reinforced polymer or aluminum, with deliberate tolerances and a finish that resists galling and scratching, will reward riders with steadier footage and fewer mid-ride adjustments.
The location of the mount deserves equal attention. Positioning the camera flush with the fairing has a dual benefit: it preserves the bike’s aerodynamics and minimizes wind noise and buffeting into the lens. A flush mount also offers a cleaner silhouette, which helps camera stabilization because the sensor isn’t fighting large changes in airflow as the bike accelerates or decelerates. Nevertheless, the ideal location is not always the most convenient. It should be a smooth, flat region away from vents, seams, and moving components. It should not obscure the rider’s line of sight, nor should it threaten access to essential controls, fuel cap, or electrical harnesses located behind fairing panels. When possible, test-fit the camera’s line of sight from the rider’s seat so you can gauge how the footage will appear against real-world riding angles. This experiential check can save hours of post-production frustration when the horizon seems tilted or the subject is cropped by a fairing edge.
The question of whether to drill into the fairing or to rely entirely on non-permanent attachment methods is not merely technical; it is philosophical. For many riders, a non-invasive method is the first choice: a robust adhesive base with a surface‑prepped bond or a high‑quality clamp that grips the edge without marring the paint. The safer, meanwhile, can still be surprisingly strong when the bond or clamp is engineered for automotive use. If drilling is unavoidable—perhaps to achieve a truly universal mounting angle or to locate the camera on a more complex surface—the rule is to minimize the number and size of holes. In such cases, place the holes only where the fairing structure can tolerate them, seal the openings against moisture ingress, and consider external protectors that can shield fasteners from vibration and the elements. The overall philosophy should be to keep the installation reversible where possible, preserving the bike’s resale value and the fairing’s integrity should your footage needs change.
Vibration is perhaps the most insidious adversary to on-bike footage. Even a small amount of engine resonance or road-induced vibration can translate into shaky frames, subtle micro-movements that degrade the sense of motion and comfort in the final edit. A well-designed fairing mount addresses vibration with deliberate dampening. Rubber grommets, silicone pads, or flexible joints act as shock absorbers, decoupling the camera from the rapid motions of the bike and the road. In practice, the best mounts provide built‑in dampening plus a cautious design that avoids rigid, unyielding connections. The mounting interface should limit the transmission of vertical, lateral, and torsional vibrations, while still allowing precise positioning of the camera. The objective is a stable image that remains steady as the bike leans, accelerates, wheels through potholes, and rides through gusty crosswinds.
Once the mounting strategy is chosen and the position established, the procedure for securing the system becomes the next focal point. A secure bond without damage is the ethical baseline for any fairing installation. Adhesive bases are popular not because they are easy, but because they offer a clean, invisible bond that preserves paint and finish. Automotive-grade adhesives—designed to endure high speeds, varying temperatures, and vibration—provide reliable strength when applied to clean, flat surfaces. However, surface preparation is essential. The fairing should be cleaned with a mild solvent that removes wax, oils, and residues. Surfaces must be dry and free of dust. A gentle scuff with a non-abrasive pad can improve adhesion by increasing the micro‑texture of the surface. The bond must be given time to cure before the first test ride. This waiting period varies by adhesive, but the principle remains: patience in the preparation yields security in the ride.
If a mechanical fastening solution is preferred—perhaps to enable quick removal or to accommodate certain fairing geometries—ensure the clamp or clip mechanism is designed for the fairing’s material and thickness. The contact surfaces should be lined with a soft pad to prevent scratches and to distribute load evenly. A secure fastening system will rely on multiple contact points rather than a single clamp with high pressure, reducing the chance of deformation under load. It is wise to document the exact mounting configuration, so later adjustments or reproductions on another bike remain faithful to the initial setup. In any case, a preliminary dry fit is indispensable. Do not ride with a camera loosely attached. The first miles should be walked through as a test, at low speed, with the bike stationary on a stand or supported by a stand. This process is not a mere formality; it is a critical assessment that reveals corner cases, such as the angle of the camera relative to the horizon, the risk of gear interference, or the possibility that the camera housing may contact the fairing under torsion.
A practical detail often overlooked is weather protection. The camera housing itself is engineered to withstand water and dust in most environments, but the mount’s hardware is not always designed with the same degree of exposure. Exposed fasteners, joints, and interfaces can become corrosion points or moisture pathways during rain or winter riding. Sealing exposed fasteners with a simple, compatible silicone sealant can dramatically extend the life of the installation, preventing moisture intrusion into concealed cavities and ensuring that the mounting system remains fully engaged across a range of temperatures. A light touch of silicone around screw heads or threaded inserts is a conservative step that pays dividends over time. Although the camera is built to live in the weather, the surrounding hardware should be safeguarded with the same careful attention.
The sequence of assembly is a choreography of checks and confirmations. Start by selecting a location that satisfies both aerodynamics and visibility. Clean and dry the surface, then apply the adhesive base or prepare the clamp area. Attach the base and verify that it sits flush against the fairing with minimal gap. If relying on an adhesive, press firmly and maintain consistent pressure for the recommended cure period. If using a clamp, tighten in a balanced manner across all contact points to avoid canting or uneven pressure. Mount the camera body and lock it in place with a minimum of three independent contact points to prevent pitch and roll. Align the camera so that the horizon line in the footage will be level when the bike is upright. This alignment is not cosmetic; it affects how the viewer perceives speed and motion in the final composition.
After the physical installation, the testing phase should be approached with the same meticulousness you would apply to any performance modification. Begin with a post-install inspection to confirm all fasteners remain tight, the mounting interface is clean, and the camera is tracking the intended field of view. Then perform a controlled ride at low speed in a safe, contained area. Analyze the footage for signs of vibration, flutter, or drift. If there is any wobble or unexpected movement, recheck every contact point. The objective is to achieve a calm, steady image where you perceive the road texture and horizon without distraction. The rider’s breathing and the bike’s engine should not be amplified by the mount in the resulting video; instead, the footage should convey a sense of being there without overwhelming sensory input.
The choice of mounting angle and perspective is as much about storytelling as it is about mechanics. A camera placed on the fairing can deliver a swept, dynamic perspective that feels immersive, but only when the angle respects the rider’s awareness and the bike’s geometry. For example, a slightly downward tilt can emphasize road texture and line pressure at the wheel, while a near‑level horizon can communicate speed in a calm, measured way. It is essential to consider the rider’s posture, the kind of ride you plan to document, and the environment. A canyon road with tight turns benefits from a slightly angled vantage that captures the cornering line; a highway ride benefits from a broader view that shows the rider’s lane position and the surrounding traffic flow. The intention should guide the angle, not the other way around. When in doubt, return to the scene on foot, mock up the line of sight with a simple frame or use the camera’s live preview to simulate the shot. This iterative approach prevents costly mid-ride repositioning and yields footage that aligns with the rider’s experiential expectations.
The channeling of your footage into a compelling narrative extends beyond the mount itself. It interacts with camera settings, lens choices, and post‑production decisions. A mount that minimizes motion does not absolve you from careful camera setup. Choose frame rates and shutter speeds that harmonize with the ride’s rhythm. A fast shutter with high frame rate can capture crisp, action‑packed scenes even on rough roads, but it can also produce a staccato feel if the ride is relatively smooth. Conversely, a slower shutter can create a smoother sense of motion but may blur motion in aggressive maneuvers. In a mounted setup, this choice is more pronounced because stabilization becomes a visual discipline. If you can, shoot some test footage at different frame rates and shutter speeds on similar terrain before attempting any dramatic sequence. Small adjustments in exposure, white balance, and color profile can significantly affect how the film communicates speed, texture, and atmosphere. The goal is not to chase cinematic tricks at the expense of reliability; it is to achieve a faithful record of the ride that can be shaped in post‑production to tell the intended story.
As we consider the broader ecosystem of fairing-mounted cameras, it is useful to reference the wide array of fairing styles and their compatibility with mounting systems. Riders with different brands and models of fairings encounter a spectrum of geometries, from ultra‑slim sport fairings to bulkier touring shells. The mounting strategy should be adaptable to these variations. In practice, a modular kit—one that can swap bases, adjust arm lengths, and accommodate different pad thicknesses—offers resilience across a fleet of bikes. For riders who regularly switch bikes, this modularity translates into consistency in footage, allowing you to replicate a tested setup on a new machine with minimal re-tuning. It also helps in maintaining your workflow, as you won’t need to relearn the placement or re‑zero the horizon with every change of bike. When exploring mounting options for particular fairings, consider the shapes and materials of the surfaces in question. For riders working with Honda fairings, there is a robust ecosystem of compatible fairing components designed to integrate with non-permanent mount systems. See Honda fairings for a broad catalog of options and potential mounting surfaces that might accommodate an action camera in a way that preserves the fairing’s lines and the bike’s aerodynamics.
In the spirit of practical integration, it is worth noting how the mounting approach can influence subsequent maintenance and service cycles. A noninvasive adhesive base, when properly cured, becomes almost invisible to routine maintenance and inspections. It won’t interfere with panel removal or bodywork maintenance, provided you document the location of the bond and the exact mounting points. If future work involves removing or replacing fairing panels, remember to perform a careful removal of the mount following the manufacturer’s guidance to avoid paint lift or surface damage. For those who rely on clamps, ensure that the clamp’s contact surfaces are not dragging across paint during any fairing removal. A quick inspection after every long ride is prudent: check the tightness of all fasteners, inspect the pads for wear, and confirm that the camera remains square to the horizon. A small routine becomes a quiet guardian of your footage’s stability and the bike’s resale value alike.
The narrative approach to mounting is not about chasing perfection through brute force. It is about a balanced, respectful engagement with the bike’s design, the road’s variability, and the camera’s demands. When done thoughtfully, a fairing-mounted camera can deliver footage that feels both intimate and expansive: the rider’s hands and the steering feel, the gleam of the fairing in sunlight, the road’s texture, and the distant horizon moving through a tunnel of scenery. It becomes a partner in storytelling, not merely a gadget strapped onto a bike. The crucial takeaways are clarity of purpose, disciplined preparation, careful material selection, and a willingness to test and retest under controlled conditions before venturing into real rides. The result is footage that carries the rider’s perspective with a sense of restraint and confidence, a representation of speed that is legible, cinematic, and respectful of the machine that carries it.
For readers who want to explore related fairing options beyond direct attachments to a single model, there exists a broad spectrum of fairing categories that can influence mounting decisions. Deliberate consideration of these categories—ranging from compact, sculpted sport fairings to larger, weather-sealed touring shells—will help you anticipate how the camera integrates with the bike’s silhouette and aerodynamics. The goal is to maintain a clean, purposeful presentation in the footage while preserving access to the bike’s essential components and controls during filming. By prioritizing a mounting strategy that respects both the machine and the moment, riders can capture footage that feels as authentic and visceral as the ride itself.
In closing, the process of mounting a camera to a motorcycle fairing is not a single action but a sequence of informed decisions that converge in a stable, well‑composed shot. From selecting a mount that harmonizes with the fairing’s surface to choosing a position that respects airflow and rider safety, to amplifying image quality through careful exposure and frame rate choices, every step matters. The result is more than just a video; it is a lived record of velocity, texture, and perception—an honest, cinematic echo of the ride. As you advance through subsequent chapters, you will encounter deeper explorations of camera settings, post‑production workflows, and scenario-based filming strategies. The foundation laid here—attention to surface compatibility, vibration dampening, noninvasive securing methods, and disciplined testing—will remain the core of your practice, empowering you to push the boundaries of mounted footage while keeping the ride secure and enjoyable.
Internal resource for compatible fairing categories can be useful when planning a mount strategy. For riders exploring mounting options for particular fairings, see the Honda fairings catalog. This resource offers a broad view of compatible surfaces and helps anticipate how different shapes may support a non-invasive mounting approach.
External reference: For official, model-specific mounting guidance and detailed compatibility information, refer to the motorcycle mount support page on the respective platform: https://gopro.com/help/articles/00700000000000000
Framed in Motion: Elevating Motorcycle Footage with a Fairing-Mounted Camera
Framed in Motion: Elevating Motorcycle Footage with a Fairing-Mounted Camera
The rider’s perspective has always been the most intimate way to tell a motorcycle story. When a camera is mounted on the bike, the footage stops being a distant record of speed and becomes a lived experience. Among the various mounting options, the fairing-mounted approach stands out for its balance of stability, aesthetics, and practical protection. It blends the mechanical logic of how a bike is built with the artistry of how a rider wants to be seen on film. This chapter explores why a fairing-mounted camera—especially on bikes with substantial front-end fairings—can deliver footage that feels both cinematic and true to the rider’s experience, without sacrificing reliability on the road or the trail of impressions left by every mile.
A motorcycle’s fairing is not merely a decorative shell. It is a carefully engineered interface between rider, machine, and the outside environment. When a camera is attached to the fairing, the device benefits from the same structural rigidity that supports the fairing itself. The front of the bike faces the brunt of wind pressure and the occasional stray stone or spray from the road, yet the fairing is designed to channel air smoothly around the cockpit and along the bike’s bodywork. This geometry creates a surprisingly stable platform for a camera, particularly when compared to handlebar-mounted solutions that are more directly exposed to gusts, crosswinds, and torsional vibrations from the steering system. In practice, this translates into footage with noticeably less jitter and fewer micro-bumps from wind buffeting, which can otherwise turn a ride into a disjointed sequence of stutters and flutters. The result is a smoother baseline for any shot, a foundation upon which more dynamic cinematic choices can be built.
From a rider’s viewpoint, the fairing-mounted position often sits at eye level or just above, depending on the bike’s geometry and the camera’s polarity of tilt. This subtle change in height matters a lot when it comes to immersion. The camera captures the rider’s line of sight—whether that line tracks a sweeping highway bend or a narrow alley of guardrails—without appearing to be perched on a separate, disconnected device. The footage feels intimate, as if the viewer is leaning into the same arc of the road that the rider is tracing with their body and the bike. It’s this alignment of optics with physical posture that makes fairing-mounted footage read as a true POV (point-of-view) experience while still benefiting from a controlled, steady recording. The camera isn’t rattling around on a handlebar cluster where shocks and cables can jostle it; it’s anchored to a structural element designed to stay congruent with the bike’s motion, which preserves the rhythm of acceleration, braking, and steering under a single, coherent frame.
The aesthetics of a clean, uncluttered cockpit are another practical virtue. When a camera sits on the fairing, it naturally avoids the clutter that can accumulate on the handlebars—phones, GPS devices, or extra mounts competing for visual space. A well-integrated fairing mount preserves the bike’s lines and emphasizes the machine’s silhouette in the shot. The result is footage that not only feels smoother but also looks more purposeful, as if the camera is an extension of the bike’s engineering rather than a separate, add-on gadget. This alignment between form and function matters not just for the final edit but for the rider’s own sense of pride in their setup. It communicates to viewers that the ride is being documented with tact and intentionality, rather than improvised in the moment.
The fairing’s positioning also affords practical protection for the recording equipment. Roads launch a variety of projectiles—water spray, salt, debris, and the occasional rain bead. A camera tucked behind the fairing is afforded a shield that lower-mounted devices seldom enjoy. The higher mounting point keeps water splashes and spray at bay, reducing the amount of post-production stabilization needed for scenes that would otherwise require weatherproof housings or aggressive weather seals. This is not a guarantee against the elements, but it is a meaningful reduction in vulnerability, especially in mixed riding conditions where sudden showers can threaten a session’s continuity. Over the course of a long ride, that protection translates into valuable in-camera lifespan and fewer interruptions in the shoot, which means more footage captured in a single session.
The forward-facing angle on a fairing mount is a deliberate choice that defines the audience’s perception of speed and distance. With the camera angled slightly toward the road, the forward horizon offers an expansive view of the surface ahead while maintaining a readable sense of motion. This viewpoint is particularly effective for time-lapse sequences and for capturing the rhythm of cornering or open-road straightaways. In a time-lapse, the camera’s eye remains anchored to the same spatial plane while the world accelerates through the frame, producing a sense of propulsion that feels both expansive and intimate. For standard motion footage, a forward tilt can emphasize the bike’s momentum while still preserving the rider’s perspective, which helps the viewer interpret the rider’s decisions in real time—when to brake, when to accelerate, when to lean into a curve. A bat-wing fairing or any broad front contour can provide a stable anchor for such an angle, ensuring the shot maintains its intended geometry even as air flows past the camera housing.
Beyond the mechanics of stabilization and the subtleties of perspective, the fairing mount offers a more balanced approach to reliability during a ride. A front fairing provides a sturdier attachment point than many alternative locations because it often presents a rigid, well-supported surface that is specifically designed to withstand air pressure, vibration, and the rigors of high-speed motion. This stability translates into fewer micro-adjustments during setup. Riders can spend more of their ride focused on riding and less on fiddling with the camera angle or retightening clamps after a few miles. It’s not just about capturing footage at speed; it’s about preserving the ability to revisit and reuse that footage later, knowing the camera was secured in a position that won’t drift, shift, or loosen with wind load during the ride. In practice, this translates into a more predictable workflow for video production on the road, a crucial factor when planning longer shoots or multi-day trips where time and gear management matter as much as the ride itself.
A fairing-mounted approach also plays nicely with the broader ecosystem of camera accessories and mounts designed for motorcycling. The modular nature of mount systems means riders can tailor the setup to the bike and the desired shot. Some mounts offer dampening features that isolate the camera’s internals from the frame’s vibrations, further shrinking the chance of blurred frames or subtle jitter that might otherwise mar a high-speed sequence. Others provide quick-release options so a rider can swap between different frames or angles without a protracted re-mounting ritual. In this regard, the fairing position becomes a springboard for experimentation, enabling a rider to test dramatic angles, switch between POV style and cinematic framing, or capture a second camera for rear or consistent horizon shots without sacrificing the primary angle. The net effect is a richer visual language—one that blends the rider’s immediate, eye-level experience with the broader storytelling possibilities of dynamic, forward-focused footage.
Of course, every mounting choice comes with trade-offs, and recognizing them is part of a mature approach to on-bike filmmaking. The fairing is an elevated surface with its own limitations: it has to accommodate wind and rain exposure at higher speeds, and the fairing’s curvature can occasionally require careful calibration to avoid vignetting or edge distortion with certain lenses. The camera’s field of view must be considered in concert with the fairing’s geometry. If the lens is too wide and the camera too close to the edge of the fairing, the shot can create a distorted sense of space that can be jarring when the viewer moves through the footage. Conversely, a lens with too narrow a field of view may undercut the sense of immersion that makes POV footage compelling in the first place. The balancing act—between lens choice, tilt, and mounting position—benefits from a thoughtful pre-ride rehearsal and a clear sense of the ride’s narrative goals. For riders aiming to convey high-speed drama, a broader, shallower angle might deliver the sense of velocity more effectively. For those documenting technique on winding roadways, a more measured angle that emphasizes line choice, braking points, and apexes can be more instructive.
The practicalities of setup are part of the craft. When choosing a fairing mount, most riders prioritize a combination of rigid attachment, ease of access, and the ability to adjust safely and quickly between sessions. A robust clamp system with lock-wiring or a quick-release mechanism makes field adjustments feasible without compromising the mount’s integrity. It is also wise to consider how wires and cables are routed. A clean, well-organized cable path reduces the risk of snagging on passing branches, road debris, or the rider’s own gear during a lean or a jump. The fairing’s own hardware often provides natural points for routing, so a little planning goes a long way. The result is a visually tidy setup that keeps the camera protected and ready, and a rider who can shift from shot planning to execution with confidence.
In the broader context of motorcycle customization and camera integration, the fairing-mount approach sits at the intersection of aesthetic refinement and technical reliability. It honors the bike’s design language while offering a stable, immersive record of that design in motion. It provides a narrative clarity that is sometimes elusive with other mounting choices, particularly in high-speed contexts where even minor camera movement can degrade the footage. For riders who want to capture a cinematic journey—one that blends the feel of the road with the story of the ride—the fairing mount offers a compelling compromise between image quality, bike integrity, and rider experience. As with any form of gear, the best choice is to align the mount with your riding philosophy and your camera’s capabilities. Some riders appreciate the clean look and the straightforward setup, while others lean into more advanced stabilization or modular systems that permit a range of angles and shot types. In either case, the core advantage remains: the fairing provides a sturdy, wind-aware, aesthetically harmonious platform that helps translate the ride’s physical realities into a visually compelling narrative.
For riders exploring compatible fairing options and broader accessory ecosystems, the journey often includes considering how the bike’s own contours influence camera placement. A rider may find that certain fairings—whether a broad bat-wing design or a more compact sport frame—offer different degrees of latitude for angle and tilt. One practical step is to map out a rough shot list before mounting, envisioning how each scene will look from the mounted position. Will the camera capture a sweeping curve with the rider’s line of sight? Will a close-up of the front tire or brake assembly be part of the scene? How will lighting change at different times of day and under varying weather conditions? Such planning minimizes the need for post-production guesswork and helps ensure the camera and its mount live up to their potential as storytelling tools. When the setup is thoughtfully conceived and properly secured, the resulting footage can feel less like a contrived documentary and more like a seamless extension of the ride itself.
The approach to fairing-mounted footage is not a one-size-fits-all discipline. It invites riders to tune the system to their priorities, whether that means prioritizing ultra-stable, cinematic sequences or dynamic, quick-edit POV cuts that emphasize speed and reaction. It invites ongoing experimentation with the angles, focal lengths, and shutter choices that shape the final look of the ride. It invites careful maintenance, from inspecting mounting hardware for loosening under stress to ensuring the camera housing remains weatherproof during a rain-soaked session. Most of all, it invites a rider to participate more deeply in the storytelling of their own journey—an invitation that grows stronger each time the fairing’s silhouette meets the road and the camera’s lens frames the story as it unfolds.
If you’re curious about where to begin with intended bike-fit and fairing integration, consider exploring the broader ecosystem of fairings and mounting hardware that accompany your bike’s year, model, and style. Some riders find value in examining category pages that organize fairings by brand or model, as a way to envision how a mounted camera will sit in relation to the bike’s overall profile. For example, the BMW fairings category offers a wide range of panels and configurations that influence both aerodynamics and the potential mounting geometry. This kind of exploration can help a rider forecast how their preferred camera angle will interact with the bike’s lines under real riding conditions. If you want a quick reference to related bike-fairing resources, you can start with the BMW fairings category as a practical touchstone for sizing and compatibility, bearing in mind that every bike’s geometry will shape the exact mounting approach you adopt. BMW fairings provide a useful starting point for visualizing how a front-facing camera might synchronize with a bike’s silhouette, while keeping in mind that the final choice should be tailored to your specific bike and shot goals.
As with any tool used to tell a story, the best fairing-mounted setup is the one that makes it easier to capture an authentic ride. It minimizes friction, supports creative aims, and remains reliable under the demands of a road or track session. It also invites a rider to reflect on their own riding style and how that style can be translated into a compelling visual narrative. The result is footage that not only documents the journey but also invites viewers to feel the road beneath the tires, to hear the wind and the bike’s mechanical chorus, and to experience the same sense of motion that the rider experiences in real time. The fairing mount, then, becomes not just a device for filming but a partner in storytelling—a stable, respectful, and integrated conduit between rider, machine, and viewer.
External resource: https://www.gopro.com/en-us/blog/motorcycle-mount-guide
The Mounting Matrix: Navigating GoPro Fairing Compatibility Across Motorcycles
When riders think about turning their daily commute into a moving documentary or turning a twisty road into a cinema-in-motion, the fairing becomes more than a shield against wind. It becomes a platform, a small stage that can cradle a camera and capture the road with a clarity that mirrors the rider’s own focus. A GoPro-style camera mount designed for motorcycle fairings promises to transform a ride into a story, but the reality of compatibility is often messier than the marketing. The heart of this chapter is not a single universal solution, but a careful, growing understanding of how a mounting system relates to the shapes, materials, and stresses of different bikes. It is a study of fit, but it is also a study of the rider’s needs: stability at speed, accessibility for quick adjustments, and a balance between the desire for spectacular footage and the practical limits of the bike’s bodywork and aerodynamics. In the end, the “mounting matrix” becomes a guide—an approach to selecting, positioning, and testing a camera setup that respects both machine and rider, while preserving the integrity of the fairing itself.\n\nThe first thing to acknowledge is the most obvious truth: fairings are not a single, uniform surface. They come in a spectrum from flat and broad to deeply curved and sculpted, from smooth composite shells to rugged, sometimes ribbed, aluminum- or carbon-fiber structures. Within this spectrum lies the bat-wing fairing—a shape favored on many sport and touring motorcycles for its bold silhouette and wind management. Bat wings create a distinctive mounting geometry. Where a flat plate would offer a simple, stable base, a curved, sweeping surface requires a mount that can grip without slippage, accommodate contour, and remain angled in a way that keeps the camera’s line of sight clear. This is where a mounting system designed for bat-wing configurations earns its keep. It is designed to spread load across multiple contact points, to feature adaptable clamps, and to allow micro-adjustments so the camera can be aimed toward the rider or outward toward the road depending on the rider’s preference.\n\nYet compatibility is not simply a matter of whether a clamp can physically attach to a surface. It is also a matter of how the mount handles vibration, wind, and heat. A motorcycle in motion is a dynamic, vibrating system. The engine hums, the frame flexes ever so slightly, and the wind interacts with the fairing at high velocity. A good fairing mount must absorb or ride out that vibration, without transferring it into the camera as micro-misalignments or image shake. The problem is compounded by fairing finishes and materials. A surface with a high gloss or a delicate paint layer may require a contact solution that distributes grip without chewing into the finish. A mount that concentrates all load in a single, rigid contact point can cause stress cracking or delamination over time—especially if the rider frequently rides on rough roads or low-volume highways where micro-impacts accumulate.\n\nFrom a practical standpoint, riders often start with the simplest paths: a flat or gently curved surface, a clamp that can bite into the edge of the fairing, and arms that can be angled to capture the desired field of view. These are not merely convenience features; they are safety features. A camera that shifts during a twist or a bump is not helpful footage; it is a distraction that can tempt a rider to overcompensate or even lose control. Therefore, the mounting matrix emphasizes two core design promises: secure attachment and precise adjustability, with a bias toward a spread of contact and minimal foreground interference. The best approach blends universal, adjustable hardware with an understanding of the specific fairing’s geometry. It is not about finding a one-size-fits-all device, but about assembling a compatible ensemble that maintains the integrity of the bike’s aerodynamics while giving the rider a reliable window to the world outside.\n\nThe compatibility puzzle expands when you consider the variety of bikes that share bat-wing or similarly contoured fairings. A sport bike with a sleek, perforated race fairing has a different edge profile than a touring bike with a broader, more robust shell. Even within models from the same brand, fairing variants can shift the mounting options dramatically. A serious rider begins by surveying the official specifications and any published compatibility charts that accompany mounting systems. It is common to find that a mount advertised as “for bat-wing fairings” will fit many models, but not all. The danger of assuming universality is that the rider may invest in a system only to discover a misfit after purchase. The prudent path is to verify through multiple channels: manufacturer specifications, published fitment guides, and real-world user photographs from rider communities. The last one is particularly valuable because it shows how a mount behaves in the wild, on hardware that the buyer actually rides. Forums, social groups, and photo-rich threads can expose angles and contact points that a glossy spec sheet cannot.\n\nTo illustrate the reality of fit, imagine a rider with a mid-2000s sport-touring machine that features a broad, slightly curved fairing with a small lip along the bottom edge. A clamp-on arm with multiple joints might be perfect for capturing a slightly elevated forward view. The rider can clamp to the edge where the lip provides a stable contact, then angle the camera just high enough to avoid glare from the windscreen while maintaining a rider-focused horizon line. But if the same clamp is used on a bike with a much flatter, wider fairing or on a more aggressively sculpted bat-wing, the same point of contact might slide under hard acceleration or vibration. Here, the importance of adjustable load spread becomes obvious: the mount should offer the ability to counteract any tendency to tilt or wander by distributing pressure across two or more contact zones, not just one. A single-point clamp can be reliable on a smooth surface but may struggle on a curved edge, especially if the fairing’s edge is narrow or rounded.\n\nAnother factor often overlooked is the size and weight of the camera itself. Entry-level action cameras are light enough that most mounts can manage them without issue, but heavier rigs demand more thoughtful engineering. The distribution of weight matters; a heavier camera perched at the top of a curved fairing can act like a lever, especially in fast corners or over uneven pavement. A robust mounting system should not only secure the camera but also position it in a way that minimizes leverage on any single contact point. This is where dual or triple-point contact designs excel. They provide redundancy and stability, reducing micro-movements that would otherwise translate into jittery footage. If the rider frequently rides on rough terrain or encounters high-frequency wind gusts, considering a mount that explicitly emphasizes anti-vibration properties becomes essential.\n\nThe selection process should also consider how easy it is to adjust the camera without tools. Quick-release mechanisms, swappable arms, and intuitive knobs can dramatically shorten the setup time between rides. This matters because riders who value dynamic footage may want to reframe shots on the fly—perhaps to capture a scenic overlook or a dramatic pass through a tunnel. Yet every adjustment touches the fairing and potentially the finish. The best solutions are designed to be adjusted with minimal torque and without requiring re-torquing after every ride. The rider should be able to tweak the camera angle, protect the finish, and return to the road with the least possible risk of damaging the fairing while making sure the camera remains firmly in place.\n\nThe art of compatibility also involves the mounting platform itself. A mount that claims universal appeal may still require a selection of adapters to match specific edge geometries, such as curved radii, subtle bevels, or recessed channels. In this context, an adjustable clamp that can swing or rotate is crucial. The rider can seek a position that aligns with natural sightlines, ensuring the camera captures the rider’s face in the helmet or the highway spearing toward the horizon, depending on the desired narrative. Positioning is not merely an aesthetic choice; it changes how the footage feels. A camera perched too high might reveal the rider’s line of sight while obscuring the road ahead; a camera placed too low can glance the pavement more than the scenery. The mount should offer not just stability but a flexible attitude toward composition.\n\nThe conversation around compatibility would be incomplete without acknowledging the role of verifying information before purchase. It is wise to consult official sources for compatibility information, but it is equally important to look at independent reviews and user-submitted images. A well-documented set of photos from riders who own bikes similar to yours can reveal subtle issues that the manufacturer’s charts may miss. The reality is that even well-engineered mounts will meet limits when confronted with combinations of fairing curvature, mounting surface thickness, and paint finish that pose unexpected friction or clearance problems. In practice, riders who treat compatibility as a multi-channel inquiry—cross-checking official charts, perusing ride photos, and engaging with community feedback—tend to achieve reliable outcomes.\n\nIf a rider wants the broadest possible fit while preserving the bike’s aesthetics and the camera’s operability, a universal or highly adjustable option often makes sense. These systems are designed to be adapted to multiple fairing shapes, with a range of clamps and arms that can be positioned along a fairing’s edge and extended toward the centerline. They also tend to offer more robust anti-vibration features than more lightweight hardware, which is valuable if the rider intends to shoot at highway speeds or on rough roads. On the macro level, the mounting matrix recognizes that universal adaptability, when well-executed, can reduce the friction of finding a perfect match. But universal does not mean reckless. The rider should still verify fit, inspect contact points for wear, and ensure that no part of the camera intrudes on the fairing’s heat vents, instrument panel, or rider’s leg.\n\nTo bridge theory with practice, consider the following approach for a rider beginning the compatibility journey. Start by identifying your bike’s primary fairing type and measuring the available edge width, curvature, and any protective lips. Then select an adjustable clamp system that promises multiple contact points and a broad clamping range. Before purchasing, review several community photos of mounts on bikes with similar fairings to gauge how the system behaves under real-world loads. Once the mount arrives, perform a careful, step-by-step installation in a controlled environment. Tighten contact points incrementally, checking for any paint scuff marks or flex in the fairing. Test the setup at low speeds, then progressively at higher speeds, paying attention to any movement that develops. If any movement persists, re-evaluate the contact strategy—perhaps moving to a location with a wider contact area or adding a stabilizing bracket to share the load. These steps are not mere rituals; they are essential safeguards that protect both the footage and the bike.\n\nThe internal landscape of bike types adds another layer to compatibility thinking. On a sport bike with a slim, aggressive fairing, the top edge often offers a clean, high-visibility plane that is ideal for a camera aimed forward. A touring bike with a broad, flat fairing presents more options, but it also introduces the possibility of wind turbulence from large frontal areas. A naked or semi-naked bike lacks a big fairing surface, which means the mount might need to be anchored to a more rigid component such as a fork crown or a handlebar clamp to keep the camera stable. The important takeaway is that the mounting system must adapt not only to the surface but to the riding posture and line of sight a rider wants to preserve. If the rider wants to shoot over the shoulder for a rider’s-eye view, the mount’s footprint and articulations must be tuned to keep the camera out of the rider’s field of view while still narrating the road ahead.\n\nIn considering the ecosystem of fairings and mounts, it’s useful to reference one practical cue from the broader market: the value of a cataloged, bike-specific approach. Some fairing lines present clean, multi-bolt surfaces that invite rigid, fixed mounting strategies, while others reward more elastic, clamp-based approaches that can be reoriented along various axes. The careful rider will weigh the ease of swap-ability against the risk of loosening in high-speed conditions. In the end, the compatibility journey rests on a balance between grip, adjustability, and the camera’s footprint. A mount that is too aggressive in its grip can mar a delicate paint job; a mount that is too lightweight can lead to creeping, even if it never visibly fatigues the finish. The challenge is to achieve a stable stance that accepts some compromise—an arrangement that remains secure yet flexible enough to reframe a shot on the fly. This is the essence of the mounting matrix in action: a dynamic negotiation between machine, rider, and footage—the three actors in a shared performance that unfolds over a ride.\n\nWithin this framework, the choice of mounting system should be seen as part of a thoughtful, iterative process. It is not only about compatibility with a single model but about how well the system plays with a family of bikes that a rider may own or borrow. A rider who values cross-bike footage will appreciate design features that accommodate different fairing geometries without compromising safety or finish. The presence of an adjustable, multi-point contact strategy can be the difference between a session that yields cinematic, stable footage and one that requires constant readjustment and leads to fatigue. The narrative of compatibility thus becomes a story of stewardship: the rider becomes a curator of camera positioning, balancing the desire for a compelling shot with the obligation to preserve the bike’s bodywork and the rider’s safety.\n\nFor readers who want a concrete sense of the landscape without being bound to a single brand or model, the most meaningful takeaway is a set of actionable criteria. Look for mounting hardware that promises adjustable articulation, distributed contact, and clear, repeatable alignment options. Verify the fit against multiple fairing geometries and seek out community-confirmed photos of mounts on bikes with fairings similar to yours. Favor systems that offer protection for the fairing finish, load distribution across multiple contact points, and a method for quick reconfiguration when desired. If you find yourself choosing between two options, prioritize the one that provides the most predictable behavior under dynamic riding conditions and the least risk of polluting the camera’s line of sight with frame rails, vent intakes, or mirrors. And when you encounter a fairing that seems less than ideal for any clamp-based solution, consider alternative anchoring methods that attach to a sturdier structural element, ensuring that the camera remains stable without compromising the bike’s aesthetics.\n\nFor further context and broader options, a reference point from the broader market shows how manufacturers and riders think about fairing compatibility in a more expansive sense. You can explore a catalog that highlights how different brands structure their fairing lines and how those designs influence mounting choices. This resource helps situate your own bike within a wider ecosystem of fairings and demonstrates how a mount’s features intersect with the solid geometry of a given fairing. And if you’re looking for a broader sense of how these pieces fit into the riding experience, a practical route is to examine how a well-suited mount translates into fewer setup headaches, faster transitions between shots, and more time focusing on the road rather than the hardware. In the end, the mounting matrix is not about chasing universal fit but about discovering practical compatibility that respects the bike, the rider, and the footage they want to create together.\n\nAs the bike and rider journey continues, the narrative remains anchored in the twin realities of form and function. The fairing’s shape and materials dictate what is physically possible, while the rider’s aims dictate how the camera should be deployed to tell the story best. Compatibility, then, is a moving target—shaped by new fairing designs, evolving mounting hardware, and, above all, the unique relationship between machine and momentum. The right mounting solution feels invisible when it works: it holds the camera steady, it allows quick adjustments, and it disappears into the bike’s lines so the viewer experiences the road rather than the clamp. The wrong solution is conspicuous, demanding attention and frustrating the ride with wobble, heat, or interference with controls. By embracing a careful, iterative approach to compatibility, riders can unlock the expressive potential of onboard footage without sacrificing safety or finish. And in that balance lies the enduring appeal of GoPro-style fairing mounts: they extend what a rider can capture while preserving what makes each bike unique and beloved.\n\nTo connect the narrative to real-world bike families and help readers with a quick comparative cue, consider exploring a representative catalog that highlights how different bike lines approach fairings. For instance, you can peek at the available options in a dedicated BMW fairings category that showcases how specific fairing geometries are treated by a range of mounting solutions. This reference helps illustrate how a given mounting system can adapt to a family of bikes that share core design philosophies while preserving individual identity. BMW fairings catalog\n\nWhen the time comes to purchase and install, the practical steps matter as much as the theory. Begin with a clear list of priorities: the intended riding contexts (city streets versus highways versus scenic mountain passes), the weight of the camera, the available fairing surfaces, and the rider’s preferred camera angle. Then map those priorities onto a mounting strategy that favors distribute-load contact, adjustable angles, and easy detachment for maintenance or changes in filming goals. After installation, run through a staged test—first at idle, then at moderate speed, and finally at highway pace. Listen for any rattles, observe any tilt, and watch for any visible strain on the fairing or mount. Tighten and reposition as necessary. The goal is not to force a perfect fit but to cultivate a setup that can reliably reproduce the rider’s intended footage while withstanding the realities of road, wind, and vibration.\n\nThe discussion thus far centers on the technical feasibility and the practicalities of compatibility. Yet the deeper value lies in how these choices shape the storytelling potential of every ride. A well-chosen mount can enable a rider to capture a sweeping landscape as the bike carves along a canyon, to frame a helmet-to-horizon perspective that puts the rider in the shot in the same moment, or to secure a low, dramatic angle that emphasizes the rider’s proximity to the road. The camera becomes less about a gadget and more about a narrative instrument that mirrors the rider’s perception. When the mount integrates harmoniously with the bike’s fairing, the footage feels purposeful and immersive, not contrived or compromised by hardware. That, in turn, encourages more experimentation, more riding, and more observations about the road’s texture, weather, and the subtle shifts in light as the day unfolds.\n\nIn closing, the compatibility question remains a living conversation rather than a fixed checklist. It requires curiosity, a measure of technical care, and a willingness to iterate. The rider should approach mounting as a craft—one that respects the bike’s fairing while pushing the boundaries of what can be filmed from the saddle. By prioritizing secure multi-point contact, adaptable angles, and thoughtful placement that preserves both finish and wind behavior, you can unlock a broad spectrum of cinematic possibilities. The journey from fit to footage is about trust—trust in the mount to hold, in the ride to remain predictable, and in the camera to translate the road’s story with clarity and character. With these principles, compatibility becomes less a hurdle and more a gateway to storytelling that moves with the speed, rhythm, and texture of the rider’s daily voyage.\n\nExternal resource: https://www.rickrak.com/products/rickrak-360-deluxe-go-pro-mount-for-all-bat-wing-fairings
Final thoughts
The GoPro motorcycle fairing mount stands out as an indispensable accessory for motorcycle enthusiasts looking to capture their adventures in stunning detail. By understanding its features, installation guidelines, advantages, and compatibility with various bikes, business owners can offer valuable insights to potential customers, enhancing sales and satisfaction in the motorcycle accessory market. As the popularity of video recording in the riding community continues to grow, stocking the GoPro mount can provide an excellent opportunity for business owners to cater to evolving customer needs. Riders will appreciate the thrill of documenting their experiences, and businesses can find a niche in this exciting market.