
Motorcycle fairings serve not only an aesthetic purpose but also play a crucial role in aerodynamics and protection. Over time, these essential components may sustain various damages, from minor scratches to significant cracks. Understanding how to repair motorcycle fairings is vital for business owners in the automotive sector who aim to deliver high-quality service to their clients. This comprehensive guide presents effective methods tailored for repairs, highlighting techniques for both minor and extensive damages. Each chapter focuses on specific aspects of the repair process, from basic surface fixes to advanced reconstruction techniques, surface preparation, and critical safety practices. By acquiring these skills, business owners can provide reliable repair services, enhance customer satisfaction, and ensure a well-maintained fleet of motorcycles.
From Dings to a Flawless Finish: Mastering Minor Dents and Scratches on Motorcycle Fairings
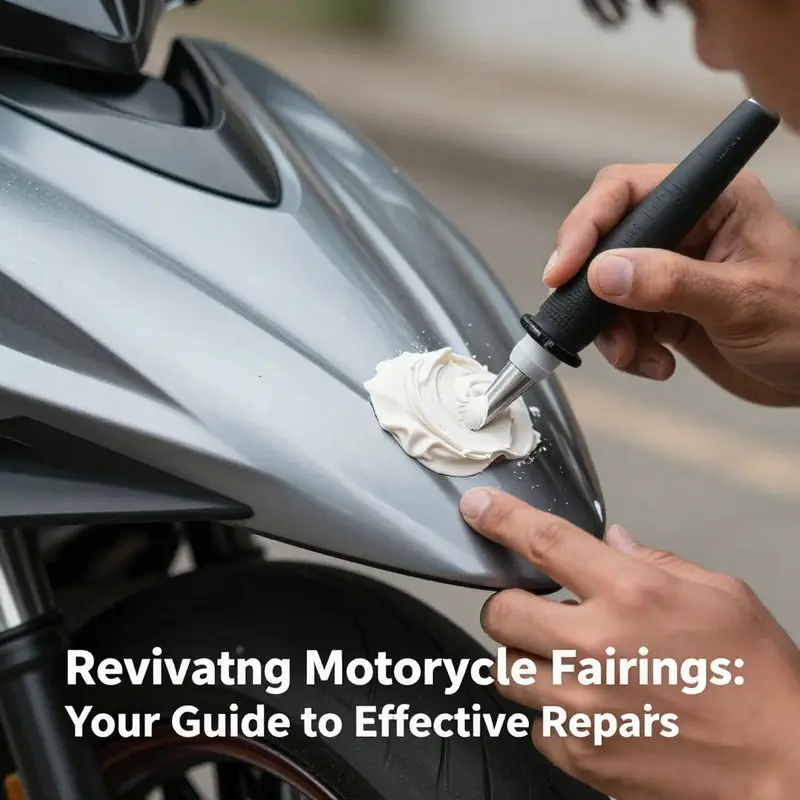
Every dent and scratch on a motorcycle fairing tells a small story about where the bike has been and how you want it to look after you fix it. When you approach these imperfections, the goal is not merely to hide them but to restore a smooth, seamless surface that looks as good as new from a short distance while preserving the fairing’s integrity. The path is not one-size-fits-all. It starts with a careful assessment, moves through a sequence of conservative restoration steps for minor damage, and remains flexible enough to shift into more hands-on repairs if the damage is deeper or more complex. The process rewards patience, cleanliness, and attention to detail, because the finish is only as good as the preparation that comes before the paint and clear coat are applied. The good news is that for most riders, small scratches and shallow dents can be repaired at home with readily available materials and a methodical mindset. The safer you are with solvents, the more steady your hands will be when you blend the repaired area into the surrounding curvature. And while the steps for light damage resemble each other across plastic, fiberglass, and polycarbonate fairings, the exact approach should respect the material you’re working with. For many riders, moving from the first wipe of IPA to the final coat of clear means following a rhythm: clean, assess, repair, blend, prime, paint, and protect. The rhythm becomes intuitive once you’ve done a few repairs, and the goal is a finish that catches the eye only as a reflection of how carefully the work was done, rather than a telltale sign of shortcuts. If you need a practical reference that mirrors this approach, you can browse Honda fairings page to see how replacement panels are organized by model and how compatible repairs might be planned in advance of a color-matched repaint. That kind of catalog can help you visualize the limits of DIY repair versus panel replacement, which is valuable when you weigh time, cost, and final appearance against the bike’s value and intended use. Ultimately, the value of good minor-damage repair lies in the precision of the surface you finish and the confidence you gain in your own workmanship.
Minor dents and scratches fall into two broad categories: those that do not breach the clear coat or paint layer, and those that do. The distinction matters because it determines how aggressive you need to be with abrasive steps and whether a filler is appropriate. For scratches that haven’t penetrated the paint, the remedy is often polishing. The surface may appear dull or hazy, but the color under the clear can still be intact. In this scenario, a fine polishing compound is your ally, and a soft cloth becomes a tool for restoring gloss rather than a weapon for removing material. The technique is simple but effective: apply a small amount of polishing compound to a clean, lint-free cloth and work it into the scratched area with light, circular pressure. The goal is to heat the surface enough to release the micro-abrasions while preserving the integrity of the clear coat. When done correctly, these superficial marks vanish or become nearly invisible, and the finish returns to a uniform luster. If you’re dealing with a very fine hairline scratch, toothpaste can perform a similar role because it contains mild abrasives, but the emphasis remains the same: a gentle touch, a clean cloth, and a careful buff until the area blends with its surroundings.
When scratches are deeper, exposing primer or the base material, the strategy shifts. Cleaning becomes the foundation of any successful repair. Isopropyl alcohol is a common choice because it evaporates cleanly and leaves little residue that might affect adhesion. After a thorough wipe, you move to controlled sanding. Begin with a very fine grit, typically around 1200, then progressively move to 2000 grit. The objective is to remove the visible edge of the scratch and feather the area so it transitions smoothly into the neighboring paint. It’s not about removing paint as much as it is about creating a feathered edge that is ready for color correction. At this stage you may apply a matching color filler or touch-up paint to fill any voids, ensuring that coverage is even and the color matches as closely as possible. Drying times matter here; rushing can trap dust or create a lumpy surface. After the filler dries, a second gentle pass of polishing helps achieve a uniform surface that accepts the final paint coat without evidence of repair.
Dents present a slightly different challenge, especially when the plastic has yielded enough that a simple abrasion and fill won’t restore the original contour. For small dents, a controlled combination of heat and pressure can coax the material back toward its original shape. A heat source like a hairdryer or a low-temperature heat gun can soften the plastic, but cautions are essential: too much heat can warp the plastic or cause distortions in the color. The technique is to warm the area evenly, pause to let the surface relax, then gently push the dent outward with a soft tool such as a wooden dowel or a plastic spatula. It’s a patient, incremental effort, and the goal is to reestablish a flat, flush surface before you proceed to sanding and repainting. If the dent resists this approach, or if the structural integrity feels compromised, then the dent may require a patch repair or professional attention. In some cases, especially with larger dents or with polycarbonate or fiberglass fairings, the material may be weakened and require one of two things: a patch to restore the contour or, in more severe cases, a replacement of the damaged section. Here too, the decision hinges on cost, time, and how perfectly the final appearance must align with the surrounding fairing.
For larger dents or more complex damage, a patch approach may be necessary. This typically involves cutting in a patch from fiberglass or carbon fiber and adhering it with a resin and hardener system. Preparation is critical: the damaged area must be cleaned, lightly roughened to accept the patch, and dried before application. The patch should be shaped to match the fairing’s contour and pressed into place with the resin system, then left to cure fully. After curing, the repair is carefully sanded to blend with the rest of the surface. The objective is not only structural integrity but also an invisible seam. When the patch process is completed, you return to the same regimen used for minor scratches and dents—feathering, priming, and color matching—so the repaired area sits in harmony with the surrounding paint. If the original finish includes a textured effect or a gold-flake layer, that texture or metallic detail must be replicated during the repaint to achieve a truly professional result. The goal is a finish that feels seamless to the touch and looks uniform from a normal viewing distance.
Finishing is where the repair truly becomes a restoration rather than a substitution. After the surface has been repaired, the entire area is primed and painted in a color-matched automotive paint. Several thin coats are preferable to a single heavy layer, as thin coats minimize runs and improve color fidelity. Between coats, light sanding with very fine abrasive paper can help ensure a silky finish. A clear coat is applied last to protect the color and add depth and gloss. The clear coat adds resilience against UV exposure, weather, and minor abrasion, helping the repair age gracefully with the rest of the bike. Throughout this process, maintaining a clean, dust-free environment is essential. Even tiny particles can settle on fresh coatings and become permanent imperfections if not managed carefully. Resins, solvents, and spray paints require appropriate safety precautions: gloves, eye protection, proper ventilation, and, when possible, a dedicated paint booth or well-ventilated workspace away from living areas.
The path outlined here is practical for many riders because it emphasizes conservatism and precision. It also leaves room for judgment calls based on the repair’s scale and the fairing’s material. For example, a small scratch on a polyurethane or ABS fairing can be revived with polishing and light touch-up paint, often without requiring resin-based repairs. A slightly deeper scratch that reveals primer may still be handled with careful sanding, color matching, and blending, but you should anticipate multiple iterations to achieve the best possible result. A larger dent or a damage patch, while more labor-intensive, is still within the realm of DIY if you approach it with patience and the right preparation. If you’re unsure about the best path for your bike’s material or your own skill level, consider using the modified approach of patching and feathering as your contingency plan and consult additional references for model-specific guidance. In any case, plan your work in stages, document your progress, and re-check alignment and gloss after each step.
The narrative of minor-damage repair is also a narrative of care. It’s not just about removing the marks but about preserving the fairing’s structural integrity and the bike’s overall aesthetics. It’s about recognizing when to push forward with a repair that is truly seamless and when to step back and seek a professional restoration. The distinction is subtle but meaningful. A well-executed minor-damage repair can extend the life of a fairing and preserve its value by maintaining a consistent, factory-like appearance. A less careful approach risks visible seams, color mismatch, or trapped contaminants that undermine the entire effort. The emphasis on cleanliness, proper curing, and careful blending is what separates a merely acceptable repair from a professional-looking result. As you gain experience, the process becomes more intuitive: a quick assess, a careful sequence of steps, a patient wait for cure times, and a final pass to ensure the repaired area mirrors the surrounding surface in smoothness, alignment, and appearance.
External resource: https://www.motorcyclecruiser.com/repairing-minor-dents-and-scratches-on-motorcycle-fairings/
Cracks, Holes, and the Road Ahead: Advanced Techniques to Restore Motorcycle Fairings
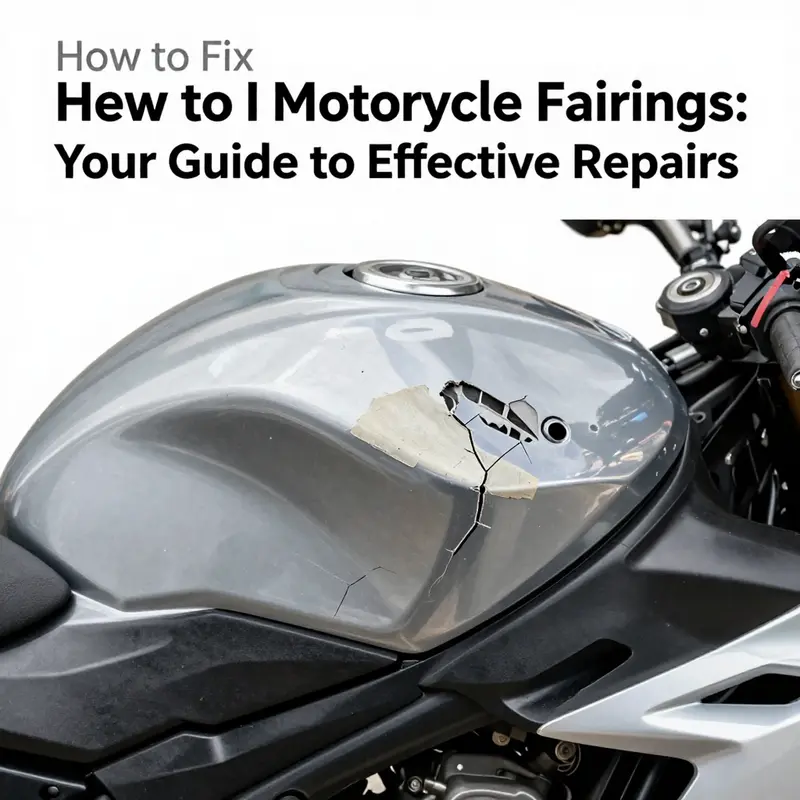
Repairing motorcycle fairings after cracks and holes requires a blend of material knowledge, precise preparation, and patient finishing. This chapter builds on the basics of fairing repair, taking you through methods that restore both strength and appearance when the damage runs deeper than a surface scratch. The aim is to bring the panel back to a form that behaves like the original under stress while looking like it belongs on the bike. The approach is material-sensitive and outcome-focused, so the first discipline is honesty about what the damaged piece can and cannot become with at-home repair. If a fairing piece has complex geometry or critical structural roles, you may choose to replace rather than repair. Yet for many common models, the combination of epoxy, fiberglass, and careful painting can extend life and save money without sacrificing safety.
Small cracks and minor holes are the most forgiving targets for repair. They respond well to a two-part epoxy resin or a specialized plastic repair kit designed for automotive and motorcycle bodywork. Begin by cleaning the area with isopropyl alcohol to remove oil, wax, and dust. A spotless surface improves adhesion and reduces the risk of micro-movements that could reopen the crack later. Lightly roughen the crack’s edges with a fine sandpaper to create a mechanical bite so the adhesive has something to cling to. When you apply the epoxy, work it into the crack until it is completely filled and the surface is flush with the surrounding plastic. Use a small putty knife or a flat object to smooth the resin so you avoid creating a raised ridge that would need extra sanding later. After applying the epoxy, follow the manufacturer’s cure time; avoid handling until it has fully set. Once cured, begin the sanding process with progressively finer grits, moving from about 400 to 600, then 800 and finally 1000 grit. The goal is to achieve a perfectly smooth transition so the repaired area blends with the rest of the fairing. If the color must match, prime the area, seal it, and apply paint in very thin, even coats. A color-matching automotive spray or high-quality brush can be used, but ensure you apply thin coats to prevent sags and orange-peel effects. The key is to create a uniform surface that accepts paint evenly and holds color over time. The finishing coat, a well-chosen clear or gloss coat, protects the repair from environmental exposure and UV degradation, helping the repair stay invisible longer.
When cracks or holes are larger than a coin or show signs of stretching across a broad area, a fiberglass patch becomes a practical solution. The first step is to cut a piece of fiberglass cloth slightly larger than the damaged region; this gives you an overhang to anchor the repair. Prepare the surface by cleaning, abrading the edges, and drying completely. Mix a polyester or epoxy resin according to the instructions, and apply a thin layer over the back of the patch or directly onto the damaged area if you prefer. Place the patch and press it firmly to ensure there are no air pockets. For added strength, apply additional layers of resin and cloth. Each layer should cure before the next is applied, and you should shape the outermost layer to mirror the contours of the fairing so the transition remains seamless. After curing, meticulously sand the repaired area, starting with a coarser grit to remove excess material and then moving to finer grits to achieve a flush, smooth surface. The goal is a final shape that accepts primer and paint without creating obvious bumps or ridges. In some cases, the texture or texture pattern of the original finish can complicate this step; in those cases, you may need to re-create the texture with careful sanding and, if necessary, a texture-recreating filler before priming.
For extensive damage or when the fairing uses a more complex material such as polycarbonate, the repair demands more than patching. Heavily damaged panels may require heat-shaping techniques to restore the original geometry before reinforcing with a patch. Warmth helps a polycarbonate surface regain its form, reducing the likelihood of a brittle or warped repair. This step should be undertaken with precise temperature control and, ideally, with a heat gun or a dedicated heat-form station. After restoring the shape, the same fiberglass or epoxy approach can be used to rebuild any voids or deep cracks, ensuring that the repaired area has adequate thickness and structural rigidity to withstand road stresses. In some cases, especially with polycarbonate, the repair might be better served by a professional service that can reproduce the original curvature and texture with high accuracy and color matching. The overarching principle is to preserve the fairing’s return-to-road performance while maintaining an appearance that does not betray the repair.
With the structural repair complete, repainting is a critical final act. Color matching is not merely cosmetic; it helps protect the repair from UV exposure and environmental aging. Begin with a high-quality primer that works with the chosen base material, whether it’s epoxy primer for fiberglass or a plastic-compatible sealer for polycarbonate. Apply primer in thin, even coats, allowing adequate flash time between applications. Sand lightly after the primer has cured to knock down any texture disparities and create a canvas for color. When choosing color, consider the base coat that sits beneath the finish. In some designs, the fairing features a metallic, pearl, or candy-clear finish that requires careful color layering to reproduce the same depth and sheen. The process typically follows a primer-sealer-paint sequence, with multiple ultra-thin coats of base color to keep the surface uniform. After the color has cured, apply a clear coat to seal the panel, enhance gloss, and provide a protective barrier against UV damage and minor abrasions. The clear coat should be sprayed in light passes to minimize runs and orange-peel texture. Gentle sanding between coats can help achieve a glassy, showroom-like finish, but avoid over-sanding that could flatten the color or reveal the repair beneath.
One practical lesson throughout this process is environmental control. Work in a clean, dust-free area with good ventilation. Solvents and spray paints release fumes, and a steady, controlled environment reduces the risk of dust embedding into fresh finishes. Safety should guide every step: wear gloves, eye protection, and, when sanding or cutting, a mask to avoid inhaling fine particles. The careful use of protective gear is not optional; it is essential for long-term results and personal safety. Even small changes in procedure—such as the exact order of sanding grits or the number of paint coats—can translate into a visible difference in color consistency or surface texture. The careful, deliberate progression from cleaning and bonding through patching and finishing is what separates a repair that lasts from one that cracks again after the first ride.
A note on matching texture and finishes helps connect the repair to its surroundings. Some fairings have a textured or metallic surface, or a specialized paint such as a gold flake or pearl effect. Matching these textures during repainting can be challenging and may require spray techniques that recreate the texture while preserving color integrity. If you’ve worked with textured finishes before, you know that texture recreation is as important as color. It’s not unusual to need a dedicated texture spray or a flexible filler that accepts texture before priming. The goal is to have a finished panel that, when installed, looks like a single, continuous skin rather than a repaired seam. This attention to detail matters not just for aesthetics but for the perception of structural integrity on the road, especially when a rider glances over the bike in the shop lighting.
A practical way to maintain continuity across the bike is to test-fit the repaired fairing before the final paint coats. If possible, mount the panel and check for fit against adjacent panels, gaps, and mounting points. Any misalignment can show up as a visible edge or a catch against another part of the bike. When everything aligns, the repaired surface will harmonize with the surrounding finish, making the repair nearly invisible to observers and more importantly, structurally sound under wind load and vibration. For readers seeking further guidance or more advanced techniques, a hands-on guide to fairing repair provides excellent step-by-step demonstrations and product recommendations. For instance, readers can explore targeted replacement options in specific bike model lineups to ensure compatibility with their cowlings, including Honda fairings for the CBR. This is a practical option when a repair would compromise the fairing’s function or aerodynamics, and it demonstrates that repair and replacement sit on a continuum of choices rather than as opposing approaches. See more about compatibility with CBR panels at the Honda fairings for the CBR page.
If you need additional references for the techniques discussed here, consider the comprehensive repair guide that consolidates steps, tips, and safety notes from experienced mechanics. This external resource complements the methods described above and provides broader context for the repair sequence, the materials used, and common pitfalls to avoid. In all cases, the aim is to restore the fairing’s protective role as well as its aesthetic harmony with the bike’s overall design. The best repairs combine correct materials, careful prep, controlled shaping, and patient finishing, so the final result is a smooth, uniform surface that withstands rider exposure and the elements over time.
For readers who want a broader catalog of replacement panels or to browse compatible fairings for popular models, the site offers a wide range of options. If you’re dealing with a CBR or another model from a familiar manufacturer, you can often find a close match among the replacement parts listings, which can simplify the finishing stage or even provide a more economical alternative to a full-blown repaint. To explore examples specific to a model family, consider browsing the Honda fairings for the CBR page, which aggregates many compatible panels and can help you gauge finish compatibility and fitment before you start the repair. The link below provides direct access to one such category that aligns well with the repair approach described here: Honda fairings for the CBR.
In closing, the advanced repair path for cracks and holes emphasizes a structured sequence: clean, bond, reinforce, shape, and finish. Each step reinforces the last, and the careful attention to surface preparation and texture matching makes the final result durable and aesthetically cohesive. If you are undertaking this work, treat the repair as a project that requires patience and precision, not speed. The reward is a fairing that not only looks good but also stands up to road conditions, maintaining the bike’s performance and safety profile. For additional perspectives and further details on extended techniques, consult the external guide linked at the close of this section. It offers a broader set of insights and practical tips that can enhance the outcomes of repair projects across various fairing materials and configurations. https://www.revzilla.com/motorcycle-fairing-repair-guide
From Rough to Ready: Mastering Surface Prep and Finishing for Durable Motorcycle Fairing Repairs

Repairing motorcycle fairings is not simply about filling a dent or patching a hole. The true measure of a repair lies in how cleanly the surface is prepared and how precisely the finish is laid down. When the goal is a durable, visually seamless result, the preparation and finishing stages deserve as much attention as the materials used. This chapter explores those stages as a continuous craft, offering a cohesive approach that ties together the careful removal of damage, the strategic use of fillers, and the meticulous layering of primer, paint, and clear coat. The logic is simple: if the base is imperfect, the finish will reveal every flaw. If the base is pristine, the finish has a chance to look factory fresh, even after years of exposure to sun, rain, and road debris. In practice, this means treating surface prep and finishing as a flow rather than a series of isolated tasks, with each step building on the last to create a durable, aesthetically pleasing repair that can withstand vibration, temperature shifts, and the everyday stresses of riding.
The journey begins with thorough surface preparation, which is the foundation of every successful repair. Before any filler is applied or adhesive is spread, the damaged area must be cleaned of all dust, grease, oil, and rust. A dedicated automotive cleaner or degreaser is essential here, because any lingering contaminant can compromise adhesion and set the stage for future peeling or delamination. This step may seem obvious, but it is remarkable how often overlooked residue compounds the repair. In addition to cleaning, a careful inspection for underlying corrosion is prudent. For any metal-reinforced sections and areas showing rust, the rust must be removed mechanically—think wire brushing or sanding—followed by a rust inhibitor to halt the progression of corrosion before proceeding. A clean, dry, decontaminated surface informs every subsequent decision about filler choice and bonding method, and it reduces the risk of a repair failing when the fairing is exposed to engine heat, sun, or moisture.
With the surface prepared, the next phase is filling and shaping. For small dents or minor holes, body fillers such as plastic putty or fiberglass filler are common choices. Plastic putty dries quickly and is user-friendly, making it a popular option for minor imperfections. However, it generally offers less strength and long-term durability than fiberglass filler, which provides superior resistance to impact and vibration. When choosing a filler, the key considerations are how the repair will be stressed and how well the material will bond to the specific fairing substrate. For larger holes, the structural integrity of the repair can be enhanced by backing with a plate—metal or high-strength plastic—creating a stable foundation that resists future flexing and cracking. This backing helps prevent the filler from cracking around edges when the fairing expands and contracts with temperature changes or road vibration. As you shape and smooth the filler, the aim is not to mask the damage with a thick layer but to rebuild the original contour, aligning with the surrounding fairing so that the transition lines disappear under light and paint.
The finishing stage is where the narrative of the repair becomes a seamless portrait of technical craft. After the filler cures, progressive sanding is the path to a truly smooth surface. Start with a coarser grit to remove the excess material and establish a level plane, then advance through finer grits to refine the texture. A typical progression might move from 80–120 grit to 180, then 220, 320, and potentially 400 or finer if the surface demands it. Skipping steps or rushing this phase can leave micro-scratches or waviness that become glaring once paint is applied. The goal is a uniform, defect-free surface that invites the paint to adhere evenly and lay down as a uniform film. During sanding, frequent inspection from different angles helps reveal high spots and low areas that might downplay the repair’s quality once finished. Dust control is not a mere convenience but a practical necessity; fine dust trapped in a seam or across the surface can ruin adhesion or cause tiny defects to show up under clear coat.
Paint matching and application are where the finish truly becomes visible. A factory-matched color is essential, especially on modern multisurface finishes that may incorporate metallic flakes, candy colors, or pearl effects. Achieving an exact match might require custom mixing, and it benefits from testing on a small, inconspicuous area before committing to the entire repair. The painting process typically uses multiple thin coats rather than a single thick layer, with appropriate flash-dry time between coats to prevent runs and solvent entrapment. This layering approach helps to build depth and even tone, allowing the repair to blend with the original panel’s hue and gloss. The final clear coat serves multiple roles: it seals the paint, adds depth, and provides the durable gloss that makes the repair indistinguishable from the surrounding finish. In high-wear regions, such as the lower fairing near the road, the clear coat’s protective properties are particularly important, guarding against UV degradation and minor abrasion from gravel and debris.
Texture matching is another subtle but critical facet of finishing. Some fairings carry textures that catch light and accentuate the shape. When repainting, preserving or accurately reproducing these textures contributes materially to the illusion of a factory finish. If the original texture is metallic or contains special paint effects like flakes or pearlescent particles, the finishing schedule must accommodate those effects, including spray technique, solvent choice, and cure times. This often requires disciplined control of environmental factors: dust-free air, stable temperature, and proper ventilation to prevent solvent odors from permeating the workspace or contaminating the finish. A clean environment not only reduces imperfections but also reduces health risks when handling resins, solvents, and spray paints.
Beyond the technical steps, the process rewards a mindset of patience and precision. Each stage, from cleaning to final clear coat, has an optimal window for adhesion, curing, and final polish. Rushing from cleaning to filler without adequate drying time can compromise bond strength, while skipping or condensing the sanding sequence risks visible ridges after paint. The finishing touches—final buffing, small touch-ups, and inspection under bright light—are the quiet moments that separate repairs that last from those that wear prematurely. The objective is not merely to cover damage but to restore the fairing so it behaves as if the damage never happened. That requires a disciplined, methodical approach and a respect for the physics of plastic and composite materials: why materials crack, how adhesion works, and how temperature cycles influence fit and finish.
For readers seeking a thorough, professional frame of reference, official tutorials and best practices from respected automotive repair education resources offer practical guidance that complements this approach. As you plan or evaluate a fairing repair, consider consulting authoritative materials that emphasize the value of surface preparation and finishing as the core of durable repairs. If you are exploring options from a broader parts and repair catalog, you can explore relevant aftermarket inventory under the Honda fairings category here: Honda fairings.
Ultimately, the health of a repaired fairing hinges on the discipline you bring to surface preparation and finishing. Materials and techniques are important, but the real difference comes from how clean the surface is before you apply any filler, how meticulously you sand and shape, and how carefully you layer paint and clear coat to achieve a seamless, factory-like appearance. In practical terms, that means dedicating time to a clean workspace, following a deliberate sequence, and validating each stage with close observation and a light touch. The result is a repaired fairing that not only looks right but performs reliably in the long run, resisting cracking, delamination, and wear that can undermine ride quality and safety. When the job is done, the fairing should look as though the damage had never occurred, and the finish should be resistant to UV exposure, weather, and the bumps of daily riding. That is the essence of a durable, professional looking repair that restores both form and function to your motorcycle. For further in-depth guidance, see the detailed, authoritative resources from Motorcycle Mechanics Institute, which offer step-by-step techniques and best practices for DIY fairing repairs: https://www.mmi.edu/blog/motorcycle-fairing-repair-tips
From Scratches to Strength: Safe, Skillful Techniques for Repairing Motorcycle Fairings

Fairings are more than a style cue on a motorcycle; they guide airflow, shield critical components, and help keep the rider safe during a spill or a gusty ride. When a fairing is damaged, the instinct is often to rush a quick cosmetic fix and hope for the best. Yet the path from dent to dependable is a careful balance of materials, technique, and safety. Whether you’re dealing with a minor scratch or a large crack, the choice of method should be guided by the extent of the damage and the intended use of the bike. A cosmetic scuff on a plastic panel can be addressed with relatively simple materials, while a compromised mount or a cracked wing demands a stronger repair that restores rigidity and retains the fairing’s aerodynamic function. The goal is to return the bike to a state where it looks right, fits correctly, and performs safely at speed, not just to cover up a blemish. With that mindset, the repair process becomes a sequence of controlled steps rather than a single, hurried fix. It also means prioritizing safety at every stage, from the chemicals you handle to the way you reattach panels to the frame. For riders who want a guided, practical approach, the following path emphasizes sound practice, attention to detail, and a finish that stays durable under weather, vibration, and heat. If you’re curious about a broader catalog of panels and replacements, there is a dedicated Honda fairings catalog that can help you visualize options and fits as you plan repair or replacement: Honda fairings catalog.
When you start a repair, the first question is always the same: is this cosmetic, or is there a structural issue that could affect riding safety? Minor dents or surface scratches on plastic fairings often resolve with a straightforward approach. You begin by cleaning the damaged area to remove any grease, wax, or dust that could interfere with adhesion. A clean surface is the foundation for a solid repair. For small dents or shallow imperfections, you apply a body filler formulated for plastics. An epoxy-based putty is a common choice because it adheres well to the plastic substrate and cures with enough strength to withstand subsequent sanding. The filler should be loaded into the dent with a spatula, then left to cure according to the manufacturer’s instructions. Rushing the cure is a common mistake and can lead to pinholes or a surface that resists true leveling. Once cured, you begin a careful sanding sequence. Start with a coarser grit—around 180 or 220—to flatten the high spots, then move progressively to finer grits, such as 320, 400, and 600. The objective is a feathered transition where the repaired area blends with the surrounding surface. Sanding must be done with a light touch and uniform motion to avoid creating new low spots or gouges.
After the surface has been feathered, you’ll prime the repair and prepare for painting. Priming seals the filler and provides a uniform base for color. The primer should be chosen to bond well with the plastic and the filler, and it should be applied in thin, even coats. Allow each coat to dry fully and sand lightly between coats to maintain a smooth finish. When the primer is solid and level, you can proceed to color-match painting. Automotive paints designed for plastics are typically flexible enough to tolerate minor impacts and temperature changes, but you must apply color in multiple thin layers rather than a single heavy coat. This approach reduces runs and ensures a uniform hue across the panel. The final step in the cosmetic sequence is a clear coat. Clear coat adds gloss and provides abrasion resistance, helping the finish resist chipping and UV damage. It’s worth mentioning that some fairings come with unique textures or finishes, such as metallic flakes or brushed textures, which require additional care to replicate. A professional paint job may involve color matching to a specific texture or pattern, and achieving that level of finish often hinges on meticulous surface prep and careful layering.
All of this, however, rests on a clean, controlled work environment. Dust-free air and proper ventilation are essential when working with resins, solvents, and spray paints. Protective gear—gloves, a mask or respirator, and eye protection—should always be worn during mixing, application, and sanding. Solvents can linger in the air and on the skin, so it’s wise to work in a well-ventilated space and to observe the manufacturer’s safety instructions for every product you use. If you’re repairing a textured finish or a panel with a gold-flake or other specialty paint, you may need additional techniques to reproduce the texture or metallic sheen found on the original. The result should be a seamless blend that you can barely detect at a glance and feel only as a smooth continuation of the surrounding curves.
When damage extends beyond cosmetic surface issues, you must shift to a more structural repair strategy. Cracks that travel through the thickness of the fairing or holes that create a void require a stronger repair that can withstand the aerodynamic and vibrational stresses of riding. A common approach is to reinforce the damaged area with a patch of fiberglass or carbon fiber. The preparation stage remains crucial: you clean and roughen the area to create a solid mechanical bond, then cut a patch that overlaps the damaged region by several centimeters in every direction. The patch is laid with resin and hardener, either by hand layup for carbon fiber or with a resin-rich approach for fiberglass. The patch is pressed into place, and care is taken to avoid air pockets that would weaken the bond. As the repair cures, you keep the surface steady, ensuring the patch remains flush with the surrounding fairing so no high points disturb the airflow. Once cured, you trim any excess fiber and begin a finishing sequence that includes sanding the patch smooth, leveling the surrounding surface, and reapplying primer and paint to match the rest of the panel.
Carbon fiber reinforcement is a preferred option for riders seeking a balance of strength and lightness, especially on performance-oriented bikes where weight and stiffness matter. If you choose carbon fiber for a repair, the process typically involves laying multiple layers of carbon cloth over the damaged area, each separated by a layer of resin. This wet lay-up approach yields a robust patch that can resist impact and maintain rigidity across the panel. It also creates a clean, high-tech look that some riders find aesthetically appealing. The work requires careful timing and attention to resin-to-hardener ratios, as well as proper ventilation due to fumes and the need to avoid skin contact with uncured resin. When the carbon fiber reinforcement is cured, you’ll still follow the same finishing steps: sanding to a smooth contour, priming, color matching, and top-coat protection. For many riders, the resulting repair not only restores strength but also preserves the fairing’s shaping and aerodynamic profile.
A critical part of any repair is ensuring the repaired panel mates correctly with mounting points and adjacent panels. After the structural work, you should perform a physical check before final installation. Dry-fit the piece to confirm alignment with the other fairings, ensure there are no gaps at seams, and confirm that fasteners and brackets engage cleanly without forcing panels into place. If mounting points show signs of damage, it may be necessary to repair or reinforce them as well, because a misaligned fairing can stress the repair and precipitate failure at speed. In short, the repair is as much about reestablishing a precise fit as it is about rebuilding the surface.
In the broader sense, best practices for fairing repair hinge on consistency and patience. Use adhesives designed for plastics or composites and follow curing times exactly as prescribed. Work in a dust-free space, and keep tools clean to avoid contaminating the surface during bonding. Before you declare victory, perform a functional test: reassemble the fairing on the bike and check for proper clearance with the frame, the exhaust, and other components. Confirm that the panel does not rub during steering input or when the suspension compresses, and verify that the color and gloss match across the entire fairing cluster. If color matching proves tricky, remember that small color deviations in a panel can look pronounced on a curved surface, so take the time to blend and feather the finish where panels meet. The most important element of safety in any repair is never compromising the integrity of the fairing, because a poorly repaired panel can detach at high speed or contribute to a loss of rider protection.
For readers who want more in-depth technique and guided steps, comprehensive tutorials from reputable sources offer valuable context and demonstrations. If you’re seeking a reliable external reference, BikeRadar provides a detailed walkthrough of fairing repair that covers everything from basic scratch repair to full panel replacement, including safety checks and recommended tools: https://www.bikeradar.com/uk/how-to/repair-motorcycle-fairings/. In addition, keep in mind that manufacturers and reputable training programs emphasize step-by-step procedures and best practices for DIY fairing repairs. The combination of careful surface prep, correct material choice, and precise finish work will help you restore both the appearance and the protective function of your fairings, ensuring your bike remains safe, aerodynamic, and ready for the road.
Final thoughts
Mastering the art of motorcycle fairing repairs allows business owners not only to enhance their service offerings but also to foster customer loyalty through quality craftsmanship. By employing the techniques discussed—from addressing minor dents with body fillers to executing advanced fiberglass repairs—shops can significantly uplift their repair capacities. The emphasis on proper surface preparation and safety precautions ensures that repairs are not only effective but also done in a safe environment. As you incorporate these methods into your workflow, the result will be a fleet of motorcycles that look fantastic and ride smoothly, ultimately supporting your business’s reputation for excellence.