Body filler plays a crucial role in maintaining and restoring motorcycle fairings, ensuring they remain aesthetically appealing and structurally sound. For business owners involved in motorcycle repair and restoration, understanding how to effectively use body filler can lead to high-quality results that satisfy customers while enhancing the value of services offered. This article delves into the importance of body filler in filling dents and cracks, techniques for surface smoothing, cost-effectiveness, and tips for selecting the right filler to optimize repair work.
From Dents to a Seamless Panel: Mastering Body Filler Repairs on Motorcycle Fairings
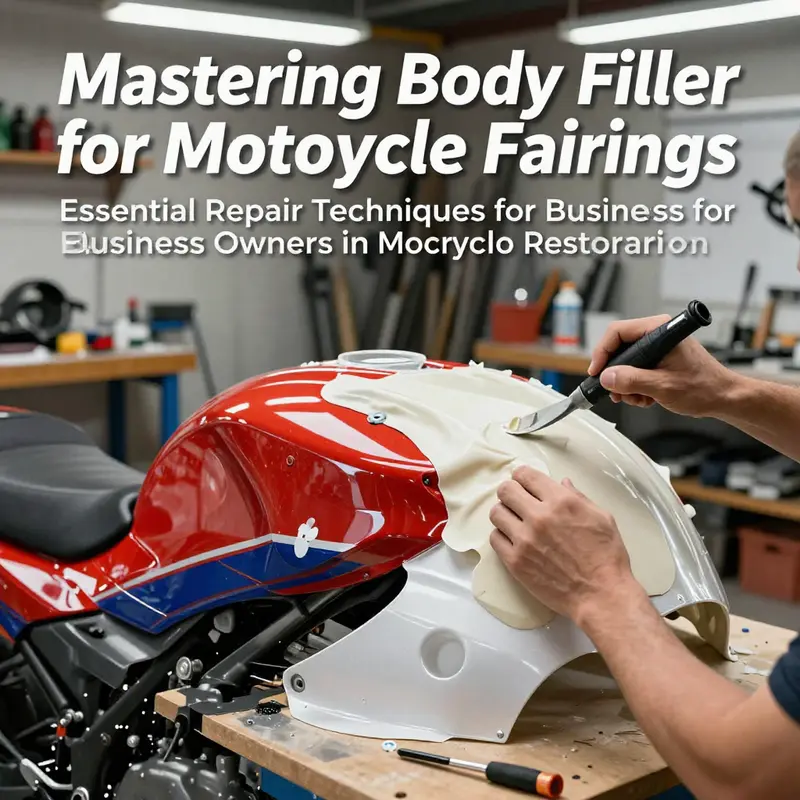
A dented or cracked motorcycle fairing can feel more like a signal of battle scars than a surface ready for a new paint job. Yet the truth is, a well-executed body-filler repair can restore both appearance and integrity with a fraction of the cost of replacement. When the fairing is made from plastic or fiberglass-reinforced composites, the aim is not merely to hide damage but to rebuild a surface that accepts primer and paint evenly and endures the vibrations and weather years of riding will bring. The process combines careful surface preparation, the right plastic-specific filler, disciplined layering, and patient curing. It is not a shortcut, but a precise sequence that yields a durable, flush finish that can hold up to panel-to-panel alignment and the demanding finish requirements of modern motorcycle aesthetics.
The journey begins with preparation. The area around the dent or crack must be clean, dry, and free of wax, grease, or silicone. Dirt or oil acts like a barrier to adhesion, and any filler placed over a contaminated surface will fail where it matters most. A degreaser or mild soap and water can remove grime, followed by a thorough rinse and air-dry. The next step is to roughen the surrounding surface to create a tooth for the filler. Light sanding with a medium grit, such as 800 to 1000 grit, is enough to expose a fresh micro-texture without cutting through the surface. This roughness increases the contact area and gives the filler a better grip. Once sanding is complete, wipe away the dust with a clean, lint-free cloth to ensure an unobstructed view of the area before the filler goes on. The surrounding area should look slightly dull rather than glossy, signaling that the surface is ready to accept the repair material.
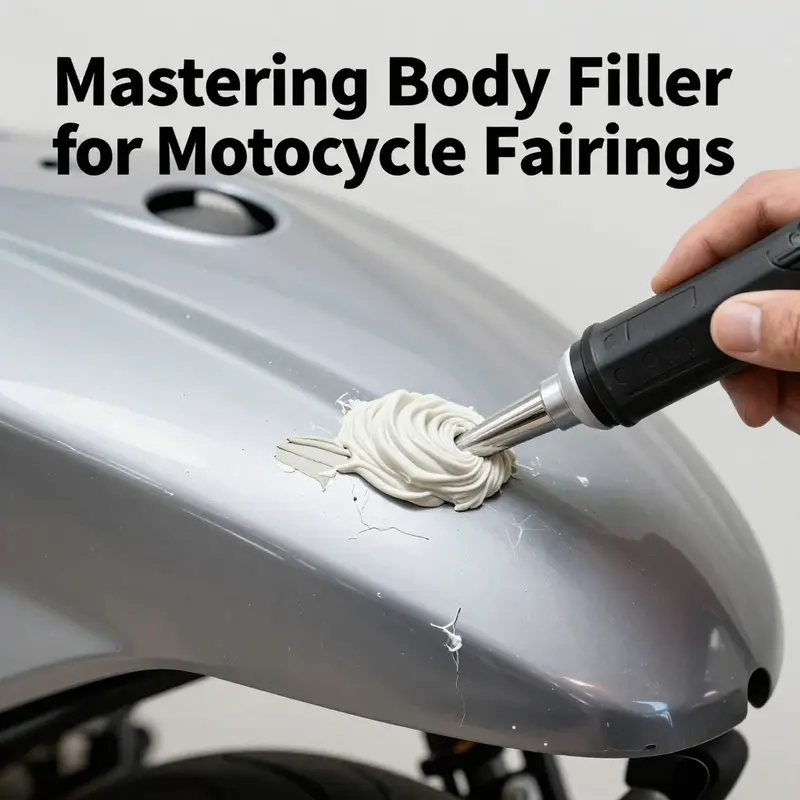
Choosing the right filler is as important as anything else in the chain. Motorcycle fairings are typically ABS plastic or fiberglass-reinforced composites, which behave differently than metal panels. A filler designed specifically for plastic or for fiberglass-based composites is essential. Standard automotive fillers that are intended for metal are often too rigid, too heavy, or insufficiently adherent to plastic surfaces. The goal is a two-part formulation that cures to a flexible yet solid finish, capable of holding up under the flexing and impact that motorcycle panels experience. The two-part system should be mixed in the exact ratio prescribed by the manufacturer, commonly around equal parts resin and hardener. This ratio ensures predictable curing times and a consistent, workable consistency so the filler can be worked into and over the damaged zone without setting prematurely. A plastic spreader or putty knife is ideal for application because it minimizes gouging and helps achieve an even fill across the contour of the panel.
As soon as the filler is mixed, it should be applied in thin, overlapping layers rather than one thick slab. Several thin layers, each carefully feathered into the surrounding surface, create a gradual transition that is easier to sand and less prone to cracking. The first layer should fill the deepest portion of the dent or Gouge, without trying to perfectly level the entire panel in one pass. Once the initial layer has been laid, use a damp sponge to slightly shape the edges if needed. Be cautious with moisture; excess water can disrupt curing or introduce impurities, so use moisture only as a shaping aid, not as a primary method of finishing.
Curing is the moment when the filler begins to reveal its true character. Patience here matters. Allow the filler to cure fully in a well-ventilated area, following the manufacturer’s guidance, which is typically in the 15 to 30-minute range at room temperature. Rushing this step invites superficial bonding or future cracks when the surface is subjected to heat or vibration. A fully cured layer is hard to scratch with a fingernail but not so hard that it resists subsequent sanding. If there is any doubt about cure, perform a light flex test by pressing on a protected corner to see if the material remains sound or starts to crumble; if it yields, give it more time.
After curing, the real shaping begins. Sand the repaired area with a coarse grit to knock down the high spots and begin to level with the surrounding surface. A typical progression might start at 600 grit, then move through 800, 1000, and up to 1500. The goal is a surface that feels uniformly smooth and looks flush under bright light. A sanding block or orbital sander helps keep consistent pressure and avoids creating new dips or ridges. Regularly pause to wipe away dust, then recheck the area under clean lighting. You should see a seamless transition that, from a few inches away, appears as part of the original panel. If you encounter any pinholes or micro-cracks during sanding, apply a thin second or third overlayer in those precise spots, allowing each pass to cure before continuing. This approach prevents over-sanding a single layer or compromising the integrity of the repair.
A critical concept during sanding is the idea of feathering. Edges should gradually blend into the surrounding plastic, not end abruptly with a hard boundary. Feathering creates a natural gradient that takes primer better and reduces the risk of paint peels or visible seams after finishing. It also helps minimize the risk of exposing the filler to undercut if a later impact occurs. Once the surface feels uniformly smooth to the touch and appears evenly pale under most lighting, a light wipe-down with a tack cloth ensures there are no particles left that could stand in the way of priming.
With the bulk of the work done on the repair, priming becomes the next essential act. A thin primer layer helps the paint adhere and reveals any hidden imperfections that sanding alone could not remove. A light, even coat—applied from a consistent distance—lets the primer do its job of exposing small surface flaws that can be addressed with a final, ultra-fine sanding. If a spot shows through the primer as a dip or a pronounced scratch, return to the filler stage for a touch-up, and re-sand until the area reads as a perfect, continuous plane. Only after the primer has cured according to the product’s instructions should you proceed to paint. In some cases, a sealer or specialized primer for plastics may be recommended to further improve adhesion and durability. It is worth noting that color matching and paint durability are influenced by environmental conditions during painting. Temperature, humidity, and dust levels can all affect the final appearance and long-term performance of the finish.
At this point, the transition from repair to finish is where many enthusiasts discover the true satisfaction of a well-executed repair. A final topcoat or clear protective layer completes the process, sealing the repaired area from moisture, UV exposure, and minor abrasions. The choice between a direct color coat and a clear-coated finish depends on the desired aesthetic, the panel’s location, and the rider’s exposure to sunlight and weather. A professional finish often involves multiple light coats rather than a single heavy application. Each coat should be allowed to cure adequately and be lightly sanded with micro-grit between layers to maintain a perfectly flat surface. The result should be a fairing that is not only visually cohesive with adjacent panels but also structurally sound enough to resist future dings or knocks.
From an execution standpoint, the most valuable approach is to view the repair as a sequence rather than a single act. Each step—preparation, material selection, mixing, application, curing, sanding, priming, and painting—depends on the success of the previous one. Skipping or rushing any step can compromise the repair’s long-term durability and the final appearance. The philosophy is to build a smooth, flush plane with attention to the microscopic details, especially around the transition zones where the fairing meets other panels or edges. The padding of filler over a dent should not intend to recreate a perfect original outline but to create a surface that, once finished, reads as a single, continuous panel.
This approach also has practical cost implications. Repairing minor damage with a carefully applied filler can be substantially cheaper than replacing entire fairings, especially when the target is only cosmetic or when the structural integrity of the panel remains intact. The economics are complemented by environmental and material considerations. A repair that uses plastic-specific fillers minimizes the risk of delamination, cracking, or poor adhesion that can occur when inappropriate materials are used. The goal is a repair that not only looks good on day one but stands up to the heat, vibration, and sun exposure typical of riding environments. The practitioner who understands that the plastic nature of the fairing demands a compatible repair system is one who will achieve longer-lasting results and more predictable outcomes.
For riders who want to tailor repairs to specific models, the journey can involve consulting dedicated catalogs or categories that group fairings by motorcycle family. If your project centers on Honda fairings, see the Honda fairings category for compatible panels and painterly considerations that align with those specific shapes and contours. This kind of targeted reference helps ensure that the repaired surface respects the panel’s curvature and mounting points, which influence both the sanding approach and the final paint thickness. The right context matters because fairings are not always flat sheets; many shapes require delicate handling to preserve edge lines and radii that define the bike’s overall silhouette. See the broader category to understand how different plastics and finishes behave under repair, and to anticipate any unique challenges that may arise with particular model generations.
Beyond the nuts and bolts of the repair, there is an implicit craftsmanship to working with motorcycle fairings. The repair demands patience, steady hands, and a respect for the material. It rewards those who keep the workspace clean, organize the materials, and maintain a clear plan for each pass of sanding and each layer of paint. The aesthetic reward—the seamless blend from damaged to restored—reminds riders that the value of the repair goes beyond price. It preserves the bike’s identity and continuity, letting the rider appreciate the story of the machine without the visual distraction of a lumped repair or a misaligned paint job. In that sense, the repair becomes a quiet act of care, a moment where technique and patience converge to restore what the ride represents: momentum, resilience, and personal expression.
For readers who want to expand their toolkit, it helps to approach the repair with a learning mindset. Gather the appropriate plastic-specific filler, a compatible primer, and a set of progressively finer sanding materials. Assemble clean rags, a degreaser, and a well-ventilated workspace. The steps outlined here are designed to be repeatable across a range of sizes and damage types, from small scratches to shallow gouges. While the appearance of repaired areas will inevitably reflect the peculiarities of each panel, the underlying technique remains the same: clean, prep, fill, cure, sand, prime, and finish with a steady hand and measured patience. This consistency creates a reliable workflow that cyclists and hobbyists can rely on, regardless of the exact model or fairing type they are repairing.
In closing, the value of body filler for motorcycle fairings lies not in a new trick but in a reliable process. When done with attention to material compatibility, surface preparation, and controlled layering, a dent or crack can be transformed into a smooth, paint-ready surface that preserves the bike’s aesthetics and resale potential. The repair stands as a testament to practical skill, where the right materials and disciplined technique converge to restore not just a panel, but a sense of confidence in the rider’s machine. And as with any specialized repair, consulting model-specific references can be a practical asset, guiding the technician through the quirks of each shape and contour. For those exploring the broader context of fairing customization and repair, a dedicated category page can provide model-oriented guidance that complements the general technique described here. Finally, for a deeper dive into the official guidance on plastic repair fillers, see the external resource linked here: https://www.bondosolutions.com/.
Smoothing the Surface: Advanced Body Filler Techniques for Motorcycle Fairings

A motorcycle’s fairings are more than just skin. They shape the machine’s character, influence aerodynamics, and set the first impression a rider gets when they glimpse the bike in a showroom or at a roadside café. When the surface beneath the paint wears, dents accumulate, scratches etch through, and the overall fairness of the panel begins to look tired. In these moments, body filler becomes more than a patch or a quick fix; it acts as a careful intermediary, a bridge between damaged reality and the smooth, factory-like finish most riders prize. The aim is not merely to hide damage but to restore a continuous surface whose contours feel honest to the touch and visually seamless to the eye. This is the core of surface smoothing: transform a flawed panel into something that looks almost engineered to be perfect, while preserving the integrity of the plastic or composite that forms the fairing in the first place.
The landscape of fairing materials is diverse. Modern fairings are commonly molded from ABS plastic, a material that offers a strong balance of rigidity, light weight, and impact resistance. When the substrate is ABS, the choice of body filler matters as much as the technique used to apply it. Plastic-specific fillers are designed to bond effectively with these substrates, accommodating the slight flex and temperature changes that plastic experiences in everyday riding. The goal is a repair that remains durable across the weathered cycles of sun, heat, and cold, without becoming brittle or prone to cracking. In the realm of fillers, there are several families, each with distinct advantages and caveats. Urethane-based fillers, for instance, are favored for deeper gouges or areas subject to stress because of their elasticity. They can expand and contract with minor flexing of the plastic surface, reducing the risk of future cracks as the fairing breathes with temperature shifts. Yet they demand careful control: longer curing times and a higher price point than standard polyester putties. On the other hand, metal-filled polyester putties—while robust for metal repairs—are generally discouraged for non-metallic surfaces, since their properties can clash with ABS and fiberglass, risking adhesion failures or galvanic concerns. Fiberglass-reinforced polyester putties, though strong, tend to be overkill for most fairing repairs and can complicate sanding due to their higher hardness and potential for chipping. The practical takeaway is simple: for most modern fairings, select a plastic-specific filler that matches the substrate, respects the depth of the damage, and offers a forgiving cure profile that aligns with your working environment.
The process, while rooted in chemistry, unfolds as a procedural craft that rewards patience and precision. It begins long before the filler ever touches the panel. Preparation is the foundation. A clean, dry surface is non-negotiable. Dirt, grease, and old paint—often residues of previous repairs—must be removed with a degreaser. If the damaged zone carries gloss or wax, these must be stripped away to reveal a rough, receptive surface beneath. A light sanding then follows, not to remove material, but to create a micro-etch that helps the filler cling. The key is to establish a surface key—tiny irregularities across the damaged area that give the resin something to grab onto. Dust is brushed away, and the area is wiped again to ensure no particles remain. This stage is about creating conditions where the filler can grip and not peel later as the bike experiences heat and humidity.
Mixing the two-part putty is the next crucial step. Filler systems are typically resin and hardener that must be combined in precise ratios. Improper mixing can lead to incomplete curing, leaving soft spots or premature failure that undermines the repair’s long-term viability. A small, clean mixing board and a plastic spreader are used to blend until the color appears uniform. The moment of mix is brief but telling; it determines how well the filler will set and how predictable the sanding will be. Once the mix is ready, the filler should be applied with even pressure and a broad, feathering motion. It’s important to extend the material beyond the damaged zone. That extra margin creates a natural blend from repair to surrounding surface, allowing for a more forgiving transition during sanding. Think in terms of feathering edges, not masking them; the goal is a gradual, almost invisible seam where the repaired area dissolves into the panel’s original contour.
With the filler spread, the curing phase begins. In temperate environments, you might feel the surface firm up within a short window, generally 15 to 30 minutes. Yet this initial set is not the end of the story. Full cure typically requires a longer interval, often in the 2- to 6-hour range depending on temperature and humidity. The difference matters because sanding a barely cured filler can smear or pull, while waiting too long invites a stiff, brittle surface that’s resistant to shaping. The patient rider learns to plan ahead: a repair that takes shape in the late afternoon might be fine for a subsequent morning sanding session after a restful overnight cure. This waiting time is not passive; it is the stage where chemistry asserts itself and the repair assumes a stable foundation for the next moves.
Sand the filled area with care, and do so progressively. Start with a relatively coarse grit of around 80 to establish the broader contour. The objective here is to flatten the fill so it aligns with the surrounding surface while maintaining the fill’s feathered edge. As you progress, switch to 120 and then 220 grit, refining the transition and removing visible ridges or hollows. Each step should reveal a surface that looks continuous, with no obvious boundary where the filler ends and the original plastic begins. If you see pinholes or tiny bubbles, that’s a cue to re-check moisture in the surface or adjust your technique; sometimes a light re-coat with a thin, additional layer is called for, followed by a fresh round of sanding. The overarching aim is not to chase a perfect contour on the first pass but to shape a surface whose reflection resembles a factory finish when viewed under shop lighting and natural daylight.
Understanding the types of fillers helps explain why the process works as it does. Urethane-based fillers deserve particular attention for their flexibility and resilience. They can adapt to the plastic’s micro-movements as the bike heats up in the sun or cools at night, reducing the likelihood of crack-prone seams along the repaired area. Their elasticity makes them a compassionate partner for parts of the fairing that are more prone to flexing or minor impact. However, this benefit comes with trade-offs: longer cure times and a more nuanced handling that requires careful temperature control. In contrast, polyester putties—while easier to work with and faster to cure—tend to be more rigid. They’re excellent for shallow imperfections and quick turnarounds where the panel will remain relatively stable, but in areas with repeated flex or significant temperature swings, they may crack or pull away over time. When damage is limited to light scratches or pin-sized dents, a high-build polyester putty combined with proper priming can deliver a satisfactory result. For more demanding repairs, especially on higher-stress areas or on plastics subject to sun exposure, urethane-based options offer superior long-term performance.
Another consideration is the overall reinforcement of the repair. In most fairing scenarios, a simple, well-executed filling-and-sanding sequence suffices. However, if the damage was deeper or if the panel has multiple flaws near each other, a fiberglass-reinforced approach might be tempting. Yet this can complicate sanding and create an overly stiff surface that resists feathering. In practice, most riders find that deeper gouges respond best to a blend of urethane-based filler for the bulk of the repair, followed by careful feathering and a final skim coat to smooth the edges. The filler’s compatibility with the substrate and the subsequent primer are crucial for achieving an even topcoat that looks uniform under color and clear finishes. Priming is not optional; it is a critical step that affects paint adhesion, color uniformity, and the durability of the final finish. A primer designed for plastic surfaces is chosen to complement the filler and the paint system, ensuring the repaired area bonds properly and does not absorb moisture unevenly.
The narrative of surface smoothing would be incomplete without addressing the subtle art of layering. Multiple thin coats tend to produce more predictable results than one heavy application. If you’ve opted for a second skim coat, apply it after the first layer has cured and the area has been lightly abraded to re-establish the key. The feathering should extend farther with each successive coat, dissolving the repaired patch into the surrounding dimples and lines of the fairing. When the time comes to sand again, use finer grits—perhaps moving from 400 to 600 or even higher—until you achieve a nearly mirror-like smoothness. It’s this gradual, layered approach that prevents a hard change in the surface’s geometry from catching the eye. The eye sees smoothness more readily than you might expect; even minor irregularities catch highlights in direct light, so the sanding strategy is the quiet backbone of the entire repair process.
Finally, preparation for the paint phase seals the repair’s fate. A clean, dry, thoroughly de-dusted surface is essential before priming. Thoroughly degreased and smoothed areas take primer well, which in turn provides a uniform base for color coats. The primer serves as a glue-like intermediary, enhancing adhesion and contributing to even color rendition. After the primer cures, you may see a few pinholes or minor imperfections that can be addressed with a light, spot-sand and a gentle re-prime. The paint application then follows tools and techniques familiar to any bodywork process: consistent spray patterns, controlled distances, and patience to apply multiple lighter passes rather than a single heavy layer. The goal is consistent color saturation with the absence of streaks or sags, and a topcoat that remains durable across UV exposure and the occasional trail of grit and rain that a ride invites. This final stage—the transition from repaired shell to glossy surface—serves as the culmination of the entire smoothing journey.
In the course of this chapter, a single thread runs through the narrative: the best repairs respect the material’s nature. ABS plastic, with its own set of physical properties, wants a filler that accommodates flexibility without losing adhesion. The optimal repair blends material science with careful technique: choose a filler designed for plastic, prepare the surface meticulously, mix and apply with even pressure, allow the right amount of cure time, and sand with increasing softness while maintaining feathered edges. When done with discipline, the repaired area becomes so seamless that even a trained eye may have to search for the seam. That is the essence of surface smoothing: a repair that disappears into the panel and leaves behind a surface that invites the next layer of color, depth, and shine.
As you work, you may find yourself thinking about the broader landscape of repair options. If the damage is truly minor, a quick polish and glaze can sometimes restore a gloss without heavy filler. But for deeper flaws or areas where the fairing has been stressed, body filler remains the most practical and durable path forward. The investment in time and materials pays dividends in long-term durability and in the confidence that a rider feels when the bike rolls out and the light catches the smooth line of the fairing. For the practitioner, the process is as much about technique as it is about patience and respect for the material. In the end, a well-executed filler repair not only restores the appearance of the fairing but also preserves the machine’s athletic silhouette, ensuring that the bike continues to look as fast as it feels when in motion.
For riders seeking hands-on demonstrations or a broader catalog of compatible fairings and repair materials, the Honda fairings catalog provides a practical reference point within a wider ecosystem of modular fairing options. This linked resource can serve as a helpful orientation as you consider how your repair choices align with your bike’s model and panel composition. Honda fairings catalog.
External resources can also reinforce your understanding of the repair sequence and the nuances of minor bike fairing bodywork. A detailed, practical guide to minor fairing and bodywork damage repair offers additional context on surface preparation, material selection, and finishing techniques that complement the chapter’s approach to smoothing with body filler. You can consult that external resource for a deeper dive into the hands-on steps and best practices that underpin a lasting repair: https://www.motorcycle-maintenance.com/repair-bike-fairing-bodywork/.
null

null
Choosing the Right Body Filler for Motorcycle Fairings: A Repairer’s Compass for ABS, Fiberglass, and a Flawless Finish
Restoring the surface of a motorcycle fairing is less about a single patch and more about a careful conversation between material, technique, and finish. The choice of body filler is the hinge on which that conversation turns. A rider’s pride rests on a finish that looks as smooth as a factory surface and holds up under wind, sun, and vibration. The wrong filler can breech that trust: poor adhesion, cracks, or a finish that appears dull or wavy after painting. The right filler, chosen with respect to the fairing’s substrate and the damage at hand, becomes a faithful partner in the repair, delivering strength where it counts and a surface that welcomes paint with durable, lasting adhesion. When we talk about body filler for motorcycle fairings, we’re really talking about material compatibility, surface preparation, and the patience to apply in thin, controlled layers. The result is not just cosmetic; it’s a repair that preserves the fairing’s integrity and the rider’s confidence in the bike’s outer armor.
To begin, it’s essential to recognize that most modern motorcycle fairings live in two common worlds: fiberglass composites and ABS plastic. Each material has its own personality, its own demands, and its own compatible fillers. Fiberglass fairings typically respond well to fillers that rely on polyester or epoxy chemistry. These fillers offer strong adhesion to the substrate and can withstand the flex and stress a fairing experiences while riding. The critical word here is adhesion. The substrate has its own chemistry, its own thermal behavior, and its own surface energy. A filler that bonds like a second skin to fiberglass will not crack easily under the rider’s vibration and occasional flex. On ABS plastic, the situation shifts. ABS is a tough, lightweight plastic that benefits from a filler formulated specifically for plastics. Generic automotive fillers—designed primarily for metal substrates—often fail on ABS, cracking or delaminating as temperatures swing and vibrations accumulate. Plastic-specific fillers are engineered to bond with polymers, to maintain a touch of flexibility, and to tolerate small thermal cycles without losing grip. In practical terms, this means choosing a filler that is labeled for fiberglass or for plastics, or better yet, one that explicitly mentions compatibility with ABS or other thermoplastics.
Once the substrate is identified, the damage itself helps steer the decision. Minor dings and shallow scratches are often well served by a lightweight, fast-setting filler that cures hard enough to sand cleanly but remains forgiving enough not to feel brittle on a curved surface. Deeper gouges, cracks that span a seam line, or areas where the skin has fatigued may require a slightly stiffer formulation, coupled with a careful feathering approach to avoid a noticeable ridge once painted. It’s tempting to pile on a thick layer hoping to save time, but the mechanics of paint adhesion tell a different story. A single thick application can trap air and solvents, produce heat during cure, and lead to shrinkage and pinch marks. This is why even when the damage appears severe, the smart approach is multiple thin layers, each allowed to cure before the next is applied. The patience here pays off in a smoother, more durable finish and reduced sanding fatigue later on.
Adhesion, flex, and the likelihood of future damage all hinge on surface prep. There is little point in choosing a premium filler if the fairing’s surface isn’t meticulously prepared. The prep begins with a clean, dry surface free of wax, grease, and loose old paint. Any contaminant, from fuel residue to silicone from last-touched repairs, can sabotage bonding. After cleaning, abrade the area to create a micro-rough “key” for the filler. For fiberglass, a light scuff with a red or gray scuff pad is often enough to expose a fresh surface for bonding. For ABS, mechanical abrasion is equally important, as it promotes mechanical interlock for the adhesive bond. Degreasing again after scuffing ensures the surface is receptive to the filler. Primers also play a crucial role. In some cases, a compatible primer helps the filler bond more aggressively and provides an even base color for later painting. The right primer, chosen to match the filler and the underlying material, can improve adhesion and reduce later paint discrepancies.
The color story also matters. Even when you intend to paint, color-matching a portion of the filler can simplify the finishing process. Some fillers dry white or gray, which may require tinting or a priming strategy that aligns with your paint system. A good practice is to select a filler that can be finished with a paint-compatible primer that matches the final color family closely. This approach minimizes color shifts and makes the final coat look uniform from edge to edge. It is a small choice with a significant payoff when the painter’s eye looks for symmetry and depth across the fairing’s contour lines.
Application technique follows from substrate and damage assessment. For both fiberglass and ABS, the filler should be mixed strictly according to the manufacturer’s instructions, with attention to ratio, pot life, and working time. The two-part formulation is not a mere convenience; it governs cure hardness, sandability, and adhesion. Once mixed, spread the filler with a plastic spreader or a soft-edged tool, applying in thin, even coats. The goal is to fill the dent or gouge, not to build a lump that will require aggressive sanding. A common error is to extend the filler beyond the damaged area to mask a broader zone. While this might seem prudent, it can create an uneven transition line that will show up under paint. Instead, concentrate on creating a flush, feathered edge where the repair meets undamaged surface. Work in stages, letting each layer cure before applying the next. The cure window—often several hours depending on temperature and humidity—must be respected. Rushing through cure results in pinholes, cracks, and a compromised finish.
Sanding is the bridge between filler and paint. Begin with a relatively coarse grit to remove the highest ridges, then move to progressively finer grits. The sequence 80, 120, and 220 is a widely used progression, but the exact progression can vary with filler type and the curvature of the panel. The shape of fairings presents a unique challenge: curved surfaces don’t respond to sanding in a straight line. Builders often rotate the sanding block to follow the contour and avoid creating flat-planed areas. It’s beneficial to maintain a light touch and check often by feel and by sight with raking light to catch any remaining irregularities that won’t fiber under clear coats. Any low spots or irregularities should be filled with a fresh, thin layer and feathered again, rather than attempting to correct with heavy sanding. The objective is a uniformly smooth surface that reads as a single plane to the eye when the final paint is applied.
Color matching and priming form the finishing arc of the process. After sanding, a suitable primer helps unify the surface and improves paint adhesion. The primer should be compatible with both the filler and the underlying substrate. In some cases, a high-build primer is advantageous as it can fill minor sanding imperfections and help you achieve a true, flawless finish before color is applied. A careful inspection under bright light will reveal whether the surface is truly flat or if any remaining patchiness persists. If any mismatch remains, it’s better to address it with another light pass rather than chasing a perfect but unrepeatable surface through heavy sanding and topcoat layers.
When you finally choose a filler, you do not buy a finish in a bottle. You buy a tool that must cooperate with the material beneath it, the environmental conditions, and the skill of the technician applying it. The best practice is to select a filler that is designed for the exact substrate you are repairing and that is compatible with your primer and topcoat system. The distinction between a general-purpose filler and an application-specific one can be subtle in the moment, but it is tangible in the long run. A premium, application-specific filler is not a luxury; it is a practical investment in durability and appearance. The goal is not merely to erase a dent but to restore a surface whose finish feels seamless and steadfast—the kind of finish that your eyes perceive as new, even if the bike has seen miles of riding, wind, and sun.
To connect these ideas to the broader repair ecosystem, consider how the choice of filler interacts with other components of the fairing restoration. If a fairing is currently part of a longer restoration project, the filler must synchronize with the chosen paint system, the expected curing environment, and the panel’s future exposure to the elements. In a warm shop, cure times may shorten, but humidity can extend them or alter the final hardness. In a cooler or more humid environment, working times lengthen, and plan for the extra time needed to avoid trap-air issues and incomplete cures. If a fairing is used in a ride where it will be exposed to UV light, choosing a filler that maintains its integrity under UV exposure matters; some fillers will yellow or become brittle if left untreated for extended periods. These considerations are not abstract. They determine how long you can delay finishing the job, how much sanding you will perform, and how the final color will settle once the base coat and clear coat are applied.
A practical approach to product selection is to identify the fairing’s material and then consider the damage’s scope. For fiberglass, a robust polyester or epoxy filler, matched to the substrate, provides strong adhesion and reliable performance in the face of vibration and stress. For ABS, a dedicated plastic filler, designed to bond with polymers and to maintain some flexibility, reduces the risk of delamination under normal riding conditions. The surface preparation steps—cleaning, abrading, priming—remain fundamental regardless of filler choice. The goal is a surface that feels uniformly smooth to touch and reads as perfectly flat to the eye under shop lighting and daylight. When the repair is complete, and the paint layers are applied, the finish should be a journey rather than a stop. The eye should travel across the fairing and perceive a single, continuous form rather than a patchwork of repaired zones.
Choosing the right filler is not just a technical decision but a philosophy of restraint and precision. It requires resisting the urge to shortcut through cure times or to pile on material to cover up for a shallow preparation. It invites experienced judgment: sometimes a more flexible filler is better if the fairing is highly curved; other times a stiffer filler yields a truer surface on a large, flat area. The rider who treats this as a craft, rather than a mechanical process, will typically achieve the best results—one that endures through miles of riding and the harsh realities of weather, road spray, and road debris. In your toolkit, keep the essentials handy: a clean workspace, a reliable degreaser, a scuff pad, a handful of plastic spreaders, a thermometer or hygrometer to monitor ambient conditions, and a quiet, patient cadence that respects cure times as a part of the repair’s integrity.
For hobbyists who want a quick reference point, the decision tree can be summarized in a single, practical question: Will this fairing be ABS or fiberglass? If ABS, reach for a plastics-rated filler and pair it with a compatible plastic primer. If fiberglass, a polyester or epoxy-based filler will usually deliver stronger adhesion. In both cases, prioritize thin, layered applications, careful feathering, and thoughtful sanding. And always verify compatibility with your paint system before you lay down color. The most durable finish begins with the right filler and ends with disciplined finishing. This is the practical arc of repair—one that honors the material, respects the geometry of the fairing, and serves the rider’s goal of a fairing that looks as good as new and performs as well as it did when it rolled out of the mold.
If you want a quick reference to the broader world of fairing options and compatibility, you can explore one of the dedicated product categories that focus on fairings for a given make. For example, the Honda fairings collection includes options that align with typical ABS-based or composite construction strategies. This resource can offer context on how a given fairing is often built and how the repair approach may align with the original design intent. Honda fairings for CBR can be a useful starting point for understanding how different fairing families are engineered and how your repair approach should respect those design choices while you restore the surface.
The discipline of choosing the right body filler for motorcycle fairings is ultimately an exercise in respect: respect for the material, respect for the rider who depends on the bike’s exterior as a shield and a statement, and respect for the craft that returns a damaged surface to its former glory. When done with care, the repair doesn’t merely hide a dent; it preserves a story of performance, maintenance, and pride in the open road. The rest of the journey—priming, painting, assembly, and finish—will unfold more smoothly because the foundation was laid with the right filler and the right approach. In that sense, the repair becomes a small but meaningful act of craftsmanship, a reminder that the surface we see at the curb and the track is the result of deliberate choices, patient work, and a commitment to quality that riders deserve.
External resource for deeper understanding: https://www.motorcycle-accident-repair.com/body-filler-guide.html
Final thoughts
Understanding body filler applications for motorcycle fairings is essential for enhancing repair quality. By mastering dent and crack filling, perfecting surface smoothing techniques, recognizing the cost-effectiveness of body filler, and selecting the appropriate products, business owners can significantly improve both the aesthetic and structural integrity of motorcycle fairings. This knowledge not only boosts customer satisfaction but also contributes to a more profitable operation in motorcycle repairs and restorations.