
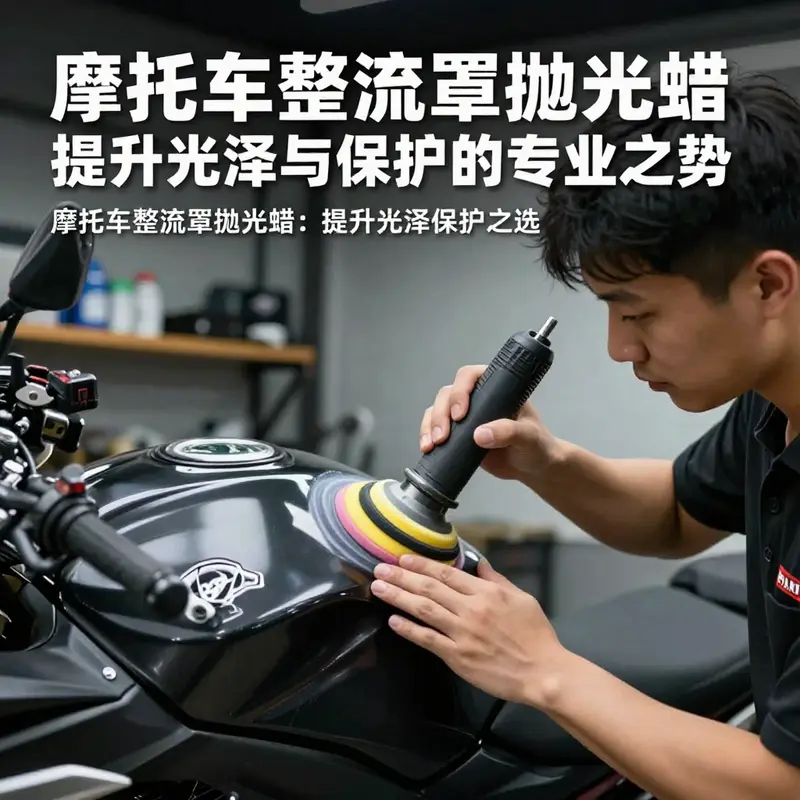
摩托车整流罩在骑行中的美观与性能至关重要,而高质量的抛光护理可以显著提升其外观和耐用性。Atas Solux 500 ml 摩托车抛光蜡专为摩托车和踏板车设计,凭借其卓越的聚合物配方,能够恢复整流罩的光泽,同时提供持久保护。在本文中,将详细探讨抛光蜡的专业应用与优势、摩托车整流罩的材料特性及其与抛光效果的关系,以及提升摩托车整流罩光泽的保养技巧与方法,帮助企业主掌握相关知识,提高产品价值。
专业应用与优势:摩托车整流罩抛光蜡的光泽重塑与长期保护
When a rider looks at a motorcycle from a distance, the first impression often comes from the glow of the fairings. Those panels—made from plastics or composite materials—carry the bike’s personality as surely as its engine roar. Over time, exposure to sunlight, rain, dust, and the tiny abrasions from road spray can dull their surface, leaving plastics chalky, mildly yellowed, or with faint micro-scratches that catch every light cue. This is not merely about aesthetics. The gloss level of the fairing surfaces can influence perceived quality, the aerodynamics’ clean interface that a rider experiences, and even the ease of maintenance. A professionally formulated polish wax—one rich in polymers and designed specifically for plastic and composite substrates—offers a twofold value. It brings back the visual sharpness of the finish and, at the same time, constructs a protective layer that lasts beyond a single wash. The essence of this approach rests on two intertwined ideas: restore and shield, in a manner that respects the delicate chemistry of modern fairing materials while delivering practical, on-the-road benefits.
At the heart of a good polishing wax for motorcycle fairings is a carefully balanced formulation. The product must be able to gently remove or reduce the effects of micro-scratches and surface oxidation without removing too much material or altering the texture that helps grip rain and dirt. The mechanism is both chemical and physical. On the physical side, micro-abrasion from controlled polishing action lifts away the oxidized film and faint scratches, revealing a fresher, more reflective surface beneath. On the chemical side, a polymer-rich carrier interacts with the plastic surface to reorient and fill tiny voids, creating a smooth, optically consistent layer. This polymer network forms a transparent shield that can endure the day-to-day assault of the riding environment. The result is not a put-on slickness but a durable, natural-looking gloss that makes color depth pop and edges look freshly molded, even after months of exposure.
The advantages extend beyond mere aesthetics. A high-concentration polymer-based polish acts as a protective film that seals in the clarity achieved through polishing. This film plays a multi-role defense: it helps resist UV radiation, which is one of the principal culprits of plastic degradation. Ultraviolet rays can break down polymer chains, leading to yellowing, embrittlement, and micro-cracking over time. By forming a semi-permanent barrier on the surface, the wax slows down this aging process, allowing the plastics to retain their flexibility and color fidelity longer. The protective layer also exhibits hydrophobic properties, causing water to bead and roll off rather than cling to the surface. This reduces water spots and helps prevent moisture from persisting in micro-crevices where dirt and acid rain can linger. In practice, this means less scrubbing required during routine cleaning and a reduced tendency for soil and grime to become etched into the surface with every ride.
Another practical benefit concerns resistance to common contaminants. Road grime, tree sap, insect deposits, and environmental pollutants leave residues that can be mildly caustic over time. The polymer-rich film acts as a sacrificial shield, catching or repelling some portion of these agents, so they are less likely to penetrate the surface and cause staining or etching. When contaminants do land on the fairing, the protective layer makes cleaning easier. Water and detergents tend to spread more evenly, and dirt lifts away with gentler wiping rather than requiring aggressive scrubbing. The overall lifecycle cost can be lower because a well-maintained fairing will resist dulling and micro-scratching longer, delaying the need for more intensive restoration work or panel replacement. In this sense, the polish wax becomes less a cosmetic upgrade and more a functional extension of the fairing’s service life.
A comprehensive polishing approach also respects the different materials used in modern fairings. ABS plastics, polycarbonate blends, and various composite laminates each carry their own sensitivities. A well-formulated polymer wax recognizes these differences and offers a level of compatibility that minimizes hazing, streaking, or residue buildup. The best products are designed to work with these materials without excessive abrasion or softening, preserving surface texture and clarity. For riders who own older bikes or those with mixed materials, this compatibility is particularly valuable because it reduces the risk of uneven wear or surface damage across panels. In addition, the protective film’s resilience against heat—an everyday factor on exposed fairings heated by sun and highway wind—helps maintain gloss without peeling or clouding. When the surface temperature calibrates with the environment, the film remains stable, preserving the finish’s appearance under a broad range of conditions.
Beyond the science and the material specifics, there is a human element to proper maintenance. The modern riding lifestyle values efficiency and simplicity. A high-quality polish wax is designed to be user-friendly, often available in spray or paste formats. This convenience lowers the barrier to regular maintenance, making it more likely that a rider will keep surfaces clean, polished, and protected. The application typically requires a clean, dry surface, a small amount of product, and a microfiber or soft cloth. The process is quick: apply to a small panel, work with light, even pressure in circular motions, allow a brief haze if the product requires it, then buff to a clear, non-streak finish. The result is a surface that looks deeply refreshed but not artificially polished. The user experience after the treatment is notable: less time spent scrubbing, faster cleaning sessions, and a visible improvement that reinforces the practice of routine maintenance.
The concept of a dedicated fairing wax is not simply about reestablishing color or gloss. It is about designing a protective micro-ecosystem on the surface. The film traps a layer of air and moisture minimally, which helps reduce the likelihood of water-induced staining and chemical etching. The presence of a polymer network also means the surface becomes smoother to the touch, which translates into a perceived cleanliness and a sense of newness whenever the rider approaches the bike. Even if a fairing has sustained some signs of age—mild yellowing, micro-scratches from road debris, or small cloudy patches—an appropriate, polymer-rich polish can restore the surface’s clarity and even-out reflections across the panel. This is not a one-off fix. It is part of a maintenance philosophy that prioritizes consistent surface management, combining cosmetic renewal with structural protection to keep the fairing looking and performing at its best for longer.
When considering material longevity, the protective layer’s durability becomes central. A properly applied film can resist daily wear and tear, maintaining its protective properties through several weeks or months of exposure, depending on climate and riding conditions. In sunny climates or places with heavy road grime, the layer may wear more quickly and require more frequent reapplication. In more temperate and cleaner environments, the interval between treatments can extend, delivering lasting visual impact with fewer maintenance sessions. The key is to form a balanced system: a surface that is easy to clean, forgiving under light abrasion, and capable of extending the period between more invasive restoration tasks. Riders who adopt this approach often report that their fairings retain a more like-new appearance for longer, even when the bike is exposed to challenging weather and busy roads.
An essential nuance concerns model-specific considerations. Fairings are not a monolith; there are variations in material thickness, surface texture, and bonding agents used in different brands and models. For instance, some fairings may incorporate more gloss-rich surfaces, while others rely on matte textures that are designed to minimize glare. A polymer-rich polish can be versatile enough to enhance both scenarios, but practitioners should tailor their technique to the surface condition and the texture. In practice, this means adjusting the amount of product, the pressure of the cloth, and the duration of the buffing step to achieve the desired level of gloss without over-saturation or haze. The goal remains: a uniform, clear finish that respects the underlying material and preserves texture where intended. For riders curious about model-specific guidance, the following resource can offer practical, brand-oriented insights while staying true to the universal principles of surface care: Honda fairings.
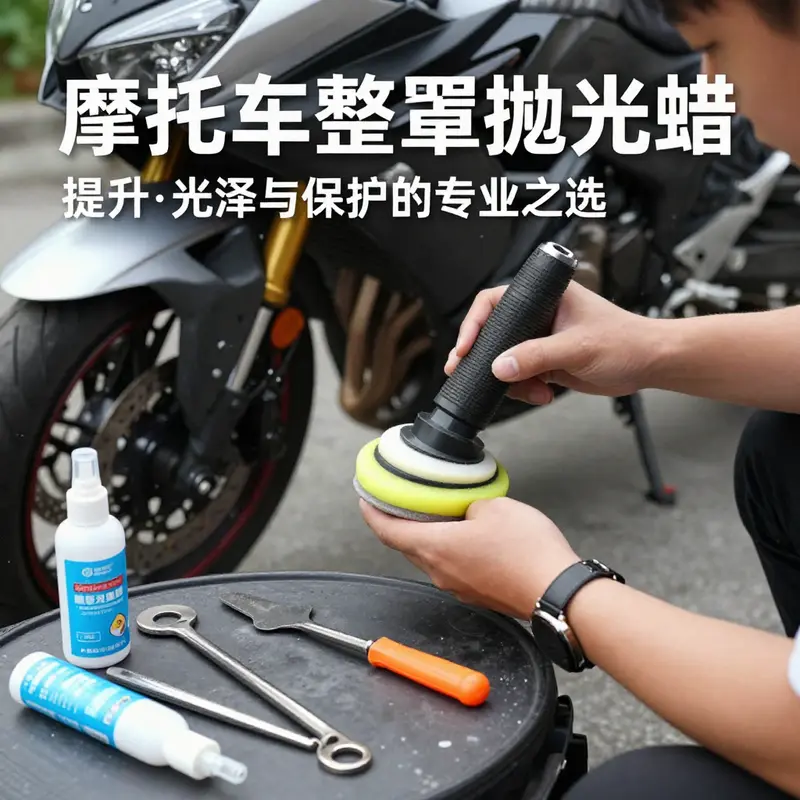
While the choice of product remains important, the technique can be equally decisive. A few core habits help ensure the best possible outcome. First, always start with a clean, dry surface. Dirt and moisture can trap particles during polishing, causing micro-scratches that persist under the wax film. A gentle wash with a mild detergent, followed by thorough drying, sets the stage for successful polishing. Second, select a controlled, shaded environment. Direct sunlight can prematurely dry the product, causing streaks or uneven haze. A stable ambient temperature helps the wax cure predictably and reduces the risk of smearing. Third, use small, measured amounts. It is easy to over-apply, especially with sprays. A light film that coats the surface is sufficient, and you can reapply in a few areas if needed. Fourth, work in sections. Treat one panel at a time, paying attention to edges and corners where grime tends to accumulate. Fifth, be mindful of texture. Glossy surfaces respond differently from matte or textured areas, and the buffing pressure should be adjusted accordingly to avoid flattening or creating micro-scratches in sensitive zones.
With these practices, the practical value of a polymer-based polishing product becomes clear. It is not merely a cosmetic trick; it is a maintenance tool that helps protect the investment in a motorcycle’s most visible, frequently used parts. The fairings are in constant motion relative to the rider and the road, catching dust, debris, and the sun’s rays while presenting a dynamic surface that can reveal the care—or neglect—of the owner. A consistent polish routine creates a protective barrier against this cycle, smoothing the finish, repelling water, and reducing the friction that might otherwise erode the surface texture over time. It is a disciplined approach that aligns with the broader philosophy of motorcycle upkeep: treat the bike with a strategy that balances aesthetics with protection, so that performance and appearance evolve together rather than diverge.
Critically, the quest for gloss and protection should not be viewed as a fleeting trend or a luxury. It is a sustainable practice that supports longer-term performance, easier maintenance, and a more gratifying ownership experience. When riders invest in a thoughtful polish routine, they experience immediate gratification in the form of a refreshed appearance, and they gain longer-term dividends in the form of preserved material integrity. The combination of a polymer-rich formulation, a careful, repeatable application process, and a realistic maintenance cadence creates a practical framework for elevating the look and longevity of motorcycle fairings. The result is a more confident ride, a more conspicuous presence on the road, and a stable platform for the ongoing evolution of the bike’s aesthetic character.
In sum, professional fairing polishing waxes deliver more than a temporary shine. They deliver a renewed surface with a protective shield that resists the elements, makes routine cleaning easier, and helps the fairing retain its form and color for longer. The true value lies in the synergy between restoring depth and preserving the material’s integrity. When applied correctly, and when integrated into a thoughtful maintenance routine, a polymer-based polish becomes a faithful steward of the fairing’s life on the road, ensuring that the bike remains not only a machine capable of speed but also a work of visual expression that can tell a story of care, pride, and enduring performance.
External reference: For a broader understanding of the science behind polishing and its impact on protecting plastic vehicle parts, see the following external resource: https://www.autocar.co.uk/article/car-care/why-polishing-matters
透亮曲线:摩托车整流罩材料特性与抛光保养的综合之道
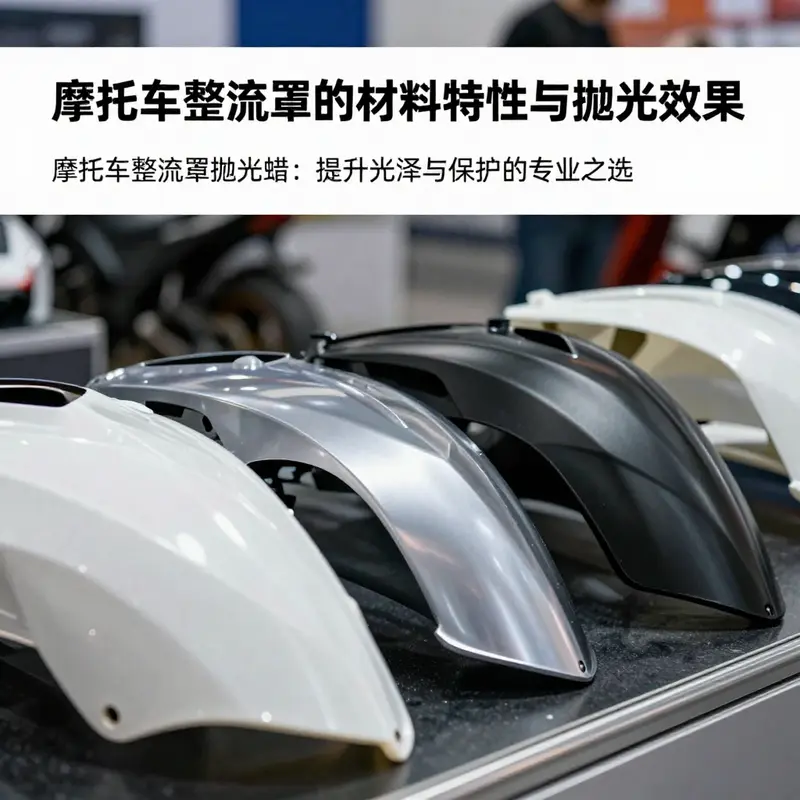
整流罩作为摩托车外观与空气动力的前线盾牌,其表面状态不仅决定视觉冲击力,也直接影响抗紫外线能力、污染物附着与日常维护的成本。要真正理解抛光护理在整流罩保养中的作用,必须从材料特性谈起,再将抛光过程嵌入到对长期耐久性的追求之中。现代摩托车整流罩多以 ABS 树脂、PMMA(聚甲基丙烯酸甲酯)等塑料复合材料为基底,辅以透明或半透明的表层涂层。ABS 提供良好的韧性与可成型性,PMMA 则以高透光度和耐划伤性见长。这两种材料在日常骑行中经受日晒、雨水、尘土和微小颗粒的侵扰时,会逐步形成浅度氧化、光泽下降甚至微裂纹的迹象。抛光的核心,不是一次性“抹亮”,而是通过科学的表面处理,重新分层修复表面的分子结构,让光线能够更直接地在表面反射。通过适当的抛光方法,能去除氧化层、油污和轻微划痕,同时不破坏原有的塑料层,保持透明度与硬度的平衡,从而延长整流罩的使用寿命与外观寿命。这一过程强调的并非单次亮度的提升,而是稳定的长期光泽,以及对紫外线和环境污染的持续保护能力。
在材料层面,常见的 FRP(玻璃纤维强化塑料)结构也时常出现在某些整流罩的设计中。FRP 的优势在于高强度和可为特定形状定制的特性,但其表面应对外部环境的特性相对敏感。未涂装的 FRP 需要谨慎处理,避免使用会刮伤或渗透纤维层的溶剂。对于这类表面,通常需要更温和的清洁与专门的抛光策略,以及最终的凝胶涂层或清漆层来提供坚固的表面保护。需要注意的是,某些未上色、未涂层的 FRP 结构在公开道路上并不具备合格的上路资格,一些仅用于竞赛或展示用途的部分材料,务必遵循相关法规进行处理与使用。
抛光效果的形成,是材料科学与精细工艺的结合。塑料灯清洁剂和抛光剂系列产品,专为前灯、尾灯以及整流罩这类大面积平整或曲面部件设计,能够在较短时间内去除表面微划、氧化层及轻微污渍。通过多阶段的磨光与抛光,表层的分子排列被重新排列,形成一个新的、均匀的折射层,使光线以更清晰、更均匀的方式穿透并反射回来。这种“翻新”效果,往往伴随透明度的提升和硬度的增强,使整流罩在抛光之后呈现出一层光亮而稳定的保护膜。更重要的是,现代抛光产品常以聚合物为主,加入紫外线抑制剂、抗氧化成分和微量抗刮材料,使表面在日常骑行中承受轻微磨损时,更难以出现明显的细微划伤和色差。
在材料类型的差异上,清晰可见一个关键点:若整流罩是表面彩色涂层的塑料件,优先考虑以清洁与柔性抛光作为起点,避免采用可能削弱涂层的粗糙磨料。若表面为未涂装的 FRP,护理策略需要更谨慎,因其本身对溶剂敏感度较高,且可能存在轻微的渗透性损伤。在这两类材料之间,真正提升抛光效果的,往往不是一次性的大力打磨,而是一个渐进的步骤,确保在去除污物与氧化层的同时,不触及甚至不破坏底材。
从实操角度讲,一个稳健的抛光流程应包含清洁、初步修整、抛光与保护三个阶段。清洁阶段以温和的塑料专用清洁剂为核心,采用微纤维布与软海绵进行表面擦拭,尽量避免带有砂粒感的材料,以防在初步清洁时已经产生更深的划痕。初步修整阶段,针对较深的划痕或局部氧化区域,使用适配塑料的中等磨料抛光剂进行轻微打磨,确保颗粒粒径控制在能够微信地打磨表层微观起伏而不进入更深层的基材。紧随其后的是细腻的抛光阶段,选用高光泽抛光剂对表面进行均匀抛光,严格控制压力与移动速度,避免在高热条件下引发热膨胀与变形。最后的保护阶段,选择具备透明保护膜性质的聚合物涂层或具有紫外线抑制功能的保护剂,形成一层均匀的薄膜,既能提升耐污性,又能增强对紫外线的防护,减少日晒造成的退色与脆化风险。
这一系列步骤的实际效果,往往依赖于您对整流罩材料的正确识别,以及对抛光剂化学成分的理解。若将材料特性与工艺步骤有效结合,抛光不仅能提升镜面光泽,还能显著提高表面硬度,减少未来的日常维护成本。需要强调的是,选择合适的材料护理产品,应以材料本身的属性为前提,而非盲目追求高光的瞬时效果。对 ABS 与 PMMA 的表面,较温和的抛光组合往往就能达到理想的光感;对 FRP 或其他未涂层材质,需更稳健的策略与保护层,以避免长期的微裂和脆化。
在实际应用中,还应考虑整流罩的几何形状和风洞设计对抛光工艺的影响。大面积曲面的抛光,需要对设备的角度与移动轨迹进行细致设计,确保抛光剂不会聚积在边缘处造成局部过热或残留物。对复杂轮廓,如前部帽位、导流槽和边缘倒角,建议采用分区处理的方式,逐步完成。分区处理不仅提升了抛光的一致性,也有利于对整流罩的每个区域进行不同厚度的保护膜应用,从而实现整体视觉的一致性。
在材料选择与护理方法之间,存在一个需要综合平衡的现实:某些整流罩部件可能需要额外的表面处理,如凝胶涂层或透明漆层,以提高耐用性。这样的处理通常包括在原有材料之上,提供更耐磨的顶层保护,同时保持良好的透光性与新鲜感。对于竞赛、展览等特殊用途的未喷涂表面,护理的重点在于保护层的构建与避免道路环境中对表面的直接损伤。只有在全面评估材料属性、使用环境与法规要求后,才能决定采用哪种抛光策略及保护方案。
在讨论材料特性与抛光效果的同时,不能忽视日常维护的长期性。抛光后的表面需要持续的保护,以保持高光泽状态并降低再次氧化的速度。清洁频率、清洁剂类型、抛光后保护膜的选择,以及日照时段的使用习惯,都会影响最终视觉效果的稳定性。这就像给整流罩穿上一层看不见的披风,既美观又抵御外界侵袭。日常维护的关键,是把每一次清洁和抛光都视为对未来骑行体验的投资,而非一次性美观的追求。
从整合的角度看,材料特性、抛光工艺与保护机制共同构成了一个完整的保养框架。一个健全的框架,要求您在开始抛光前就清晰识别表面材质,并据此制定逐步提升表面状态的计划。通过科学的清洁、渐进的打磨、精细的抛光以及稳定的保护,整流罩的光泽将更持久,色彩也更稳定。这样的长期效益不仅体现在外观上,更体现在抗污染与抗紫外线的综合表现上。抛光的艺术,最终落在把握材料边界、尊重表面物理与化学特性上。
如果需要将这一章节与具体车型或品牌的整流罩联系起来,读者可以参考面向不同车型系列的整流罩分类页面,这些页面通常集中展示不同款式的外壳组合与配件适配性。对于需要浏览具体系列的读者,以下链接提供了直观的分类入口,便于快速定位到您感兴趣的整流罩类别:BMW fairings。
总之,抛光护理不是简单的美观操作,而是一套以材料科学为基础、以长期保护为目标的综合策略。理解整流罩材料的特性,掌握恰当的清洁与抛光节奏,选择合适的保护膜与涂层,才能真正实现外观与耐用性的双重提升。这一过程强调的是对材料边界的尊重、对工艺参数的细致把控,以及对未来使用环境的前瞻性规划。只有在这种全面、协同的视角下,摩托车整流罩的光泽与光洁度才能在多次使用后仍然稳定如新,成为骑行体验中的一抹独特而持久的亮光。
外部参考资源: https://www.jiangsucareguys.com/motorcycle-cowl-care
Mirror-Ready Shield: Mastering Gloss on Motorcycle Fairings
Gloss on a motorcycle fairing is more than a cosmetic flourish; it is the visible evidence of a sane maintenance mindset. The fairing, often molded from ABS, polycarbonate, or reinforced composites, handles heat, sun, rain, and road grime. When it is polished, light dances across its curves, revealing lines and proportions that might otherwise go unnoticed in a dull haze. But gloss is also a protective ally. A well-sealed surface repels dirt, sheds water, and slows the aging process by blocking ultraviolet rays that degrade plastics over time. The goal of the polishing discipline is to balance aesthetics with durability: to restore a lost brilliance and to keep that brilliance stable through many rides. This balance is not achieved by brute force but by understanding how surface chemistry responds to cleaners, polishes, and sealants that are compatible with plastic and composite materials. In this chapter, the focus is practical, not theoretical; it is about a repeatable routine that keeps the fairing looking sharp ride after ride, year after year, without turning maintenance into a ritual that distracts from riding itself.
To understand gloss restoration, you first need to know what you are dealing with. Motorcycle fairings are rarely painted metal; they are plastic or composite skins that bear a protective color coat on top of a substrate chosen for lightness, impact resistance, and flexibility. ABS is common for its toughness and ease of molding. Polycarbonate offers clarity and resilience but can scratch more readily if treated roughly. Some fairings incorporate fiberglass or other reinforced resins, which behave differently under polish and scratch-removal products. Each material choice carries its own tolerance for heat, solvents, and polishing compounds. The key is to select products designed for plastics rather than abrasive compounds intended for automotive paint. The approach here favors a polymer-based polish or sealant that cushions the surface, adds a layer of film, and strengthens UV resistance. While it is tempting to reach for a heavy wax with deep gloss, that kind of product can trap micro-mess and become difficult to remove if it is not compatible with plastic surfaces. The objective is a soft, clear shine that lasts and protects rather than a brittle, glassy film that shatters at the first stone chip. That is the spirit of maintenance rather than a one-off fix and it provides a dependable baseline for subsequent care that follows.
Preparation begins long before you touch the surface. A calm, controlled environment makes all the difference. Work in a shaded, well-ventilated area where temperature stays moderate. A cold surface can attract condensation when you introduce solvents, while heat can soften plastics in ways that invite smear or uneven polish. Start with a thorough dry brush to remove loose dust—an ultra-soft brush or a microfiber duster works best. Then rinse with plain water to lift stubborn dirt that might grind into the resin during polishing. The next step is a careful surface inspection. Look for bird droppings, sap, and road grime that may have penetrated the resin’s pores or crept into micro-scratches. Contaminants trapped under a delicate finish will reappear as halos or hazy reflections after polishing, so you want to lift them gently rather than grind them in with aggressive cleaners. If you notice chalky oxidation near sun-exposed areas, it signals surface aging and the need for a slightly more attentive polish—but always one formulated for plastics. The goal is a clean, dry canvas ready to receive gloss without residues and without new scratches. This stage lays the groundwork for the quality that follows and influences how well a protective layer adheres.
Cleaners play a pivotal role in shaping the result. Use products clearly labeled for plastics or polymers, and avoid harsh solvents, acids, or abrasive cleaners. Plastic-safe cleaners are designed to suspend and lift contaminants without altering the resin’s surface energy, which is essential for the next steps. After washing, dry with a microfiber towel by patting rather than rubbing; this reduces the chance of faint towel marks that might be mistaken for gloss loss. It is common to perform a quick wipe-down with a dedicated surface prep product that removes fingerprints and old residues before the polishing stage. This step ensures the surface is neutral and ready for the first contact with polish. If decontamination is skipped, you risk embedding micro-particles into the gloss during polishing, creating new micro-scratches that will demand corrective steps later. The result you want is a clean, neutral canvas with no oily or waxy residues—just the surface ready to return to life. With this foundation, you can begin the polishing and protection sequence with confidence.
Polishing and protection should work in tandem, not as competing practices. When it comes to plastics, a non-abrasive polish or one with ultra-fine microabrasives is usually the safest route. The aim is to refresh the surface by removing the micro-oxidation layer that dulls the color and reduces clarity, not to grind away material. After cleaning, apply a small amount of polymer-based polish on a soft foam or microfiber applicator. Work in small circular motions with light pressure, following the fairing’s contours and paying attention to corners and edge radii where dirt tends to accumulate. You should be able to see the surface brighten as you work. When you wipe away the residue, use a clean microfiber cloth and a gentle touch. If you notice faint hazing, reapply with a fresh cloth and a tiny amount of product. The benefit of a polymer-based approach is that it tends to form a protective film when cured—one that helps repel UV rays and water without creating a thick layer that dulls the surface. A proper polish is a component of a maintenance sequence, not a single miracle, and it should be repeated with a cadence aligned to your riding frequency and wash routine.
Before you move to sealing, you want to verify that the surface is truly ready. An easy test is to observe how water beads on the surface after drying. A smooth, repellent surface will cause water to bead into tight spheres that roll off the curve. If beads cling or smear, you may be dealing with leftover polish or a rag that left fibers behind. In that case, buff the area with a dry microfiber, switch to a fresh pad, and re-wipe with a clean cloth. The residue left by any polish must be removed completely to avoid a milky finish or streaks once a sealant is applied. Lightly buffing with a fresh cloth, then wiping again with a clean microfiber, helps ensure you are not carrying high spots into the next step. The goal is a surface that responds evenly to light and reflects color with depth rather than a surface that catches light and shows micro-scratches at shallow angles. This discipline pays off when the sun returns and the gloss needs to sustain through another week of riding.
Protection after polishing comes in two forms: sealants or coatings and UV-protective layers. A polymer-based sealant can be applied to the clean, dry surface to lock in the gloss and create a hydrophobic barrier that sheds rain and spray. The best choice for plastics is a product designed specifically for synthetic surfaces; it should be non-silicone if possible, because silicone can complicate future refinishing and sometimes leave a ghostly residue under certain lighting. Apply a thin, even layer with a clean applicator and allow cure time according to the product’s instructions. Then buff with a fresh microfiber to remove any high spots. The result should be a uniform shine with a protective sheen that lasts through several wash cycles. Some riders opt for a ceramic-like coating; these can offer longevity but require careful surface preparation and sometimes more exacting removal if not applied evenly. The core principle remains: gloss is a durable shield, not a fragile illusion. It should resist UV damage, shed water, and reduce the rate at which dirt adheres to the surface.
Maintenance sustains gloss between major refreshes. After each ride, rinse with lukewarm water or gentle pressure, avoiding a direct spray into joints or edges where residues can accumulate. Dry with a clean microfiber, patting rather than dragging. If you ride in dusty conditions or expect rain, consider a light reapplication of the polymer sealant after a few washes to stabilize the surface and prevent micro-scratches from turning hazy. The frequency of reapplication depends on climate and exposure. In intense sun, protective properties decline over weeks rather than months; in humid or coastal environments, salt spray and moisture can erode the protective layer faster. For riders who store their bikes in garages, seasonal refresh may be sufficient; daily riders may benefit from a monthly check. The objective is consistency: a predictable routine of cleaning, light polishing, and protective reconditioning that keeps the fairing’s gloss honest and the surface resilient. The aesthetic payoff is real, but the protective role of gloss preserves value and rideability when the bike moves through rain, gravel, and the inevitable contact at the pit lane.
Edge radii and transitions pose particular challenges. The edge of a fairing is where sunlight, wind, and dirt converge, and it is often where micro-scratches become most evident. When polishing plastics, avoid deep abrading agents or aggressive pads that can round the edge or create hazy halos around trim lines. A gentle touch, combined with a polish formulated for plastics, minimizes risk. If the surface shows fine lines or oxidation that seem to sit within the resin itself rather than on the surface, consider a dedicated plastic polish that includes ultra-fine abrasives; these products refine the surface to a higher gloss without removing material excessively. For polycarbonate or fiberglass areas, the same approach applies, but the polish selection may differ in heat tolerance and cure time. Always test on a small, inconspicuous area first; if no adverse reaction is observed after a short dwell, you can apply to larger areas. This careful, measured approach reduces the likelihood of introducing distortion and preserves the clarity of the fairing’s color. A measured process also helps ensure that any future refinishing work is easier, should you choose to refresh color or texture later.
Climate matters as much as technique. In bright sun, the surface heats quickly and the polish can cure too rapidly, leading to high spots or smearing. In humid climates, moisture competes with evaporation and can hinder film formation. If you ride in winter, the cold can slow cure times; plan your session for when the surface is at a comfortable temperature. Ensure the ambient humidity is moderate and avoid working in oppressive heat or expected storms. If you store the bike in a garage, don’t seal the space too tightly; good air exchange helps any residual solvents dissipate and reduces the risk of solvent buildup. In all conditions, work in a clean, organized space with lighting that reveals imperfections. A good pair of gloves helps keep oils off the surface and reduces fingerprint stains. The more you respect the environment and the surface, the more predictable your results will be. Gloss, when managed properly, becomes a reflection of deliberate care, not chance.
Two common missteps can undermine months of effort. First, using an automotive wax that relies on petroleum solvents not friendly to plastics. Some waxes leave a film that attracts dust or degrade the plastic surface. Even if the finish looks good, you may trap residues that hinder subsequent re-polishing. The second misstep is over-polishing. It is tempting to chase hazing with more abrasion, but plastics do not respond to endless rubbing. You risk heat-affected zones and permanent micro-scratches. The right approach is minimal intervention with a cautious hand. If you see haze, step back, clean again, and reassess rather than pressing ahead. The best practice is to treat polishing as a means to restore depth of color and clarity, not to chase a flawless look in one session. With patience, the gloss will return with a depth that makes the lines of the bike sing and reinforces the quality of the underlying materials. This patience also pays dividends in consistency across panels when you add aftermarket fairings or change color schemes later on.
A fairing’s material dictates not only the polish chosen but the way you handle it. ABS tends to tolerate mild polishing well; its surface accepts a gentle blend of cleaners and a non-abrasive polish. Polycarbonate, while clear and tough, requires caution because its surface can craze under aggressive solvents or high heat. Fiberglass or other composites can respond differently to sealants, particularly if the resin has not fully cured or has been repaired. In all cases, the safest path is to use products explicitly labeled for plastics or polymers, with clear instructions for use on different substrates. If in doubt, perform a patch test in a discreet area such as behind a vent or near a trim line before applying across larger sections. The patch test should confirm that the chosen product does not alter color or create a hazy layer. A little patience here ensures you do not darken or cloud the finish in one zone while smoothing another. The goal remains uniformity across the fairing, so light reflection remains even and the color depth remains true to the design.
Many riders customize their bikes with aftermarket fairings, which adds another layer of complexity to maintenance. The new panels may have different surface treatments, edge profiles, or paints that respond differently to cleaners and polishes. In such cases, treat each panel as a separate micro-surface and adjust your technique accordingly. If you want to explore options and see how different fairings are presented in product collections, you can consult the Yamaha fairings category for reference Yamaha fairings. Viewing these variations helps you understand how gloss interacts with different plastic grades and color formulations, and it also gives a sense of how your own bike’s surface might require slightly different care. This awareness prevents over-polishing one area while under-treating another, avoiding uneven gloss and a visually inconsistent appearance across the fairing surface. It also highlights how future refinishing work may require different product choices as materials evolve or as you change the bike’s look.
The chapter that follows will expand beyond gloss to explore color retention, micro-scratches, and the interplay between surface conditioning and long-term finish. We’ll look at how color and gloss shift with age and how coatings can stabilize color consistency across panels. The practical method of gloss restoration outlined here is designed to be repeatable as your riding schedule changes and as the bike moves through different storage environments. It is not a one-off; it is a routine that respects the material, honors the engineering of the fairing, and preserves the bike’s visual identity. As you practice the steps described, you will begin to recognize subtle cues in the surface: a touch of warm glow in certain lighting, a softened reflection along curves, or a tighter bead when rain test passes. Each cue tells you that gloss is ready for another pass, or that the protective layer needs a refresh. The aim remains the same: a mirror-like shield that accompanies your momentum rather than competing with it.
Ultimately, gloss is a living relationship with your bike. It needs attention after every ride, scheduled maintenance, and protection that suits the material. By treating the fairing as a worthy surface, you extend not only its beauty but its resilience to heat, sunlight, and road debris. The problem of dull plastic is not a defeat; it is a solvable condition when approached with patience, correct products, and a steady hand. For those who want additional practical guidance on plastic care and general surface protection, a broad external reference provides helpful context. External reference: https://www.autogeek.net/car-care-tips.html
Final thoughts
通过恰当的抛光护理,摩托车整流罩不仅可以恢复光泽,更能够延长使用寿命。选择高品质的抛光蜡,如Atas Solux,能够为您的整流罩提供长效保护,让车辆保持最佳状态。了解材料特性及日常保养技巧,对于企业主而言,将是提升摩托车整流罩市场竞争力的重要手段。今后,在摩托车护理中,不妨考虑整流罩抛光的重要性,从而为客户提供更专业的服务和品质保证。