
Wrapping motorcycle fairings is essential for businesses that aim to protect these components during transport or modifications. Adopting an effective wrapping technique not only ensures the physical safety of the fairings but also conveys professionalism to customers. This guide provides a holistic view on how to wrap motorcycle fairings efficiently and securely by covering key preparation steps, material choices, securing techniques, labeling, and best wrapping practices. Each chapter dives into critical aspects necessary for achieving optimal results, ensuring that your wrapped fairings arrive at their destination in pristine condition.
The Quiet Craft of Prep: Setting the Stage for Wrapping Motorcycle Fairings
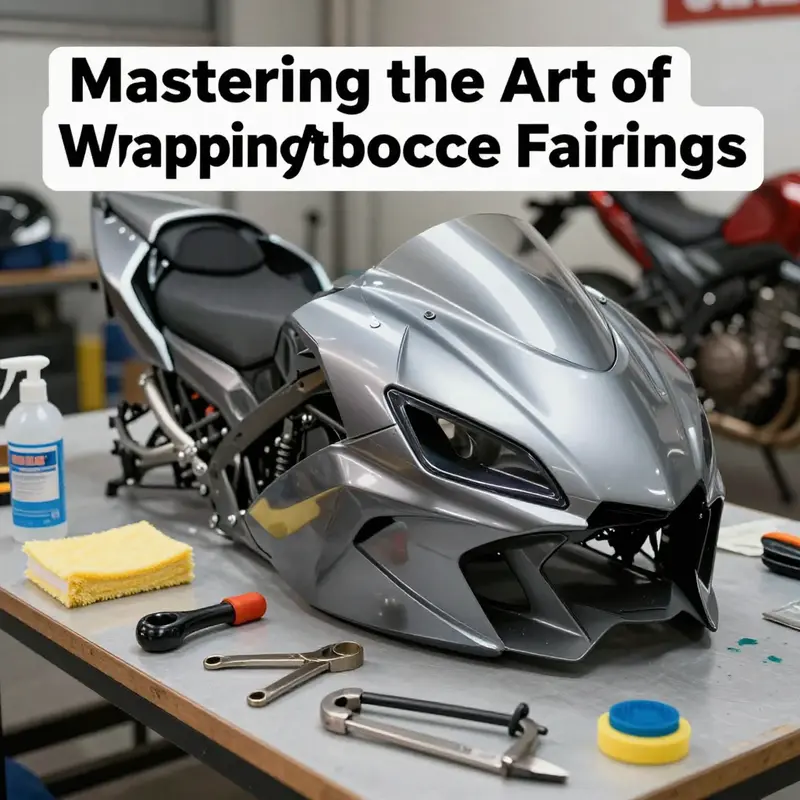
The art of wrapping motorcycle fairings begins long before the first peel of film comes near the glossy surface. It is a discipline of preparation, where every square inch of the bodywork is coaxed into a state that invites adhesion and patience. In practice, preparation is not a mere prelude; it is the guarantee that the wrap will endure through handling, transport, and the daily realities of riding. The journey from clean panels to a flawless finish reads like a careful conversation between material and metal, where the goal is a seamless bond that respects the lines and contours of the bike while preserving its integrity.
The foundation of any successful wrap lies in cleanliness. Dirt, grease, and residue are silent saboteurs that can undermine the film’s grip. A mild detergent and warm water work together to dissolve the grime that settles into tiny ridges and crevices. The process should be deliberate, with attention paid to every nook—undersides, seams, and edge curves that often escape casual cleaning. After washing, drying becomes more than a step; it is a ritual of inspection. A soft microfiber cloth is chosen precisely for its gentleness, pulling away moisture without abrading the paint or leaving behind lint that could trap under the film. Residual moisture is a magnet for air bubbles and micro-motes that resist a smooth lay, so the surface must emerge from washing dry and inviting, almost gleaming in its readiness.
Once the surface is pristine, the next phase is inspection. This is where a quiet eyes-up becomes decisive. Look for scratches, nicks, or any subtle distortions in the fairing’s plane. While many imperfections can be addressed after the wrap begins, noticeable flaws may invite tension during application and beyond. A light touch with fine-grit sandpaper—think around 1500 to 2000 grit—can create a micro-smoothness that helps the film conform to curves and avoid catching on burrs or texture. Sanding is not an invitation to aggressiveness; it is a fine-tuning, a way to prime the surface for the film to kiss rather than repel it. After this, a careful wipe-down with a lint-free cloth dampened with isopropyl alcohol removes dust and oils that reemerge from the sanding dust or from hands and air. This final wipe is a safeguard against the faintest traces of contaminants that could creep into tiny gaps and undermine adhesion.
The preparation also includes thoughtful planning for the wrap itself. Measuring and cutting come next, but they are not mechanical repetitions. They are guided by an understanding of the fairing’s geometry—the way the surface bends, curves, and terminates at an edge. The wrap film should be cut to sizes that are generous enough to cover the largest expanse with slack for the curves, yet precise enough to avoid waste and stubborn panels. A common approach is to lay out the film on a clean work surface and trace each panel’s silhouette, then add a margin that accommodates coolant lines, rivets, and any protruding features. When the pieces are cut, the importance of alignment becomes apparent. The film’s grain, if any, should be oriented to harmonize with the panel’s natural direction so that the final appearance reads as a single, continuous surface rather than a mosaic of mismatched patches.
Preparation also demands attention to edges and corners, the points where fatigue and impact tend to reveal themselves first. This is where you begin to imagine the wrap’s life on the road: the brush of road debris, the occasional contact with a tunnel wall, the inevitable stone chip. To prepare for these realities, a strategy of edge reinforcement is employed. Foam sheets or rigid foam board can be placed around sharp edges or corners to provide a cushion that reduces the risk of tearing or crackling as the wrap is conformed around those features. The aim is not to create a barrier to the wrap’s wrap, but to smooth the transition and reduce the likelihood of micro-tears that can propagate under tension. In a practical sense, this means layering a little extra padding in vulnerable zones and ensuring that the foam remains flat and undisturbed as the film is applied.
With the surface prepped and the material ready, the process moves into the core of execution: measuring, cutting, and warming the film. Measuring ensures the film’s footprint is adequate to cover the entire panel, including the edges that tuck into recesses or wrap around contours. Cutting should produce clean, straight lines along deliberate guidelines so that the edges align with the fairing’s natural seams rather than floating freely into air. The film’s pliability is enhanced by gentle heating. A heat gun or a hair dryer on a low setting softens the polymer just enough to allow it to lay into curves without claiming folds or warping the surface. The warmth also reduces the risk of air being trapped in hard-to-reach pockets, a common source of frustration for beginners and veterans alike. This is where patience and perception meet; the film’s response to heat guides the hand as it glides over a radius or wraps around a convex bump.
The actual application follows a careful sequence: pressure, smoothing, and retreating adjustments. A squeegee or a soft cloth is used to push out air and moisture from the center toward the edges, maintaining a frictionless glide along the curves. It is a quiet, methodical process, not a sprint. Each pass aligns the film with the fairing’s shape, while occasional micro-stretches around stubborn curves demand a gentle touch and a humane dosage of heat. The surrounding environment matters as well. A clean, dust-free workshop reduces the chance that stray particles become tiny specks trapped under the wrap. A controlled temperature, not too hot and not too cold, helps the film sit without warping or pulling away from the substrate.
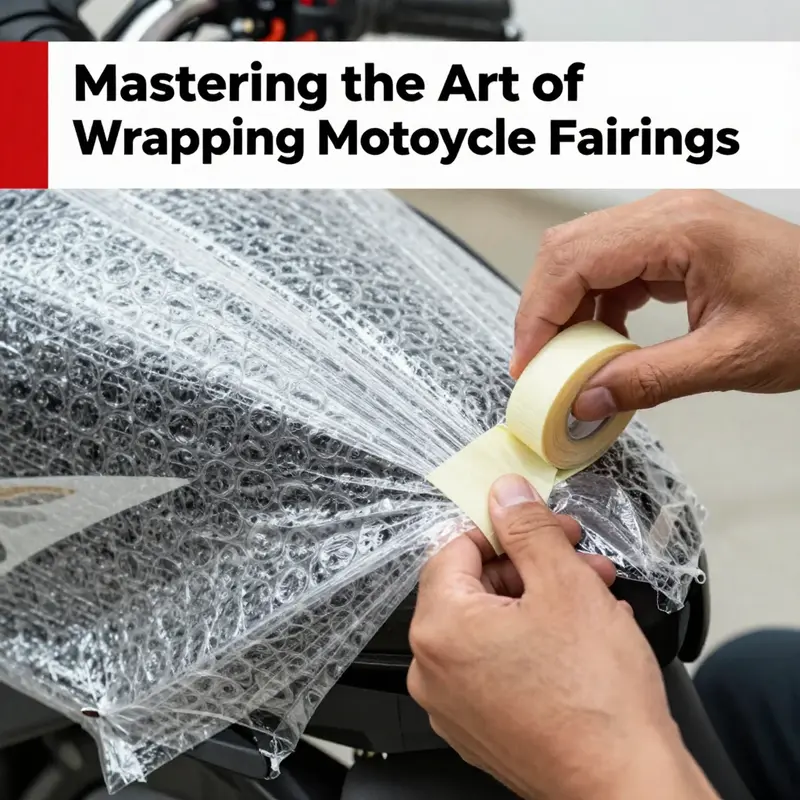
All along, discipline guides choice and restraint. The temptation to use aggressive adhesives or to force the film into a too-tight embrace around a corner is real, but it is a trap. Duct tape has no place directly on the fairings, a rule born from experience when residue and paint lift are the common casualties. Instead, ends and overlaps are secured with low-tack tapes or masking tape that can be removed without marring the paint. Seams are managed with meticulous attention; they should tuck neatly against each other and be sealed to prevent shifting during handling. The objective is to achieve a surface that breathes with the bike, not a brittle overlay that peels from the edges in a matter of weeks.
Beyond the mechanics of wrapping lies a conscience about documentation and transport. Once the wrap is in place, labeling the panels helps anyone who handles the bike during storage, transport, or reassembly. Phrases such as Fragile or This Side Up, along with the bike model, make practical sense in a workshop that moves parts between spaces or ships them as components of a larger project. In situations where a full transport crate is used, the wrapped fairings should nest within a supportive container lined with foam inserts and secured so that no movement can rattle the surface. This final layer of care—how the wrapped pieces are stowed, marked, and transported—completes the preparation, turning a meticulous process into a reliable outcome.
For readers seeking model-specific context or inspiration, a visit to model-category pages can be helpful. For instance, exploring the Honda fairings category provides a sense of how factory contours influence wrap planning and edge protection. This broader view can illuminate the subtle differences between models and how those differences inform padding strategies and panel layout. See the Honda fairings category for model-specific considerations.
In this chapter, the emphasis remains on preparation as the backbone of wrap quality. The hand travels from a clean panel to a fully formed, tension-free surface only after decisions about cleaning, inspection, smoothing, measuring, and heating have anchored the process. The result is not merely a cosmetic alteration but a durable, respectful modification that honors the bike’s lines while offering the protective and aesthetic benefits of a properly applied wrap. The craft lies in rhythm and restraint: a careful pace, careful tools, and a quiet confidence that the plan will yield a finish that endures.
External reference: https://www.motorcycle-ride.com/how-to-wrap-motorcycle-fairings/
Layered Protection: Material Choices for Wrapping Motorcycle Fairings
Selecting the right materials to wrap motorcycle fairings is not merely about choosing something soft or strong. It is about building a layered defense that survives transit, storage, and the rough realities of handling. The primary goal is to prevent scratches, dents, or moisture from finding its way into the paint or composite surface. A well-chosen combination works with the bike’s contours, rather than fighting them.
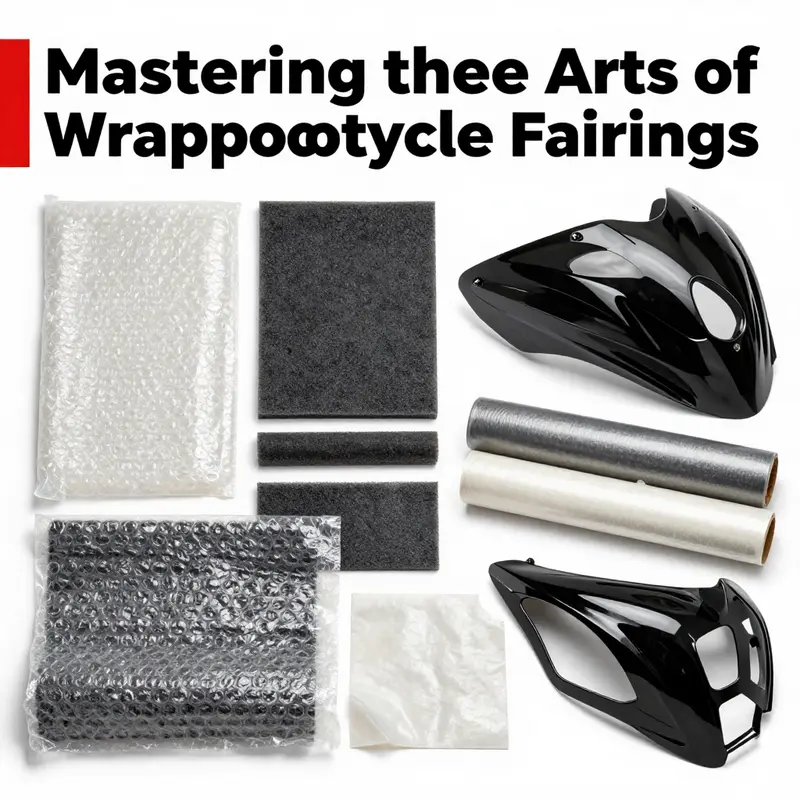
In practice, most wrappers rely on three interlocking layers. The innermost layer should be a soft, non-abrasive surface that sits directly on the fairing. Bubble wrap fits this role well when used carefully. Choose the type with larger bubbles for more cushion, especially along edges and corners where impact is most likely. For extra rigidity, especially on flat planes and near sharp edges, add foam sheets or a rigid foam board as a secondary shield. Foam acts as a sacrificial layer that bears the brunt of pressure and drags less across paint compared to fabric or paper.
Outside the foam, bubble wrap remains essential. But its job is not solely cushioning. It also creates a uniform barrier that evens out minor imperfections on the surface and distributes pressure from handling. In practice, you will apply several layers, starting from the top and moving downward. Each layer should overlap slightly with the previous one. Do not wrap too tightly; you want a little give so the layers can compress rather than pinch the plastic of the fairing.
A third layer adds moisture resistance and keeps the wrap in place during movement. Plastic film or stretch wrap is a practical option here. It tightens the ensemble and helps seal seams, preventing dust and moisture from seeping in between layers. When you apply this outer wrap, work slowly and maintain tension so the film hugs the contours without pulling on delicate points. The goal is a snug, stable envelope that won’t unravel if a hand brushes against it during loading or unloading.
This is the moment to consider edge and corner protection more deliberately. The fairing edges, hinges, and exaggerated curves are the areas most vulnerable to scuffs. Reinforce corners with extra foam sheets or another wrap of bubble. If a corner has a sudden radius, cut foam to match and tuck it into the seam where two panels meet. When you reach smaller sections, such as the small scoops or diverter tips, cut additional foam slivers and place them as protective buffers rather than forcing wrap to fit too tightly.
One practical mistake to avoid is direct contact of rough materials with the painted surface. Burlap, rough cardboard, or similarly abrasive bases can mar the finish even when wrapped. The soft interior should always be the last line of defense. Use masking tape or low-tack adhesive tape to secure wraps, never heavy duct tape on the fairings themselves. The tape should hold the wraps in place without leaving residue or lifting paint when removed. At the same time, ensure that all seams are sealed. A loose edge is an invitation for shifting during transit, which can create friction and scratches.
An additional layer of caution concerns the fit and shape of the bike. Modern fairings are not flat blocks; they flow with curves and corners. When preparing your wrapped setup, you must tailor pieces to the model you are dealing with. Cut bubble sheets to follow each contour, and trim foam so that it sits flush against the surface rather than riding high on a ridge. This approach reduces movement and creates a stable, protective shell around the bike’s plastic or composite surfaces.
If your goal is transport rather than long-term storage, you may want to opt for a thicker or multi-component solution. Heavier bubble wrap with larger cells provides more shock absorption, while foam gives rigidity to prevent bending under pressure. In a warehouse or trailer, the smooth, continuous surface created by foam and bubble can ride out minor bumps without concentrating stress at any single point. If you are keeping the fairings in a storage cabinet for months, consider additional measures such as dust covers or breathable wraps that still allow air circulation to avoid moisture buildup.
The decision about materials should also reflect the specific environment. Temperature swings, humidity, and exposure to sunlight can influence how adhesives behave and how protective layers respond. The soft inner layer should remain intact even if the outer layers experience expansion or contraction. For long journeys or seasonal shipments, the wrap should tolerate handling by multiple people without loosening or tearing. In this sense, a modular approach to wrapping, where you can remove and reapply protective layers easily, offers real value. It is not just about one protective blanket, but about a system that travels with the fairing and maintains its integrity through tiresome conditions.
You may wonder how to balance protection with practicality. The answer lies in the integration of materials that complement one another. Foam gives rigidity, bubble wrap adds shock absorption, and stretch film supplies moisture resistance. The combination creates a protective stack that distributes impact forces and guards against abrasion. When planning, you can lay out the fairing on a clean surface and run through a mental checklist: is there direct contact with any sharp edge? Have you wrapped the corners thoroughly? Are the seams sealed and predictable during handling? Will the wrap survive the trip from garage to transit?
In a professional setting or for frequent changeovers, you might also consider a purpose-built bag or cover designed for the model. Custom-fit plastic covers are particularly effective because they bear a near-perfect shape that shields the entire fairing from dust and minor knocks. They are reusable and usually equipped with securing straps that hold the cover in place without relying on tape. If you ever encounter a situation where you must showcase the bike or ship it quickly, this kind of cover is a reliable option that complements the wrap rather than replacing it entirely.
For readers who want to visualize fit and compatibility, exploring model-specific parts categories can be a help. A simple browse through the Honda fairings category, for instance, can give you a sense of how the shapes wrap around gentle curves and ridges. It also illustrates how protective covers can align with the contours. This practical insight is not about shopping; it is about understanding the geometry of the bike’s bodywork so your protective wrap follows every line. You can explore the Honda fairings category here: Honda fairings category. This reference helps you picture the kind of surface you are protecting and the way layers should flow with it.
Ultimately, the aim is to minimize risk without adding unnecessary bulk. A lean, well-fitted wrap that obeys the lines of the fairing will not impede handling, loading, or unloading. The process should feel deliberate rather than hurried, and the results should be predictable when you return to the bike after a storage period or after transport. The memory of the layers should be stable enough to prevent shifting, yet flexible enough to accommodate minor adjustments. Your wrap should read as a single, cohesive shield rather than a patchwork quilt.
As you finalize your method, remember that documentation matters. Labeling each wrapped piece with clear, durable markers, such as Fragile, This Side Up, and model details, helps anyone handling the package treat it with care. This practice reduces the chance of rough handling and clarifies expectations for drivers, couriers, or mechanics who might interact with the shipment. When combined with a sturdy outer container, be it a box or crate lined with foam padding, the wrapped fairings present a professional, organized image. The result is not only protection but a demonstration of due care and attention to the bike’s value.
For readers who want a broader, externally verified guide, Motorcycle.com offers a comprehensive walkthrough on protecting fairings during storage or transport. This resource complements the practical steps outlined here and reinforces the central idea: protection is a system, not a single material or technique. See the detailed guide at https://www.motorcycle.com/how-to-protect-motorcycle-fairings-during-storage-or-transport/ for additional context and validation of the best practices discussed above.
Safely Wrapping Motorcycle Fairings for Transport
Start with a clean, dry surface and remove loose parts to prevent shifting during transit. Use medium bubble wrap and foam padding to cushion corners and edges, overlapping each layer for full coverage. Seal with stretch wrap and light tape only to hold layers in place, avoiding adhesive contact with painted surfaces. Label the package clearly and place the wrapped fairings in a box or crate with extra foam to prevent movement. This approach provides durable protection against scuffs, moisture, and impact while keeping the fairings intact through handling and transport.
Guarding the Journey: Mastering Protective Wrapping, Labeling, and Safe Transport of Motorcycle Fairings

Wrapping motorcycle fairings for transport is more than a mundane task of protection; it is a careful act of stewardship that preserves value and ensures a smooth return to service. The process blends preparation, material choice, and precise technique into a single discipline. The goal is not merely to cover the painted surfaces but to create a protective envelope that can absorb impact, dampen vibration, and resist moisture and dust through the rigors of travel. When done well, the wrapped assembly behaves like a compact, well-padded package, ready to ride again in the hands of a mechanic, an courier, or a shipping team. The logic behind this approach is simple: treat the fairings as delicate components that will endure movement, not as rigid, invincible shells that can survive rough handling unprotected. In practice, this philosophy translates into a sequence of moves that begins with cleanliness and ends with secure, labeled containment within a crate or box that is sized to provide ample buffer.
Preparation sets the tone for everything that follows. It starts with a thorough cleaning of the fairings themselves. Dirt, dust, and residual grime are more than cosmetic nuisances; they can create micro-abrasions when surfaces are moved, and they can reduce adhesion if any wrap or film comes into contact with contaminated areas. A mild cleaning solvent paired with low-suds soap, followed by a careful rinse and a complete dry with a soft microfiber cloth, creates the pristine surface needed for effective protection. The cleaner the surface, the more uniform the wrap will lay down, and the less likely small particles are to work their way into seams or corners during transport. In this stage, it helps to remove any detachable components that might complicate wrapping. Mirrors, small trim pieces, and control housings can be set aside and wrapped separately if needed. Packing these parts in labeled bags prevents loss and makes reassembly straightforward later, a small but meaningful step toward minimizing downtime should the bike need to be reassembled quickly.
The wrapping itself rests on layered protection that blankets the fairings while preserving their shape and paint. Start with a base of cushioning material that can spread the load away from sharp edges and protrusions. Foam sheets or rigid foam boards are excellent for this role, especially around corners, edges, and hinges where flexing or impact is most likely to occur. Over this base, add a continuous layer of protective wrap—typically a high-quality padding such as bubble wrap with medium to large bubbles. The wrapping should begin at the top and progress downward, with each successive layer overlapping the previous one to eliminate gaps. The aim is to create a smooth, continuous shield over every contour without creating air pockets that could shift during handling. As you build up the layers, pay attention to the vulnerable features: the edges that catch on crates, the pointed corners that can poke through, and any protruding components that might press against other items during transit. If a fairing edge is particularly acute, consider a secondary thin layer of foam or an extra wrap to reinforce that zone. This careful staging of materials ensures the outer surface remains free of crease marks and pressure points, preserving both appearance and structural integrity.
Securing the layers is a small art in itself. Avoid using aggressive tapes directly on the paintwork, as they can leave residue or peel finishes on removal. Instead, use masking or low-tack tapes to anchor the wrap ends and prevent movement at edges and seams. Where possible, choose a system that can be undone cleanly without leaving traces, a practical benefit when rewrapping or inspecting the package en route. The seams deserve special attention; seal them tightly so moisture cannot seep in and compromise the padding layers. If the bundle has sharp corners or hinges, reinforce these areas with additional foam or extra wrap to absorb any unexpected impacts during loading and handling. The result should be a snug, ripple-free envelope that resists shifting and disperses any shocks across a broader area rather than concentrating them on a single point of contact.
Dismantling and reassembly considerations are not afterthoughts but essential components of the packaging strategy. Removable items, such as mirrors or lights, are best treated as separate sub-packages. Wrapping them in their own cushioned shells and labeling them clearly makes the later reassembly stage a straightforward process rather than a scavenger hunt. This approach reduces the risk of accidental damage when opening the package or when unpacking in a cramped workshop or a busy loading dock. The main fairing assembly then benefits from being wrapped as a cohesive unit, with its own dedicated protective shell. Custom-fit foam inserts or rigid protective shells designed to cradle each contour can provide superior stiffness and minimize the risk of flexing or cracking during transit. While these inserts can be more labor-intensive to produce, they are a wise investment for riders who frequently ship or transport fairings across long distances or through variable climates. The combination of a well-fitted foam cradle and a bubble-wrap envelope creates a dual-layer defense that diminishes the likelihood of micro-movements inside the container and the possibility of abrasions from incidental contact with other cargo.
Labeling and documentation echo the organizational discipline that underpins safe transport. Clear labeling communicates intent and handling expectations to anyone who touches the package. A simple set of inscriptions—Fragile, This Side Up, and the model designation—goes a long way in guiding handlers to treat the bundle with care. Literacy matters here; the clearer the markings, the less ambiguity for people who may not speak your language or who are moving many crates in a high-volume environment. In addition to visible labels, it is prudent to document the contents and weight on an external tag. This extra data assists in planning how the crate will be moved, lifted, or loaded into a transport vehicle. The end result is a well-documented, confidently handled package that minimizes the chance of missteps. For readers wanting to explore similar content across related topics, a helpful path can be found in the Honda fairings category, which offers insight into fitment considerations and compatibility that inform how you protect and ship bodywork during modifications and upgrades. Honda fairings provides a sense of the scale and shape of typical fairings you might need to wrap, reinforcing why precise cushioning and edge protection matter when planning your transport strategy.
The final stage of the journey is how the wrapped fairings are housed for transport. For moves within a workshop or a controlled facility, a sturdy, purpose-built containment approach is preferred. The wrapped set should be placed inside a rigid container large enough to provide a buffer of roughly two to three inches on all sides. This space is not decorative; it is the margin that prevents contact with crate walls during rough handling. Inside the container, use cushioning inserts around the perimeter to damp vibration and reduce the risk of shifting. Securing the fairings with additional straps or high-tensile webbing at multiple, fixed points helps immobilize the load and eliminates the possibility of the bundle rolling or sliding during transit. The outer casing should be sealed with a waterproof film or shrink wrap to shield against moisture and light spray while the crate moves through various environments. The goal here is control: control over moisture, control over movement, and control over how easily the package can be unpacked and inspected later. The packaging should be robust enough to endure the uncertainties of transport without becoming a source of damage in return.
In many cases, the entire unit is best transported in a wooden crate or a reinforced cardboard box designed to accommodate the bike’s dimensions. The crate itself serves as a rigid backbone that prevents flexing and distributes load more evenly than a loose pile of components would. The combination of a tightly wrapped fairing pair, its separate components, and a well-constructed crate creates a transport system that respects the investment in the bike and the care that a rider expects when a project involves cosmetic updates, repairs, or long-distance moves. It also aligns well with industry standards that emphasize the importance of protecting vulnerable assemblies from impact, vibration, and environmental exposure. The International Safe Transit Association’s guidelines, cited in detail in official resources, offer scientifically tested principles that support these practical choices and provide a framework for continual improvement in how motorcycles and their components are packaged for transit. For readers seeking authoritative standards, these guidelines offer a vetted reference point that complements the on-the-ground, hands-on methods described here. https://www.istahq.org
As the journey from workshop to destination concludes, the chapter closes not with a final flourish but with a quiet, repeatable routine. The wrapped fairings, the dismantled subassemblies, and the rigid crate all occupy a predictable space, allowing workshop crews to plan unloading, inspection, and reassembly with confidence. The discipline of wrapping, labeling, and secure transport pays dividends in reduced downtime, fewer returns for damage assessment, and a preservation of the bike’s aesthetics and mechanical integrity. In practice, there is a rhythm to the process that becomes almost second nature: clean, disassemble, cushion, wrap, seal, label, crate, transport. This rhythm stands as a practical testament to the idea that good packaging is not an afterthought but a core element of motorcycle maintenance and logistics. The craft is not merely about concealing a surface; it is about safeguarding a moment of transformation—the moment when a bike leaves one state for another—and ensuring it arrives ready to continue its story without interruption.
Contours of Protection: Mastering the Art and Science of Wrapping Motorcycle Fairings

Wrapping motorcycle fairings is more than a cosmetic upgrade or a simple sheet of plastic pressed onto curved surfaces. It is a careful blend of preparation, material science, and steady technique aimed at protecting the bodywork during transport, storage, or modification, while delivering a clean, durable finish that can be colorChanged or customized for years. The approach rests on a philosophy of respect for the fairing’s geometry and an understanding of how a wrap behaves on complex curves, sharp edges, and vents. When done with patience, it not only shields the paint and underlying panels from nicks and moisture but also allows quick changes without sanding or repainting, reducing downtime and maintaining resale or value over time. The best results emerge from a single, continuous workflow that starts long before a piece of vinyl meets the fairing and ends only after a careful cure has settled in.
The first pillar is meticulous surface preparation. A clean surface is the foundation of lasting adhesion. Start with a genuine automotive cleaner or a high-quality isopropyl solution to strip away wax, polish residues, and dust that ordinary cleaning leaves behind. Any trace of oil or silicone can create margins where the wrap peels or clouds, so the substrate must be pristine and fully dry before the wrap is introduced. It is tempting to rush here, especially if deadlines loom, but the wrap’s long-term performance hinges on this step. The next layer of respect is removing components that could complicate the wrap or trap air under the film. Mirrors, small trim pieces, and loose panels should be detached and bagged with clear labels. This prevents accidental damage during handling and reduces the risk of needing to lift the vinyl later to rework a stubborn seam.
On the material side, the choice of wrap film matters almost as much as the technique you bring to the project. A high-grade vinyl wrap designed for automotive use offers the best balance of conformability, UV resistance, and durability. The ability to mold around complex curves without buckling or visible seam breaks is what separates a professional finish from a rushed job. In practice, this means opting for a film engineered to hug contours, resist fading from sun exposure, and maintain its adhesive strength through temperature swings. The exact brand names are less critical than the film’s mechanical properties: stretch and cling, memory when cooled, and a forgiving, smooth release during trimming. A slightly larger-than-necessary cut gives a safety margin. It allows adjustment without forcing the film to stretch over an edge, which can create stress lines or premature lifting.
A controlled environment amplifies success. Work in a dust-free space with stable temperatures, ideally in a range that keeps the adhesive at a predictable tack. Temperature extremes—too hot or too cold—change how the film behaves, making it either difficult to squeegee out air bubbles or prone to wrinkling and shrinking after installation. With a calm, measured pace, begin by laying the wrap sections high on the fairing and working downward. This order helps gravity guide the film away from vents and openings, while keeping seams aligned along natural lines of the bodywork. The use of heat is not optional at this stage; it is a strategic tool that makes the vinyl pliable enough to glide over gentle curves and tight radii. A gentle warmth softens the film and reduces the risk of cracking or lifting at sharp points. The heat should be applied sparingly and evenly, never blasting a single spot until the surface looks glossy, because excessive heat can distort the film or alter the paint beneath.
Application is a careful dialogue between pressure and precision. A soft applicator or squeegee is your most trustworthy ally, pressed from the center of each panel outward toward the edges. This center-out technique pushes out air and captures any stray pockets before they become a problem. Around edges, seams, and around vents, go slow and work with small, deliberate motions to maintain alignment. When working near mounting points or complex hardware, the film may need gentle pre-creases to accommodate the shape. Where corners meet, pay extra attention to bridging the gap with a few careful passes rather than forcing the film into place in one aggressive push. The goal is a uniform layer that sits flush against the contour without visible ripples or air trails. If a bubble appears, it can often be coaxed out by pressing toward the edge with the applicator while applying a tiny bit of heat; avoid prying at the bubble with a blade, which risks lifting the edge.
Trimming is where careful focus becomes essential. A sharp utility knife and a straight edge deliver crisp seams that won’t lift in everyday use. The cut line should follow a natural edge or flow with a panel line so that any seam hides under a contour rather than catching on protrusions. After trimming, double-check that the wrap at the edges remains secure and that the film has adhered across the entire bend radius. Edges and corners are the most vulnerable in transit or during handling, so reinforcing them with an extra light pass of heat and a final smoothing stroke can prevent premature lifting. A well-executed trim reduces the likelihood of snagging during assembly of adjacent panels and makes the wrap look almost seamless—the hallmark of a professional finish.
Curing and aftercare complete the process. Even after the wrap appears settled, give the adhesive time to cure fully. A typical window of 24 to 48 hours helps bonds reach maximum strength before exposure to cleaning agents or high-pressure wash. In the days that follow, wash the bike with mild soap and water only, avoiding abrasive scrub pads, aggressive cleaners, or pressure washers that could loosen edges. The wrap’s protective value comes not from a single moment of film placement but from the patience that accompanies the curing phase, which cements the adhesion and endows the colors with lasting vibrancy. When the work is done, label and document the wrapped units if they are part of a larger shipment or a fleet. Fragile handling instructions and side-up indicators help ensure the wrapped fairings travel with care, reducing the chance of scuffs or corner damage during transport. The wrapping is not just a static coating; it is a dynamic shield that must be treated with the same care you would show the chassis beneath.
Shipping and handling add a practical layer to this craft. Even a well-wrapped fairing can suffer if it is moved haphazardly in a crate without proper cushioning. A sturdy container lined with foam around the outer panels, with foam inserts filling any gaps, prevents shifting and impact. Consider marking the package with clear instructions: fragile, this side up, and the motorcycle model if part of a larger shipment. Such labeling helps handlers treat the package with the respect the work deserves. In practice, the practicalities of wrapping also extend to sourcing materials and coordinating with suppliers. The broader market for wrap films and protective materials is heavily oriented toward major manufacturing hubs in Asia, where producers offer integrated production lines and logistical options that fit a B2B workflow. For professionals seeking more detailed guidance on supplier selection and quality control, there is a comprehensive reference that outlines the landscape of sourcing from the region and how to evaluate capability, lead times, and compliance. The takeaway is simple: build a supply chain that mirrors the care you give to each panel, ensuring consistency from one wrap to the next, especially when multiple fairings or models are involved.
As a rider or shop, you might explore panels that align with your bike’s geometry and aesthetic goals. For example, riders considering compatible panels from a specific category can explore a broad selection that suits different chassis shapes and mounting patterns. This kind of exploration helps you plan a wrap that not only looks cohesive but also respects the original engineering of the bike. If you are curious about practical compatibility and fit, consult a dedicated category that groups the relevant panels together, such as the Honda fairings category. Honda fairings category.
Ultimately, wrapping fairings is a balance of science and craft. It rewards thorough prep, disciplined technique, and a respect for the materials that perform under tension and heat. When executed with care, the process yields a finish that holds fast through rides, rain, and road grime, while still being reversible should you decide to change the color or revert to stock. The chapter above translates theory into practice, guiding a reader from the first wipe of cleaner to the final post-wrap inspection. It is the kind of stepwise discipline that keeps paint intact, edges sealed, and the bike’s silhouette looking as sharp as its performance. The result is not just a wrapped fairing, but a durable, thoughtfully executed transformation that honors the machine and the rider alike. For readers seeking further depth on related sourcing considerations and broader supplier ecosystems, an external resource provides a practical overview of how to evaluate and engage with regional suppliers in a way that complements hands-on wrapping work: https://www.example.com/motorcycle-fairing-supplier-guide-china-b2b
Final thoughts
In conclusion, wrapping motorcycle fairings is a critical process for any business involved in motorcycle care and transport. By following the preparation steps, carefully choosing materials, implementing safe securing techniques, accurately labeling, and adopting best practices, your motorcycle fairings will not only be protected but also present a professional image to your clients. The information captured in this guide provides a robust framework for ensuring the fairings arrive in perfect condition, ultimately enhancing customer satisfaction and promoting long-term business growth.