As a business owner responsible for maintaining a fleet of motorcycles or managing a motorcycle repair shop, it is crucial to ensure the aesthetic integrity of your bikes. One common issue you may encounter is the stubborn residue left behind by stickers on motorcycle fairings. Understanding how to effectively remove this residue not only enhances the appearance of your motorcycles but also helps preserve the finish. This guide will explore effective techniques for removing sticker residue, essential safety considerations, a comparative analysis of products available on the market, and post-removal care tips to maintain the quality of your motorcycle fairings.
Stick to the Finish: Gentle, Proven Ways to Remove Sticker Residue from Motorcycle Fairings
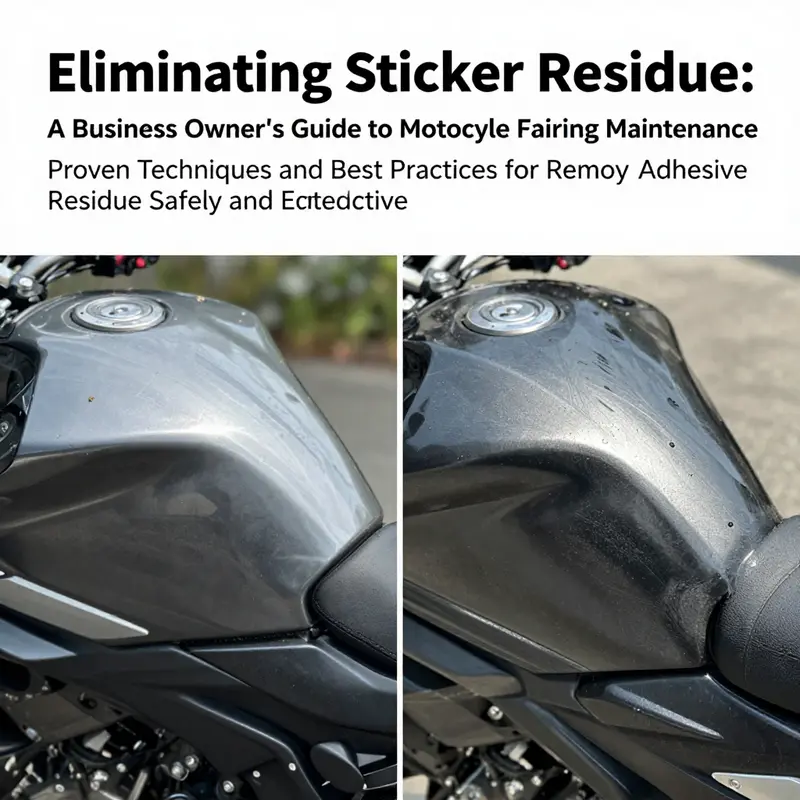
Sticker residue on a motorcycle fairing can look like a small annoyance that refuses to quit. Left untreated, it attracts dust, degrades gloss, and can even lift thin edges of paint or clear coat over time. The good news is that you can restore a clean, uniform surface without risking the integrity of the finish. The approach is not about brute force but about a careful sequence of steps that respect the material you ride. The fairing is typically formed from ABS plastic or polycarbonate with a paint or clear coat that adds depth and resistance. Each layer has a different tolerance for chemicals and heat, so the goal is to lift the adhesive without softening, hazing, or removing the paint beneath. The process begins with a gentle touch, and only after mild methods have been tried should you consider stronger options. In practice, the most reliable path blends tested, automotive-friendly products with common household tools, all used with restraint and attention to the surface. This is an art as much as a science, a balance between chemistry and craft that keeps the bike looking as pristine as it performs on the road.
The first principle to keep in mind is testing. Before you apply any solvent, spray, or heat to a conspicuous spot, try your chosen method on a small, out of sight patch. A discreet test helps you confirm that the finish accepts the cleaner without dulling, staining, or swelling. If the test passes, move to the residue itself, working in a circular motion with a clean microfiber cloth. The microfiber is crucial because its soft fibers lift residue rather than grind it into the surface. Use light to moderate pressure and avoid scrubbing aggressively. Adhesive remnants tend to lift rather than dissolve in a single pass, so patience pays off.
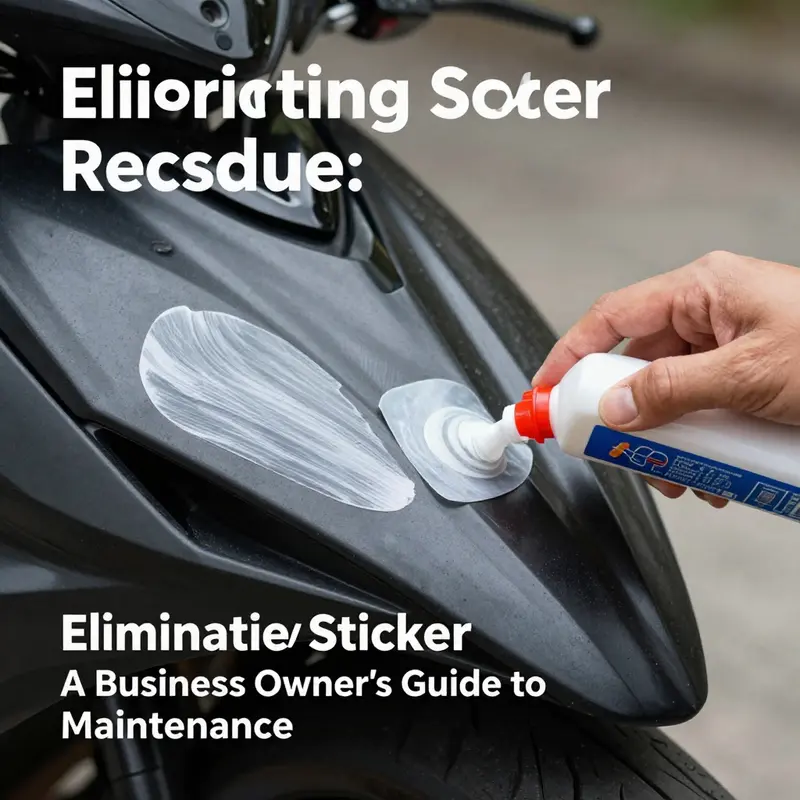
The most recommended starting point is a dedicated adhesive remover designed for automotive finishes. These products are formulated to break down sticky residues while preserving paint and clear coats. Apply a small amount of the remover to the residue or to a microfiber cloth, then gently place it on the area and let it sit for a few minutes. The goal is to soften the glue without letting the solvent pool or wick into seams. After the brief dwell, wipe away with a clean cloth and inspect. If any residue remains, repeat the process with a fresh cloth rather than layering the same cloth over the area. When finished, rinse gently with plain water and dry. This method is effective because it targets the glue chemistry without compromising the surface.
If a commercial adhesive remover is not available, or you prefer a more readily accessible option, alcohol is a dependable alternative. Isopropyl alcohol at 70 percent or higher can dissolve many adhesives without being overly harsh on painted finishes. Dampen a lint-free microfiber cloth with the alcohol, then rub the residue in small circles. The motion helps lift the glue while the solvent softens it. Avoid saturating the area or leaving the cloth perched on one spot for too long. The warmth of your hand and the slight friction often do the rest. After the adhesive lifts, wipe the area with a dry cloth to remove any residual film. Alcohol is particularly forgiving on newer finishes, but on older vehicles with delicate clear coats you should proceed with extra caution and shorter dwell times.
Heat can be a powerful ally when the adhesive stubbornly clings to the surface. A hair dryer set to medium heat can soften the glue, making it easier to lift with a plastic or rubber scraper. Position the dryer about 6 to 8 inches away and keep it moving in a slow, even sweep to avoid localized overheating. The aim is just to warm the glue enough so that it loses its grip, not to bake the paint. Once you detect a softening, switch to a plastic scraper or a soft cloth to lift the residue. Afterward, wipe with a cloth dampened with soapy water or alcohol to remove any remaining film. Direct flame or excessive heat should always be avoided, as it can irreparably damage the fairing’s finish.
A mild, non-toxic option worth trying for light residues is a warm water solution with a touch of dish soap or a splash of white vinegar. Soak a soft cloth in the solution, then apply it to the sticky patch and let it dwell for several minutes. The soap or vinegar loosens the adhesive so that gentle rubbing with a soft brush or cloth dislodges it. Rinse with clean water and dry thoroughly. This approach is gentler on sensitive finishes and can be especially suitable for vintage or matte paint where aggressive solvents might alter texture. It is not the fastest method, but it offers peace of mind when the residue is faint and the surface prize is protection over speed.
For very light residue, an eraser can be an unexpectedly effective tool. A clean, soft eraser used in small circular motions can remove the top layer of adhesive without introducing chemicals. This method carries the least risk of harming the paint or stripping gloss, but it is practical only for tiny patches. It works best when the residue is loose enough that the eraser lifts it without abrading the surface. If you choose this route, proceed slowly and check your progress frequently, stopping as soon as the adhesive releases.
Across all methods, several guardrails keep the process safe and repeatable. Never use steel wool, abrasive pads, or sharp metal tools. Even the finest metal implements can scratch the fairing or cut through thin layers of paint and clear coat. Harsh solvents such as acetone or gasoline are not universally dangerous, but they can attack certain finishes. If your finish is old or unfamiliar, skip aggressive solvents and lean toward milder options with a careful test patch first. After you have removed the residue, wash the area with mild soapy water to remove any leftover cleaner or film, then dry thoroughly to prevent water spots or streaks. A final light pass with a clean microfiber and a quick wax or polymer sealant can help restore gloss and create a barrier against future residues. This follow-up step is more than cosmetic; it helps protect the area as the bike faces road grime, sun, and weather.
As you gain confidence, you may find a preferred sequence that works best for your bike and your technique. A practical order is to start with a dedicated adhesive remover as the primary method, then switch to alcohol if needed, and reserve heat, vinegar, or the eraser for stubborn or tiny patches. The rationale is simple: begin with the least aggressive approach that has a high likelihood of success, and escalate cautiously only when the surface and the adhesive demand it. This staged approach minimizes the chances of damage and keeps the fairing looking as clean as the day it left the factory.
When the job is complete, take a moment to consider the surrounding area. Protect nearby decals, seams, or panels with painter’s tape if you plan a second pass in a broader area. After cleaning, rinse away any cleaner residue with clean water and dry completely. A quick inspection under direct light helps catch any leftover adhesive film or streaks you might miss in ambient light. Finally, consider a light maintenance spray or wax designed for automotive plastic and painted surfaces. A protective layer can help repel future sticker removals and reduce the grip of new residues. It also keeps the color vibrant and the finish uniform, so the bike continues to look the part when you roll into the next ride or show.
If you are tackling a broader restoration or customization project that involves replacing panels or refinishing parts, you may want to explore model-specific finish options for a given fairing family. For example, a dedicated product category that matches your bike’s fairing style can provide a consistent look if you are upgrading or restoring multiple panels. For readers seeking model-oriented options, you can explore the Honda fairings category to see how OEM and aftermarket pieces align with your ride. Honda fairings
In any case, the aim remains the same: perform a controlled removal that respects the delicate balance of the fairing surface and the adhesive chemistry. The best results come from patience, small, repeatable steps, and an awareness of how the finish responds to cleaners, heat, and mechanical help. While there is no one-size-fits-all method, the combination of a purpose-built adhesive remover, an alcohol alternative, cautious heating, and gentle mechanical aids provides a robust toolkit for riders who want to preserve finish quality. The chain of care you apply today pays off in the long run by keeping lines sharp, colors true, and the bike ready for the next adventure.
As you move forward, remember that every fairing is a little different. Plastics vary in density and gloss, and coatings shift with age and exposure. The safest path is to treat the job as a series of small tests and conservative passes, documenting what works on your particular model and under what lighting or weather. If a patch passes your tests, replicate the approach in the rest of the residue with the same measured tempo. If not, back off and reassess. In practice, that thoughtful, iterative mindset is what separates a clean finish from a compromised one. For the more curious rider, the process also offers a quiet education in how adhesives behave under heat, solvent, and friction, turning a simple cleanup into a deeper understanding of how a motorcycle’s surface interacts with the world.
External reference: For a broader, step-by-step perspective on sticker residue removal, you can consult a detailed guide available at Motorcycle.com.
Safety-First Sticker Residue Removal from Motorcycle Fairings
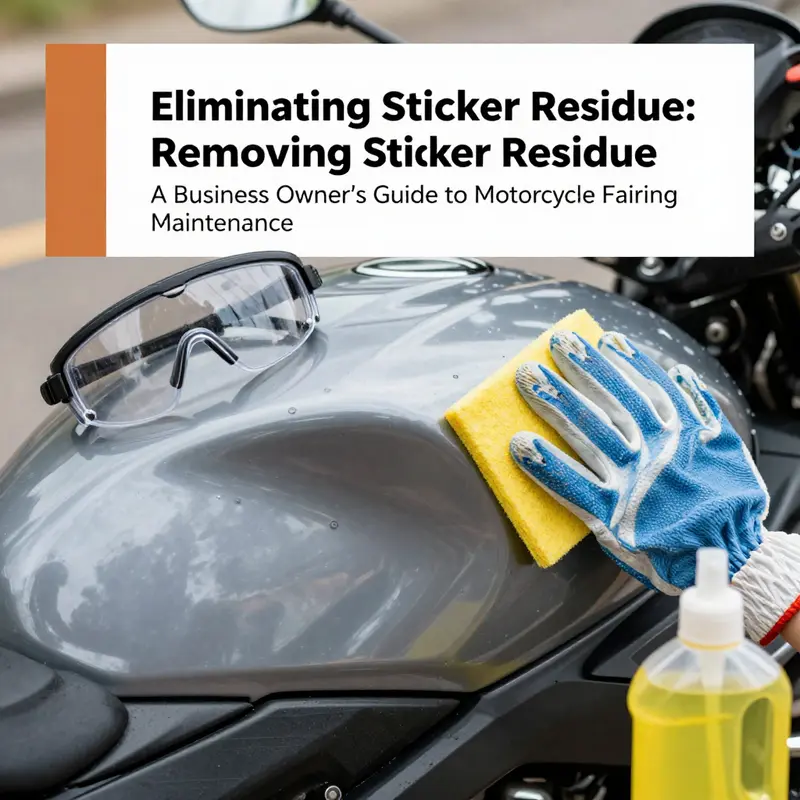
Adhesive residue on a motorcycle fairing is more than a nuisance; it can damage paint and plastics if removed carelessly. A safety-first plan keeps you in control and protects the finish you ride every day.
Before any tool touches the surface, test a small, inconspicuous patch with your chosen cleaner. If color or gloss changes, stop and reassess. The goal is to verify compatibility before you treat the whole area.
Warmth and a soft touch are your first allies. Use a warm, damp microfiber cloth to soften the adhesive. Move slowly and avoid concentrated heat on any one spot. When the bond softens, switch to a clean microfiber cloth and a mild cleaner to lift residue gradually rather than scraping.
If stubborn residue persists, consider an automotive or motorcycle adhesive remover. Apply only to a cloth or a small area, and follow the product’s dwell time. Do not spray directly on the fairing. Wipe with gentle, overlapping strokes and repeat in small increments.
Avoid harsh solvents such as pure acetone on painted or clear-coated surfaces unless the manufacturer explicitly approves it for your finish. When in doubt, err on milder options and more time. For light residue, a clean eraser can help without chemicals; work in small circles and monitor the effect.
Finish with a gentle wash and dry, then apply a light protective layer if desired. Wear gloves and ensure good ventilation. Protect vents and avoid trapping solvent in seams. If you are unsure, consult the fairing manufacturer’s care instructions or model-specific guidance.
This careful, stepwise approach reduces risk and helps you preserve both appearance and integrity of the fairing for the long ride ahead.
Gentle Science, Clean Finish: A Practical, Integrated Method for Removing Sticker Residue from Motorcycle Fairings
Sticker residue on motorcycle fairings is a common, stubborn nuisance that tests both patience and judgment. Fairings are often molded from delicate plastics or coated with layered paints and clear coats, and the last thing you want is a cleanup that leaves dull patches, micro-scratches, or clouding in the finish. The challenge is not just removing the gummy film, but doing so in a way that respects the integrity of the surface while delivering a clean, almost invisible result. The approach that follows blends tested chemistry with careful technique, and it unfolds as a single, cohesive flow rather than a parade of isolated tricks. The aim is a method you can repeat with confidence on a range of fairing plastics, paints, and finishes, with a strong preference for gentleness first, and more potent remedies only when required and approached with care. \n\nBegin with a quick assessment of the residue and the surface. Look at the contour of the fairing where the sticker sat and note any color change, discoloration, or dulling around the edges. A good starting point is always a spot test on a small, inconspicuous area. A tiny dab of any solvent—whether a dedicated automotive adhesive remover or a household solution—will reveal how the finish responds within seconds or a minute. If there is no adverse reaction, you can proceed with greater confidence on the main area. If you see any adverse change, switch to a milder approach or stop and reassess before proceeding. The idea is to establish a baseline for compatibility before you commit to full-scale treatment.\n\nThe most reliable path is to use a dedicated adhesive remover formulated for automotive surfaces. These products are designed to break down the gummy layer without harming the paint or clear coat when used as directed. The process is simple in concept: apply a small amount to the residue, let it interact for a brief, manufacturer-recommended window, then wipe away with a clean microfiber cloth. The residue often loosens in minutes, sometimes faster, and the remaining film can usually be rolled away with a light touch of pressure from a non-metal scraper. The key is patience and restraint. Apply, wait, and wipe; resist the urge to scrub aggressively, which risks lifting finish or creating micro-scratches. Always follow the label’s time guidance and test a discreet patch first to confirm compatibility with your particular fairing material and paint layer. The advantage of this route is clear: it targets the adhesive at a chemical level, reducing the need for aggressive mechanical action. As you work, keep the fairing surface cool and avoid letting the remover pool in seams or channels where it might linger and later attract dirt.\n\nIf you do not have a dedicated remover on hand, a high-purity isopropyl alcohol—usually 70 percent or higher—provides a solid, budget-friendly alternative. Alcohol dissolves many glues and resins effectively and evaporates quickly, leaving little residue itself. The technique is straightforward: dampen a lint-free microfiber or cotton pad and apply in gentle, circular motions. The residue should begin to soften and lift as you work. It is important not to saturate the surface or let the liquid pool in joints and crevices, where it may find its way into hidden areas. Once the adhesive loosens, wipe with a dry, clean cloth to lift the last traces. While alcohol is generally safe for most painted finishes, it can be rough on very old, thin, or highly sensitive coatings if used repeatedly or left to sit. If you notice any dulling, haze, or color shift, switch to a milder method and re-evaluate. The beauty of alcohol lies in its accessibility and control; the risk lies in overuse.\n\nFor more tenacious residues or when you’re working with larger patches, a heat-assisted approach is worth considering. A hair dryer on a low to mid setting held about 6 to 8 inches away from the surface can soften the adhesive so that it releases more readily under a plastic or rubber-edged scraper. The trick is to move the heat source slowly and evenly, never lingering in one spot long enough to overheat the polymer or the paint. After the adhesive becomes pliable, use a plastic putty knife or an old gift card to lift the edge at a shallow angle, then gently scrape away the softened film. It’s essential to keep the blade flat and to avoid metal tools that could scratch a glossy finish. Finish with a wipe using a cloth dampened with mild soapy water or a touch of isopropyl alcohol to remove any residual film and heat-driven residues. This method demonstrates how heat can shift the mechanism from chemical breakdown to safe mechanical removal, but only when used with care and constant surface awareness.\n\nThere are gentler, non-toxic options that can help when the residue is light or the finish is particularly sensitive. A solution of warm water with a few drops of dish soap or white vinegar can soften and loosen the film over a short period. Soak a soft cloth in the solution, apply it to the affected area, and allow it to dwell for 5 to 10 minutes. Then, work with a soft brush or cloth to lift the residue. Rinse thoroughly and dry completely to prevent water spots. This approach is slow but respectful, especially for riders who prioritize eco-friendliness or who fear potential reactions with clear coats. It’s often best reserved for light, recent residues where the adhesive hasn’t adhered deeply to the surface. The vinegar and soap method minimizes chemical exposure and reduces the risk of discoloration or hazing, but it may require more effort and time to achieve a pristine finish.\n\nFor stubborn or stubbornly persistent patches, an erasive technique can provide a final, low-risk lift. A clean, soft eraser can be employed in small circular motions to remove the outer adhesive layer. This mechanical approach, when used with light pressure, won’t scratch the finish and can quickly deal with isolated pockets of adhesive. It’s especially useful when combined with a preceding solvent step that has already softened the glue. The eraser method is not a cure-all; it’s a complementary tactic that can finish off the job in areas where chemical action has already done the heavy lifting. It also serves as a reminder that not all residues demand strong solvents; the simplest tools, employed with care, can sometimes do the work cleanly.\n\nAcross all methods, a set of safety practices anchors the process. Never use steel wool, metallic pads, or sharp tools on a painted fairing; they’ll drag and scratch. Avoid pure acetone or other aggressive solvents unless you have verified compatibility with your specific finish, and never allow solvents to linger near edges or molding seams where they can penetrate further. After any method, wash the area with mild soap and warm water, rinse, and dry with a lint-free cloth. This not only removes chemical residues but also helps bring back the surface’s clarity and gloss. If you’ve used a solvent, a light pass with a fine wax or sealant after the surface is fully dry can help restore the protective layer and reduce the chance of future residue grabbing dust or oils. The goal is to leave the finish looking uniform and polished, with no sticky trace or dulling around the edges. A final, calm inspection under good light will confirm whether the job has been completed to the highest standard.\n\nThe chapter’s practical arc also invites a closer look at the underlying material realities of fairings. Plastics such as ABS or certain polyesters can respond differently to solvents and heat than painted acrylics or urethanes. The safest strategy is to begin with the mildest approach and escalate only when necessary, all the while staying mindful of the surface’s age, its coating quality, and the fit and finish that give your bike its character. With practice, you’ll sense when a patch of residue can be coaxed away with the edge of a plastic card, and when it needs a chemical handshake. In the end, the residue comes off in layers, and the finish remains intact, resulting in a seamless look that mirrors the rest of the fairing’s gloss. \n\nTo keep continuity with ongoing maintenance and to support future refinishing or customization, consider how the chosen method might influence subsequent steps. If you used a solvent, a thorough rinse and dry, followed by a light polish or protective layer, helps reestablish the surface’s barrier against dirt and residue. If you leaned on heat, a gentle cool-down period and careful inspection for any micro-distortions is prudent before applying a finish. And whether you used water-based soaks or alcohol-based wipes, the habit of a final wipe-down with a clean microfiber ensures you won’t chase streaks or smudges in the light of the workshop or garage. These steps aren’t optional frills; they’re the practical care that preserves the visual integrity of the fairing while keeping its feel and color accurate across years of riding and exposure to weather.\n\nFor riders who want to connect their cleanup process with broader upkeep, a model-specific care view can be helpful. If you’re working on a Honda fairing, for example, exploring the dedicated fairings category can guide you toward compatible coatings, edge protectors, or finishing products that complement the base paint. The category page offers a centralized resource for related maintenance needs and can help ensure that the repair or restoration workflow remains cohesive across the bike’s overall aesthetics. Honda fairings provides a convenient reference point within the broader maintenance library.\n\nAs you move toward the finish line, keep in mind that the goal is not simply to remove residue but to restore uniformity and protect the surface for the road ahead. The best practices emphasize balance: a method strong enough to lift stubborn glue, yet gentle enough to preserve clarity, color, and coating integrity. You’ll develop a rhythm—test, apply, lift, wipe, rinse, and protect—that can become almost instinctive with time. And you’ll find that the residue, once stubborn, yields to a careful plan that respects the layered reality of modern fairings: plastics that are resilient yet delicate, paints that gleam when treated gently, and clear coats that kiss the light rather than glare back at it with micro-scratches. The art is in recognizing when to switch tactics, how to combine chemical and mechanical tools, and how to finish with a surface that looks as though the sticker had never existed at all.\n\nFor readers seeking deeper guidance beyond the immediate method, a broader external resource on adhesive removal and paint-safe cleaning offers additional perspectives and techniques. It complements the practical steps here by exploring safety considerations, material science of polymers, and the principles of solvent interactions with coatings. External resource: https://www.wikihow.com/Remove-Sticker-Residue
Beyond the Peel: Restoring and Protecting Your Motorcycle Fairing After Sticker Residue Removal

The moment the last edge of adhesive slides away, the job shifts from extraction to restoration. Removal can leave a surface that looks clean but feels different—faint haze, micro-scratches, or a dull patch where cleaner or solvent briefly softened or rewetted the finish. Post-removal care treats these signals as a map of the surface’s needs: how to restore depth, how to shield against sun and rain, and how to prepare for any future decals you might choose to apply. A fairing is not just a cosmetic shell; it’s a functional shield against wind and debris, and its finish influences how the bike looks in sunlight, how easy it is to wash, and how long it will maintain its color and clarity. The approach should be patient, practical, and attuned to the material makeup of your fairing—whether it’s high-gloss painted plastic, matte-coated panels, or a composite with a clear protective layer. Begin with a careful inspection in good light. Look for any streaking from cleaners, micro-scratches from there removal process, or areas where the gloss has faded slightly. If the surface appears even and smooth, you can proceed with a disciplined cleaning and protection routine. If there are blemishes that catch the light differently, address them gradually with targeted care, testing any product on a discreet corner first before wider application. A considered start sets the tone for days and miles of protective maintenance ahead.
Cleaning after residue removal is not merely rinsing away dirt; it is a controlled reset of the surface. Begin with a mild wash using warm water and a gentle soap designed for automotive finishes. Apply the solution with a soft microfiber cloth or foam applicator, and work in small sections that follow the fairing’s contours. Use light pressure and let the cloth lift the grime rather than grind it into the finish. Rinse thoroughly to remove all soap residues, which can dull the gloss or leave a film that attracts new dirt. Dry the surface with a clean, lint-free microfiber towel, patting rather than dragging to prevent micro-scratches, especially near edges or around decals where the substrate might be more delicate. A thorough dry is not merely cosmetic; it helps avoid water spots and ensures the subsequent protective layer adheres evenly.
Once dry, the surface is ready for protection. The goal is a durable barrier that resists UV rays, rain, dust, and the occasional dribble of road grime. Choose a protective product suited to automotive plastics or painted surfaces, and apply a thin, even coat. In warm or humid conditions, apply with careful, overlapping strokes to avoid streaks or uneven patches. If you are dealing with plastic panels that have dulled or chalked from sun exposure, a plastic-safe glaze can help restore a clearer, more uniform look. The application process matters almost as much as the product selection: a light touch, deliberate passes, and a final buff with a clean microfiber will reveal a restored depth and a shield that makes future washings easier. After curing, a gentle buff removes any remaining haze, leaving a smooth, even surface that feels as slick as new paint to the touch.
Choosing the right protective layer means balancing appearance with durability. A gloss-rich finish will respond best to a wax or sealant that forms a uniform, hydrophobic film, repelling water and dirt so future cleanings are quicker. For matte or satin finishes, select products that preserve the texture without returning unwanted shine. For carbon fiber or other composite panels with a clear coat, opt for a sealant compatible with clear layers to maintain that translucent depth without clouding the fibers beneath. Application should be performed in thin layers with ample cure time between passes, and always follow the product’s instructions for temperature and humidity. Don’t rush the cure—and resist the temptation to layer too many products at once, which can lead to a patchy finish or layering that traps dust.
In situations where the fairing has sustained more sun exposure or minor oxidation, a light plastic or automotive-safe polish can help bring back clarity and vitality. Use a soft pad or cloth and work in small areas with gentle pressure, testing first on a hidden corner. If deeper micro-scratches remain, a fine polish can help smooth the surface without removing excessive material. After polishing, reapply a protective film to seal in the improved gloss. Polishing without clear protection leaves the surface vulnerable to the next round of washings and road grime; protection is the follow-through that sustains the investment in restoration.
Maintenance is the backbone of long-term satisfaction with the finish. The care you apply today should set up a rhythm that reduces the need for aggressive treatment later. Wash regularly with mild, pH-balanced soap, preferably when the bike is cool and in shade to avoid water spotting. Use soft cloths and avoid abrasive pads or stiff brushes, which can reintroduce micro-scratches. When drying, fold the cloth and avoid dragging it across edges that are prone to wear. Small areas that draw more attention—such as near decals or along seam lines—deserve a quick, thorough check after each wash. Look for any signs of residue buildup, mold release from cleaners, or clouding on any plastic panels. If you see anything unusual, address it promptly with a light wipe and a fresh application of protective layer. The aim is a consistent surface that is easy to clean and hard to stain.
Storage and environmental conditions influence how often you need to re-treat the finish. If you park outside, consider a breathable cover that protects the fairing from dust, bird droppings, and UV radiation while allowing moisture to escape. A cover that traps moisture can promote mildew on metal fasteners or trim, so choose a design that breathes and fits snugly. In very hot climates, park in shaded areas or during the hottest part of the day to minimize heat-induced aging of coatings. Even with a robust protective layer, sun and heat remain adversaries; building regular maintenance into your riding routine helps you catch early signs of wear before they become costly repairs.
As you refine your post-removal regimen, you begin to see how the surface responds to each step. A surface that accepts a thin layer of protection, dries without streaks, and responds to polishing with even color and depth is a surface you can trust under heavy use. The goal is not perfection but consistency—the ability to wash quickly, protect reliably, and maintain the fairing’s color and clarity for miles to come. It also makes future decals simpler to apply, since a well-prepared surface yields cleaner edges and a smoother substrate for any new sticker or graphic. You might even notice that a properly cared-for finish is more forgiving when minor bumps or scratches occur, because the protective layer can be spot-repaired rather than requiring a full refinishing.
To connect this care routine to practical choices for your bike, consider the specific fairing family your bike uses. If your machine relies on a Honda fairings family, you can explore the available options in the Honda fairings category to ensure consistency in color, texture, and protective compatibility across the entire bodywork. Explore the Honda fairings category. Honda fairings category.
For riders seeking broader, evidence-based guidance beyond the immediate care routine, an in-depth resource that synthesizes removal and post-removal care offers additional context and techniques. For a deeper dive into sticker residue removal techniques and post-removal care, you can consult the authoritative guide here: https://www.motorcyclewindshieldtrim.com/blog/how-to-remove-stickers-residue-on-motorcycle
Final thoughts
Removing sticker residue from motorcycle fairings is not merely a matter of aesthetics; it is essential for maintaining the value and longevity of your vehicles. By employing safe and effective techniques, observing necessary safety precautions, utilizing the right products, and following post-removal care steps, you can ensure that your motorcycles continue to exude professionalism and care. As a business owner, these practices not only enhance the visual appeal of your fleet but also promote a sense of pride and care in your operations.