
Scratches on a motorcycle fairing can be a significant concern for business owners in the motorcycle industry, impacting both the appearance and value of the bike. Understanding how to effectively remove these scratches is essential for maintaining a professional image and ensuring customer satisfaction. This article will explore proven techniques for addressing minor surface scratches, moderate paint damage, and recognizing when to seek professional help. Each method will equip business owners with the knowledge they need to keep their motorcycles looking pristine.
Fine Lines, Smooth Shine: Mastering Minor Scratches on Motorcycle Fairings
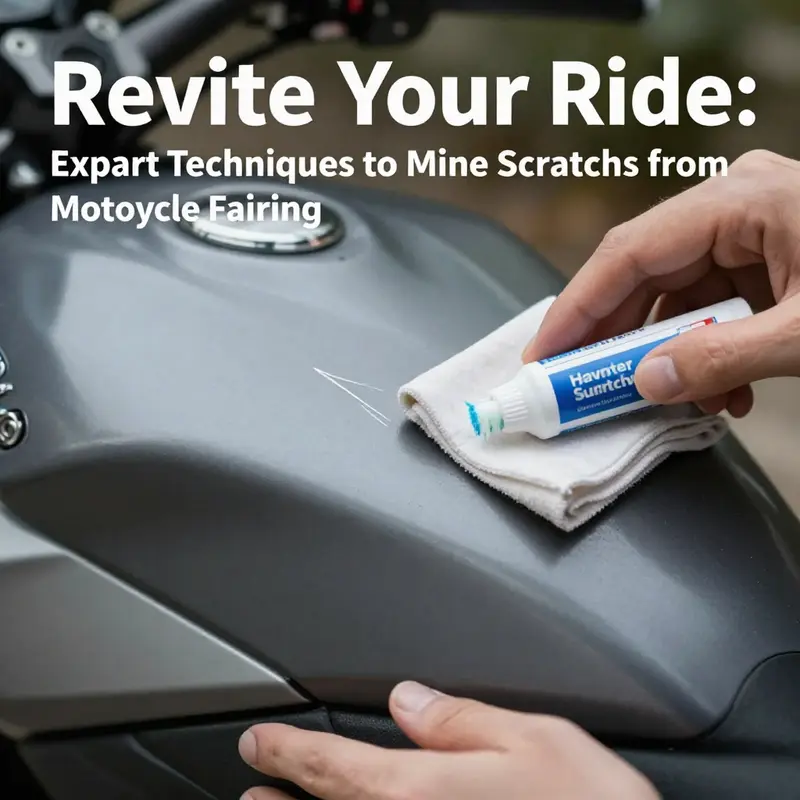
Scratches on a motorcycle fairing are a common ache that riders learn to live with after a few seasons of bold rides, tight turns, and occasional encounters with road debris. When a scratch is small and shallow, it often leaves behind a ghost of its former self rather than a deep wound in the fairing. The challenge—and the opportunity—lies in knowing when a simple polish suffices and when a careful, layered repair becomes necessary. This chapter follows a single thread through the landscape of minor surface scratches, treating the fairing as a sensitive but resilient panel that can be coaxed back toward its original luster with method, patience, and the right touch. The aim is not only to restore appearance but to preserve the material integrity of the plastic or fiberglass that forms the glossy shell around the bike’s frame. In this context, minor scratches are not merely cosmetic nuisances; they are signals about the surface condition, the need for proper preparation, and a disciplined approach to maintenance that can pay dividends in longevity and resale value.
To begin, a rider must distinguish between the degrees of damage. A surface scratch that only touches the clear coating is fundamentally different from one that has broken through the finish and exposed base paint, and both are different from scratches that pierce the plastic or primer beneath. A thoughtful assessment reduces the risk of over-smoothing, over-sanding, or applying a method that could do more harm than good. It starts with a simple examination—gently running the fingertip over the mark to feel its depth, inspecting with good light to note whether the scratch catches on the surface or disappears under the sheen of the clear coat, and determining whether the surrounding area remains uniform or shows a color change. The presence of a color reveal often means the base paint has been breached, signaling that more involved work lies ahead and that the repair strategy must adapt accordingly. As with any delicate repair, the aim is to restore the gloss and contour with as little intrusion as possible, keeping the finish consistent with the rest of the panel.
For the conscientious rider, the repair journey begins with preparation. A clean, dust-free environment is not a luxury but a prerequisite. Debris in the work area can embed itself into fresh polish, filler, or paint, and a touch of dust can ruin otherwise smooth layers. It is essential to choose a calm, well-ventilated space, and to protect surrounding components from stray dust and accidental compound splatter. The surface should be washed with mild soap and water to remove surface oils, followed by a wipe with a dedicated plastic cleaner or isopropyl alcohol to dissolve any remaining grease. The goal is a surface free of wax, oils, and silicone that could interfere with adhesion or polishing later. Before any material is applied, the area should be dry and free of lint—hence the value of a soft, lint-free cloth and a methodical, patient approach. The careful rider might even perform a patch test on an inconspicuous area to verify that the chosen product behaves well with the specific plastic or fiberglass composition of the fairing.
The most common pathway for truly minor surface scratches—those that have not penetrated into the base color—is a polishing-centric approach that uses mild abrasives to blend the scratch with the surrounding clear coat. The logic is simple: tiny abrading particles can round the sharp edges of the scratch, restore the smoothness of the surface, and draw the light across the repaired area so that the scar is less visible. A note of caution accompanies this method. The term “polish” in this context does not mean a heavy buff with a stiff pad and brute pressure. Instead, it calls for a deliberate, even motion with a low-resistance tool, often a dual-action polisher for even results, and a fine rubbing compound designed for automotive plastics. The correct technique is to apply the compound with light pressure and to keep the polisher moving in a consistent rhythm. Prolonged pressure in one spot can create new swirl marks, heat buildup, or a recessed patch that catches the eye more than the scratch itself. The objective is to erase the appearance of the blemish while preserving the surrounding clarity.
If the scratch lies just a fraction deeper than the clear coat but does not reveal bare primer or base color, the cure demands a slightly more involved sequence—clean, lightly abrade the edges, and then reintroduce the finish with a well-matched tint. Start with a thorough cleaning to remove any dust or oils that could interfere with adhesion. A fine 1500-grit sandpaper, used gently and in a single direction, can smooth the edges around the scratch without cutting into surrounding paint. It is essential to keep the sandpaper wet during this stage to minimize heat and reduce the risk of melting or distorting the surface. Following the initial smoothing, move to a 2000-grit paper for a finer texture. In some cases, a small amount of plastic-safe filler can be applied to level the surface if the scratch edges are uneven or if a slight contour irregularity remains after sanding. The filler, once cured, can be sanded again to a uniform plane, after which a color-matched paint or clear coat can be applied in thin, even coats. The color-matching step is a delicate one, requiring patience and repeated light coats rather than a single heavy application. Allow each coat to dry thoroughly according to the product’s guidelines before applying the next, and finally finish with a polishing stage to reestablish the gloss. The final look should be a seamless blend with the surrounding panel, with no obvious line where the repair ends and the original surface resumes.
In some cases, the scratch is both deeper and larger, with a risk that filler or paint could fail to produce the desired uniformity or longevity. Here, the repair may transition from cosmetic correction to a more formal panel restoration. For deep or extensive scratches that reveal underlying plastic or primer, a professional repair is strongly advised. The skilled technician can perform priming, filling, sanding, and spraying with a color-matched tone that aligns with the original factory finish. This path, while more involved and costly, offers the best chance of a flawless result that stands up to the elements, UV exposure, and the daily wear of road use. It also ensures that the repaired section remains indistinguishable from the rest of the fairing when viewed from normal riding distances. The decision to escalate to professional help rests on several factors: the depth and breadth of the damage, the color fidelity required, the time available, and the rider’s long-term goals for the appearance of the bike.
Throughout this process, a steady respect for the nature of plastic and fiberglass is essential. These materials respond differently to abrasives, solvents, and heat compared to metal surfaces. Plastic can craze, warp, or soften if the polish is too aggressive or if heat rises from prolonged rubbing. Fiberglass behaves more like a rigid composite, but it still benefits from careful, gradual work and a protective finish. The surface chemistry matters. Some plastics are more tolerant of mild solvents, while others require stricter avoidance of certain cleaners. A practical rule is to work with the mildest effective product and to monitor the area closely for any adverse reaction such as dulling, whitening, or inkling of color shift. This is a field where patience is rewarded: small, incremental improvements accumulate into a gloss that looks almost new and a uniform tone that makes the scratch disappear from the rider’s eye.
Maintenance hygiene remains an essential companion to the repair. After a successful minor restoration, the area should be kept clean and protected from environmental harshness. If the panel is exposed to harsher weather, a dedicated wax or polish designed for automotive plastics can help maintain the gloss and provide a sacrificial layer against future scratches. It is wise to recheck the repaired zone after a few weeks of riding in varied conditions, especially after washing or exposure to strong detergents. The curing time for paints and clear coats is a critical factor as well. Avoid exposing the repaired area to water, soap, or harsh chemicals for at least 24 to 48 hours to give the finish a chance to cure. Protecting the cure period with careful handling can mean the difference between a repair that remains intact and a new scratch that undermines the result.
The narrative of minor scratches is also a dialogue with the rider’s own chassis and fashion sense. A well-executed repair preserves the bike’s aesthetic continuity and contributes to a sense of pride in maintenance. The market may not require a showroom shine, but the appearance should convey care and attention. Sometimes the right choice is not to chase perfect brilliance but to minimize the perception of damage through judicious polishing, careful color blending, and a respectful understanding of the fairing’s material life. This approach speaks to a philosophy of practical, responsible ownership—a commitment to keeping the bike in balance with the rider’s expectations and the road’s realities.
In the broader scope of motorcycle care, minor scratches on fairings offer a test case for a rider’s technique, materials, and temperament. They reward a patient, methodical approach more than brute force. A well-executed minor repair can blend so seamlessly with the surrounding color and sheen that the fault becomes a memory, a blemish that no longer calls attention. And while the temptation to take shortcuts is always present, the most durable results tend to come from steps that respect the surface’s physics: the direction of polishing, the grain of the sanding, the sequence of application for fillers and paints, and the timing of each stage. The chapter’s lesson is simple yet powerful: treat minor surface scratches as a diagnostic of the surface’s health. The better you understand that health, the better your repair plan—and the more likely you are to preserve the fairing’s life and luster for countless miles to come.
For readers seeking deeper, model-specific options, the fairing landscape is broad and nuanced. The internal market offers a range of fairings tailored to different makes and models, with many panels sharing similar polymers and coatings. If you are interested in exploring more about bodywork options tied to your bike’s make, you can explore the Honda fairings category to find pieces that might better align with your maintenance goals or aesthetics. Honda fairings can be a starting point for understanding how aftermarket parts might influence future repairs, matching color, and the overall finish of the fairing. While this chapter focuses on repairing the existing surface, acknowledging how replacement panels or skin options interact with the repaired area offers a broader perspective on long-term upkeep. It pays to know what materials are used in your bike’s fairing and how they react to polish, fillers, and paints, particularly when you plan to embark on more extensive maintenance down the road.
In closing, minor scratches do not need to define a rider’s relationship with their machine. They are a call to apply careful technique, the right materials in proper sequence, and the discipline to let each layer cure before moving to the next stage. By embracing a methodical approach—from honest assessment and meticulous cleaning to measured sanding, precise color touch-up, and a concluding polish—you can restore a fairing’s appearance and extend its life without sacrificing performance. The process rewards patience more than speed, and it rewards fidelity to the panel’s original geometry and finish. For those who wish to widen their reading on the topic, a broader reference list is available, including a well-regarded external resource that details practical, field-tested techniques for repairing surface scratches on motorcycle fairings. This external guide offers additional perspectives on when to push forward with a light touch and when to call in a professional to achieve a pristine, durable result. https://www.motorcyclecruiser.com/repairing-surface-scratches-on-motorcycle-fairings/
Between Clear Coat and Color: Restoring Moderate Scratches on Motorcycle Fairings

Moderate scratches on a motorcycle fairing sit at a distinct threshold between surface flaws and deeper paint damage. They can reveal the base color at the scratch edges or show thinning clear coat, and they require a careful, layered approach that preserves the protective finish while restoring a uniform gloss.
Assessment and preparation guide the process. Look for depth, note whether the clear coat is intact, and decide how much of the color layer is involved. A scratch that glitters in the light or feels gouged indicates more care is needed. Start with a clean slate: wash with a neutral soap, warm water, and a soft microfiber cloth. Avoid solvent-heavy cleaners that can soften the clear coat. Rinse and dry completely to reveal the true depth of the scratch.
Cleaning and gentle abrasion form the foundation. Use a microfiber pad and a professional-grade scratch-removal compound on the affected area. Work in small sections with light pressure and slow, circular motions. Keep the surface slightly damp to reduce heat and swirl risk, and wipe away residue frequently to monitor progress. The goal is to level micro-unevenness and soften the edges so the surrounding clear coat blends rather than stands out.
If the scratch has reached the base paint, color correction becomes necessary. Begin with a careful isopropyl wipe to remove oils that could interfere with adhesion. For shallow breaches that have not exposed color, you may finish with a touch of a mild abrasive (such as toothpaste on a soft cloth) tested in a small area first. When the base color is exposed, apply a color-matched touch-up in ultra-thin coats, allowing each layer to dry before the next. A fine brush or airbrush can help with precision and minimize texture differences.
Seal and blend. After the color has dried, apply a clear coat in a few light coats, following the product directions for drying times. The aim is to create a durable finished area that resists future washing and abrasion while maintaining contour and gloss. Between coats, do not rush drying; temperature, humidity, and airflow influence cure times.
Finish with feathering and polishing. Lightly sand the repaired patch with very fine grit (around 2000 grit) in short, even strokes to feather the edges into the surrounding finish. Re-polish with a high-quality compound and a soft pad to restore showroom gloss, taking care not to remove the new clear layer. The result should be a smooth, uniform panel where the repaired zone is barely distinguishable from the original.
Care and realism. Avoid harsh solvents, aggressive abrasives, and aggressive scrubbing that can degrade the paint or clear coat. After repairing, protect the area with a wax or sealant compatible with both layers, and consider a clear protective film for high-wear zones. Regular washing with a mild cleaner, gentle drying, and periodic polishing will help maintain the finish and reduce future visible wear. If the damage feels beyond a conservative DIY repair, consult a professional detailer or body shop with experience in motorcycle finishes for color matching and panel-level repairs.
From Surface to Seamless: Navigating Scratch Repair on Motorcycle Fairings

Scratches on a motorcycle fairing reveal more than cosmetic blemishes; they hint at the depth of the damage, the plastic or composite material, and the durability of the finish that protects the ride. This chapter guides you through a depth-aware approach: assess the scratch, decide between DIY methods and professional repair, and restore a surface that both looks good and holds up at speed. You will learn how to identify materials (ABS, polycarbonate, or composites), perform careful cleaning, and apply a graded repair plan. For shallow scratches, polishing or a purpose-made scratch remover can restore gloss with minimal risk. For scratches that breach the clear coat but leave the base color intact, feathered sanding, color-matching touch-ups, and a final polish are typically prudent. When the damage exposes primer or structural plastic, or threatens aerodynamics or safety-critical areas such as windscreen edges or vents, professional repair becomes advisable. The main objective is a durable, aesthetically pleasing finish that preserves the fairing’s performance and resale value while avoiding new damage during the repair process. Practical guidelines emphasize a clean workspace, gradual testing on inconspicuous spots, and patience in letting coatings cure. Whether you ride daily or for show, the right approach respects the material, the finish, and the rider’s expectations for longevity and appearance.
Final thoughts
By understanding how to effectively remove scratches from a motorcycle fairing, business owners can enhance their reputation and serve their customers better. Whether addressing minor surface scratches or severe paint damage, employing the right techniques is crucial. Regular maintenance and attention to detail not only improve the aesthetics of the motorcycle but also contribute to its overall value and longevity. Remember, when in doubt or faced with extensive damage, seeking professional assistance ensures the best results and restores the motorcycle’s integrity.