For motorcycle repair businesses, ensuring the appearance and integrity of fairings is vital. Bondo, a high-performance body filler, plays a crucial role in restoring damaged motorcycle fairings. Understanding how to effectively utilize Bondo can streamline repairs, enhance customer satisfaction, and improve profitability. This guide will walk business owners through the essential steps for using Bondo in repairs, discuss its limitations, and provide insight into sourcing effective Bondo repair kits. Each chapter supports your understanding of Bondo’s role in maintaining the quality of motorcycle repair services.
Mending the Wing: A Practical, Artful Guide to Plastic Filler Repairs on Motorcycle Fairings
Across the spectrum of riding, the motorcycle fairing stands as a rider’s shield and a craftsman’s canvas. It protects the engine, smooths the ride, and gives a machine its distinctive silhouette. Those who spend time on the road learn that even the best plastics suffer inevitable scrapes, gouges, or small cracks from rocks, debris, or a careless parking lot encounter. When damage is minor and non-structural, a two-part epoxy-based plastic body filler offers a fast, economical path to restore the fairing’s contour and gloss without surrendering the bike to a time-consuming replacement. The technique demands a careful balance of surface prep, material handling, and patience. The goal is not merely to fill a defect but to re-create a seamless surface that accepts paint and clear coat with long-lasting adhesion, so the repaired area remains virtually indistinguishable from the surrounding skin after the finish has cured and cured again under the sun and weather of daily riding. This chapter follows a single, coherent thread: how to approach a typical, minor fairing imperfection with responsible materials and disciplined method, while recognizing the limits of repair and the realities of riding performance.
Repair work on a fairing begins with a mindset. The rider who respects the plastic’s nature, the bond between filler and substrate, and the finish’s final appearance is already ahead. The first step is to assess the damage with honesty: is this a shallow scratch, a small dent, or a deeper gouge that has created a hollow or a crack radiating outward? Epoxy-based plastic fillers excel at filling shallow to moderate surface imperfections and can be feathered to meet the surrounding plane so that the eye recognizes continuous form rather than a hard edge. Importantly, this filler is not a substitute for an impacted or deformed shell. If a crack runs through into a structural region or if the fairing is cracked or warped in a way that compromises its rigidity, a repair may offer cosmetic relief but will not restore structural integrity at speed. In those cases, replacement is the wiser, safer choice.
With the question of structure settled, attention turns to the preparation of the surface. A critical, often overlooked detail is the kind of plastic used in the fairing. ABS and polycarbonate are common, and some shells incorporate polypropylene blends, especially in older or more economical designs. Each plastic type has its own bonding characteristics. ABS tends to take fillers and primers well after a proper scoring and adhesion promoter treatment. Polypropylene, however, is notoriously stubborn; it resists adhesion without surface roughening and a promoter designed for plastics. The repair plan must accommodate this reality. Begin by removing any hardware that might interfere with the repair, including the relevant section of fairing if it is easily detachable from the bike’s frame. The cleaner you are, the more predictable the bonding will be. Use a mild degreaser or isopropyl alcohol to wipe the area, removing waxes, oils, and fingerprints. Do not rush this step; residues act like a slip layer, preventing the filler from grabbing the surface. After cleaning, rinse any residue and dry completely before sanding.
Surface preparation continues with profiling the damaged zone. Light sanding with 180 to 320 grit paper is a common approach to create a bite for the filler and to dull the glaze of the surrounding surface. The aim is not to remove material but to give the surface a slightly rough texture that helps the filler adhere. If you know the fairing is ABS or another common plastic, you may opt for a plastic adhesion promoter as a primer layer; this helps to establish a chemical bond between the plastic surface and the filler. For polypropylene or particularly smooth plastics, use a promoter followed by a dedicated plastic primer designed to tolerate flexible substrates. The moment you switch to primer, you should be mindful of the delicate balance between flexibility and rigidity; overly aggressive primers can craze or lift on flexible plastics. In all cases, apply the promoter and primer in thin, even coats and allow full dry times as directed by the product instructions before proceeding with the filler.
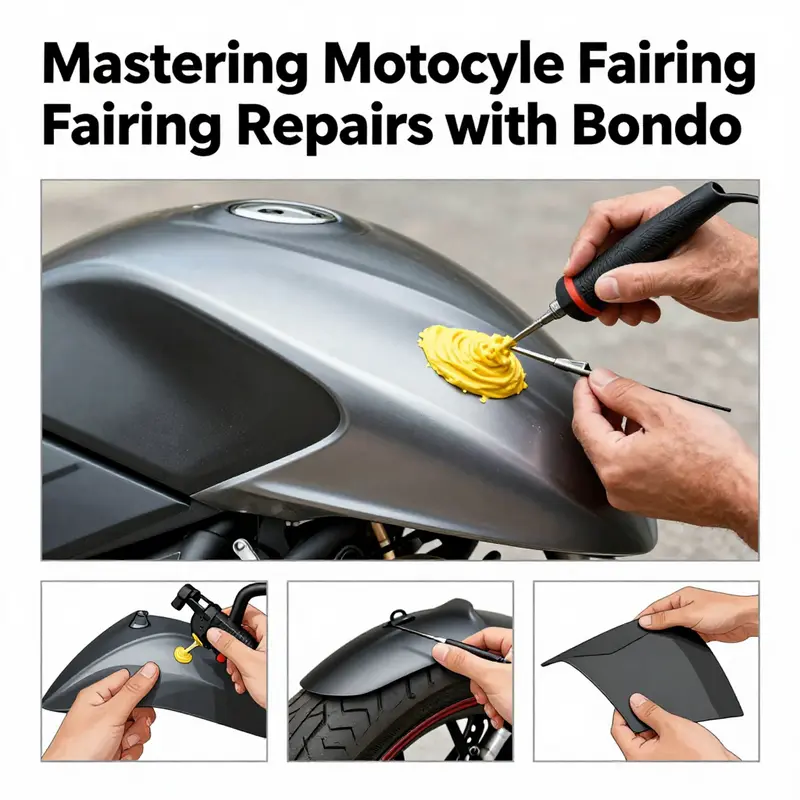
The filler itself is a two-part epoxy-based plastic body filler, designed to cure into a firm yet featherable mass. Read the product instructions carefully and mix the two components in the recommended ratio, usually around two parts filler to one part hardener by volume. The exact ratio can affect the cure time and the final hardness, so do not improvise. Mix until the color appears uniform, with no streaks or unmixed pockets. A clean, dry mixing surface and a clean spreader are essential. Once mixed, work quickly enough to prevent premature hardening, but calmly enough to sculpt with precision. A standard approach is to apply the filler in thin coats rather than a single thick layer. The first coat should be a shallow skim that fills the deepest gouge and begins to level the surface toward the surrounding plane. Use a flexible plastic spreader to push the material into corners and along the edge where the damaged zone meets the intact surface. The goal is to create a uniform plane that is slightly proud of the surrounding area, so the subsequent sanding can feather the edge into invisibility. If you encounter a deep groove or a through-crack, consider applying a light layer, allowing it to set, and then applying a second, slightly thicker pass after the first layer has begun to cure. Layering ensures you do not create a hard, flat false step that is difficult to sand away and that might reflect light as a telltale sign of repair.
Curing is a period of quiet waiting. It is tempting to rush, but this is the moment when the repair begins to show its true character. Follow the manufacturer’s cure times, and do not be tempted to sand while the filler is still soft. A good test is to press a fingernail into the surface gently; if resistance is perceptible but not hard, the layer is on its way. A fully cured skin may feel slightly springy or soft before it loses its tack; wait longer if the environment is cool or humid. Once the filler has fully cured, the real art begins: shaping and feathering. Begin with a coarse block or sandpaper in the 120 to 180 range, using long, even strokes to flatten the high spots and to level the edges where the new material meets the old. The intention is to reduce the visible transition, not to erase the entire contour. Maintain the fairing’s original curvature and lines as much as possible. A careful eye and a light hand will determine how many passes are needed. It is easier to refine later on than to remove excess filler now and risk creating a new valley later.
Feathering is where the repair starts looking like a natural part of the fairing. As you approach the outer edges of the repaired zone, switch to finer grits, moving progressively to 240, then 320, and finally 400 grit. The goal is to achieve a smooth, continuous surface that blends without ridges or craters. A sanding block helps keep the plane of the surface true and prevents the formation of a concave or convex blemish. Take occasional breaks to wipe the area clean and inspect under good light. At this stage, you may notice a faint halo around the repair where the color and texture differ from the surrounding plastic. A second, finer filler layer can be applied to address minor low spots you find during sanding. In many cases, a small amount of micro-fillers—produced for fine feathering—can be brushed into the edge to smooth the transition without creating new bridges of excess material that later require more sanding.
After you are satisfied with the level of feathering, the next phase is priming. Primers for plastic surfaces serve several roles: they seal the filler, provide a uniform base for paint, and, in the case of adhesion promoters, help the paint bond to the plastic substrate. Use a thin, even coat of a plastic-appropriate primer. Let the primer dry completely, and examine the surface for pinholes or defects. If you see pinholes, you can fill them with a small amount of filler or a micro-sphere filler before reapplying a light primer. It is essential to ensure the texture is uniform under the primer so that the finish coat will lay evenly. Do not hurry this step with a heavy application; the primer should be a light mist that covers without pooling. A well-executed primer tray the groundwork for color matching and a flawless final appearance.
Color matching is an art as much as a science. If you have a factory color solution that matches the bike’s original paint, you may choose to apply a base coat in that shade. The color layer should be transparent enough to reveal the underlying primer’s uniformity while still providing the tone needed to blend with the rest of the fairing. The base may require two light coats with gentle drying intervals between applications. Do not apply wet coats that can cause solvent attack or lifting of the primer. After the color coat, a clear coat is typically recommended to protect the paint and provide the gloss that makes the repair vanish from view. The clear coat should be applied in light, even layers, allowing adequate cure times between coats. A final wet-sand and buff with a fine compound after the clear coat can yield a showroom-gloss finish that mirrors the bike’s original luster. Working in a shaded, dust-free area helps minimize debris that could mar the finish, and a clean air supply or booth can dramatically improve outcomes in more ambitious repairs.
Of course, the repair must withstand real-world conditions. A fairing is subject to temperature changes, UV exposure, humidity, and the occasional impact at speed. A repair that looks perfect in a shop under bright lights can sag or crack if the adhesive bond fails or if the layer dries too quickly or inconsistently. A practical approach is to test the repaired area for flexibility after cure by gently flexing a small portion of the panel. If you feel any stiffness or hear a crackle under stress, the section may be too brittle and could crack again under vibration and wind load. In such cases, re-checking the surface for uniform adhesion and potentially adding a light second coat or a reinforcing layer in the outermost area can improve resilience. It is also wise to consider hidden reinforcements for larger or deeper repairs. For non-structural cracks, a light fiberglass mesh patch embedded under a subsequent thin coat of filler can help distribute stress and prevent micro-motions that cause hairline cracks to reappear. This technique is a bridge between cosmetic repair and structural reinforcement and should be used judiciously.
The broader context of any repair includes maintenance and prevention. Once a repaired fairing has been color matched and sealed, a careful habit of cleaning and protecting the surface will extend the look and performance of the finish. UV exposure is a primary enemy of painted plastics, so applying a wax or sealant designed for plastics can reduce chalking and color fade. It is also prudent to consider a protective film or clear bra in high-wear areas, which can dramatically reduce future hits and scratches. If you ride in harsh climates, be mindful of temperature swings that can stress the repair. Rapid cooling after a ride in a hot sun can cause differential expansion and contraction that, over time, may reveal the repaired edge. In such cases, a more conservative approach to color matching and a longer cure time before hitting the road can improve longevity. The process may take a weekend to complete if you are balancing work and riding, but the patience invested yields a repair that not only looks good but behaves like part of the original shell.
A note on the broader motorcycle world: the repair approach described here applies across many brands and fairing shapes. In practice, you will find similarities in technique whether you are patching a Honda, a Yamaha, a BMW, or a Ducati. The principle remains constant: correctly prepared plastic surfaces, appropriate adhesion promoters, careful layering of filler, gentle feathering, and a restrained, quality paint finish. For riders who want to explore these ideas across varying shapes and curves, the corresponding fairing catalogs can serve as useful references for fit and geometry. For instance, if you are exploring a broader range of options and you want to understand how certain fairing lines influence repair strategy, a reference like Honda fairings offers a concrete sense of how curved panels and seam lines interact with coatings and repairs. You can explore broad categories of fairings and specific models via the linked page, which presents a spectrum of style and compatibility that helps you anticipate how a repair might align with a bike’s overall aesthetics. Honda fairings.
In the end, repairing a motorcycle fairing with a plastic filler is a disciplined craft, not a quick trick. The work demands careful prep, measured mixing, and a patient, staged approach to sanding and painting. The materials used—two-part epoxy filler, an adhesion promoter, primers appropriate to the plastic, and a compatible paint system—are tools to replicate the fairing’s original curvature, texture, and color. The intention is not to hide damage but to fold it back into the fabric of the bike’s surface in a way that respects both form and function. The rider who completes this journey gains more than cosmetic improvement. The act of repair enhances the bond with the machine, reinforces the idea that maintenance is part of the riding experience, and preserves the visual integrity that motivates a rider to keep clocking miles. And as the bike emerges from the last clear coat with a surface that mirrors its pre-damage gloss, the owner is reminded that skillfully applied plastic filler is not about masking a flaw. It is about reimagining the fairing’s surface as a shared surface—one that has absorbed impact and returned to beauty through patient, informed craftsmanship. For those seeking a deeper dive into related techniques and broader context on fairing repair and maintenance, a thorough external resource offers a broader, well-constructed guide to the science of body filling and paint adhesion: https://www.autobody101.com.
The journey from scratch to seamless finish is a satisfying one, especially when you see the repaired contour catching light with the same intensity as the surrounding plastic. The repair isn’t merely cosmetic; it is a tangible reminder that a rider can extend the life of a fairing through measured effort and respect for the material’s nature. The chapter above sketches a roadmap: identify the damage, prepare for adhesion, mix and apply a two-part epoxy filler in deliberate layers, cure and sand with intention, prime for a uniform base, color and seal with a compatible finish, and finally step back to evaluate the result under sun and shadow. When done with care, the repaired area becomes a quiet testament to practical engineering and the artistry of restoration, a small but meaningful win in the ongoing conversation between rider, machine, and road.
Riding on Thin Plastic: The Real Limits of Epoxy-Based Fillers for Motorcycle Fairings
A long ride begins with a small flaw, and in the world of sport bikes and daily riders alike, those flaws often show up on the fairings that slice through the wind and define the bike’s visual language. Epoxy-based body fillers, the generic cousins of the familiar shop staples used for cosmetic repairs, promise a quick path back to a smooth surface. They’re widely available, forgiving to work with for a DIY repair, and capable of erasing shallow scratches, minor dents, and small cracks with a hand-friendly workflow. The appeal is clear: a fairing that looks as good as new, at a fraction of the cost of a full panel replacement. Yet beneath the surface, the story is more nuanced. For all their utility in cosmetic touch-ups, these fillers carry limitations that can undermine performance, durability, and even safety when used in the wrong context or under the wrong conditions. A careful understanding of these limitations helps riders decide when a patch is sufficient and when the only responsible choice is a replacement or a more robust repair approach.
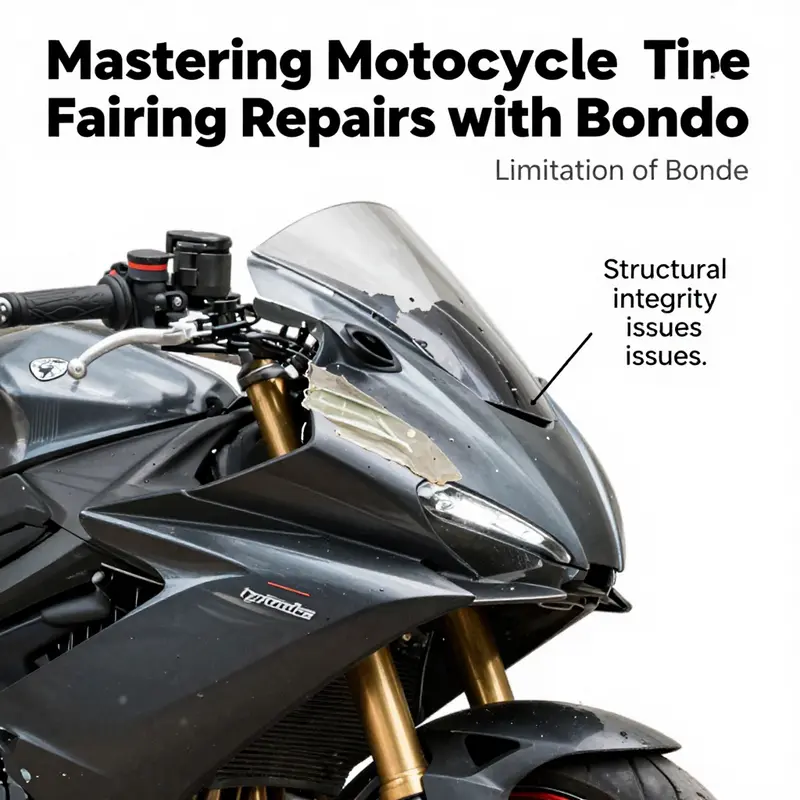
First, the question of structural integrity cannot be ignored. A motorcycle fairing is not a purely decorative shell. It is a composite-like component that endures constant vibration, air pressure, and rapid temperature swings as the engine heats the bike and the sun bakes the plastic. Epoxy-based fillers, by design, are good for filling voids and creating a smooth planar surface, but they are not engineered to behave like the original plastic in the face of flexing and impact. When the bike vibrates at highway speeds or when a fairing experiences even moderate mechanical stress during a minor crash or a heavy brush with a guard rail, the filler tends to crack or delaminate. Cracking may begin at micro-movements along the repair line, particularly if the surrounding plastic has any give or if the filler has been pressed or flexed beyond its comfort zone. Over time, repeated cycles of heating and cooling can cause the filler matrix to become brittle, and small fissures can propagate. The aerodynamic surface, which depends on a seamless contoured skin, becomes compromised not just by visible lines but by subtle changes in the surface stiffness that alter airflow and increase drag slightly. In high-performance riding, where even tiny changes in surface roughness can affect downforce and stability, the limitations become more pronounced. In everyday riding, the consequence often manifests as a less durable cosmetic repair that may require repeated attention before a more permanent solution is reached.
Second, adhesion on plastic surfaces introduces a separate set of challenges. ABS plastic dominates modern fairings because it combines light weight with impact resistance and moldability. Achieving a reliable bond between an epoxy-based filler and ABS requires a meticulous prep sequence: thorough cleaning to remove oil and wax, careful abrading to expose a fresh surface, and an appropriate primer or bonding agent that can bridge the substrate to the repair material. If any of these steps falter—if the surface remains contaminated, or the sanding is insufficient, or the primer is ill-suited for this chemistry—the bond may be weak. A poor bond is not merely a cosmetic defect; it is a functional risk. Under stress or at high speeds, the repair material can peel away from the plastic, creating a new edge that catches air and invites further damage. Even when the repair holds for months, UV exposure from sunlight can gradually degrade the bond or the filler’s surface, leading to a chalky finish or micro-delaminations that are invisible at first glance but evident under close inspection or in changing light. The reality is that plastic surfaces require a careful, often multi-step bonding approach that goes beyond what many quick-fill products can consistently deliver, especially when the repair sits under heat from the engine or under the sun for long durations.
Third, weight and finish labor represent practical trade-offs that many riders overlook. Epoxy-based fillers add mass to the repaired area, and every gram matters when a fairing is designed to be as light as possible for handling and cornering behavior. The filler itself is denser than the original plastic, and while it seems like a small excess, it can influence how the panel behaves in a dynamic environment, particularly near edges and intersections where aerodynamics matter. The finish work required to achieve a factory-like appearance is extensive. Sanding, priming, and painting are steps designed to produce a seamless look, but they are also a test of the repair’s durability. Each stage is an opportunity for missteps to reveal themselves later: sanding gaps can create uneven texture, primer layers can trap air pockets, and the final paint layer may react with the filler if the chemistry is not perfectly matched. If the painter’s technique is imperfect or if the underlying substrate is not properly prepared, the result can be a finish that appears uniform at a glance but reveals micro-bulges, waviness, or color mismatch under different lighting. For a rider chasing a pristine, factory-like surface, the effort to achieve that level of finish with a filler that is not inherently designed for long-term cosmetic fidelity can be substantial and sometimes unrewarding.
Fourth, the repair’s lifespan is a practical determinant of value. Cosmetic repairs are often treated as temporary fixes, a stopgap before a more complete replacement becomes necessary. This is particularly true for fairings that see high-speed airflow, resist moderate impacts, and bear the brunt of aerodynamic forces that relentlessly seek to straighten or reorganize surfaces. A cosmetic patch can extend the life of a fairing for a season or two in a road-only context, but in the rough-and-tumble world of sport riding or in regions where temperature swings are dramatic, the repair may deteriorate sooner than expected. The filler can separate from the substrate, the finish can crack, and the patch can accumulate moisture in crevices if the seal is imperfect. In such scenarios, the rider ends up performing the same repair multiple times, compounding weight, cost, and downtime, which defeats the purpose of a clean, durable fix. The more time and labor involved in maintaining a patch, the more it becomes clear that the repair is not a permanent solution and that a more robust approach—such as a fiberglass rebuild, a dedicated repair kit with matched resins, or the replacement of the fairing segment—offers greater long-term reliability and safety.
Fifth, compatibility with paint and finishes cannot be overstated. A filler’s chemistry must play well with the chosen primer and paint system. The wrong combination can lead to a sequence of aging problems: poor adhesion, solvent migration, outgassing, and eventual blistering or discoloration. Outgassing is particularly insidious; certain fillers can release trapped gases as the paint cures, producing tiny bubbles that later bloom into visible pimples under the clear coat. This kind of defect undermines both aesthetics and surface integrity. The risk is not limited to the cosmetic layer. If the painted surface is compromised, it can lead to moisture ingress, which, in turn, can accelerate corrosion on underlying metal components or promote the onset of creaks and structural weaknesses around the repair zone. The observation here is not that fillers are inherently incompatible with paint, but that the combination of filler chemistry, substrate, primer, and topcoat must be matched with care. If a rider chooses to proceed with a patch, the job should be treated as an investment in the repair’s cosmetics rather than a guarantee of a flawless, long-term color match or surface stability.
The cumulative effect of these limitations pushes many technicians and experienced riders to view epoxy-based fillers as a tool for specific, narrowly defined roles rather than a universal remedy for fairing damage. They are well suited to minor, non-structural cosmetic corrections, where the aim is to restore a smooth, paintable surface without altering the panel’s geometry. In such cases, the repair can be carefully executed with attention to surface preparation, bonding conditions, and controlled finishing. Yet when the damage crosses into areas where the panel bears a load, or when the underlying substrate is compromised, or when a long-lasting, high-quality finish is the objective, alternatives tend to deliver superior outcomes. The safer, more durable options include structural repairs using reinforced composites, such as fiberglass cloth and epoxy resins engineered for service in a motorcycle environment, or replacing damaged sections with manufacturer-recommended repair components or OEM-compatible shells. These approaches address the real demands of the fairing’s role, offering stronger adhesion, better impact resistance, and a finish that better withstands the rigors of real-world riding.
In practice, the choice between a cosmetic patch and a more robust fix hinges on context. Consider a shallow scratch or a small dent in a non-load-bearing area that is not in the line of air flow and is not subject to higher impact or heat. In such a scenario, a carefully executed filler repair can restore the surface to near-original appearance with a reasonable expectation of durability, provided that it is followed by proper priming and a compatible topcoat. For a rider contemplating deeper damage, or a panel that has suffered a crack that spans the thickness of the material, the safer route is to pursue a repair that explicitly addresses structural characteristics or, when necessary, to replace the damaged fairing segment. The idea here is not to dismiss the value of patching but to situate it within a reality check: it is a useful tool for a specific set of cosmetic issues, not a universal solution for high-performance, long-term use.
For readers who are exploring repair options, it can be instructive to study the broader landscape of fairing repair resources. A practical path is to learn from the experiences of others who have navigated similar challenges. In many repair scenarios, a combination approach proves most effective: a conservative cosmetic fix to address minor surface defects, followed by an assessment of the panel’s structural condition and a decision about potential reinforcement or replacement. The repair sequence, when executed with attention to material compatibility and environmental conditions, tends to yield the best balance between immediate appearance and long-term reliability. When in doubt, leaning toward a more durable solution pays dividends in the form of safer handling, steadier aerodynamics, and a finish that resists the elements for a longer period.
It is worth noting that while cosmetic patches can be a temporary remedy, they should not be mistaken for a substitute for a well-considered repair plan. A true assessment requires looking beyond the surface to the underlying conditions: the integrity of the plastic, the strength of the bond, the potential for moisture migration, and the eventual finish. When the fairing is more than cosmetic damage—when there are large cracks, delamination, or warping—replacement or a full structural repair becomes not just advisable but necessary. In those cases, the aim shifts from restoring an appearance to restoring a functional, aerodynamically active surface that can withstand the air pressures and vibrations of regular riding. For a rider who wishes to maintain a high standard of appearance while preserving performance, it is important to balance the desire for a fast, affordable fix with the realities of how the repair will behave under stress.
As the discussion unfolds, one recurring theme emerges: the value of recognizing the repair’s scope before committing to a method. If a repair is being considered, it is essential to evaluate whether the damage is cosmetic or structural. Cosmetic issues can often be addressed with a careful, well-executed filler repair that is paired with priming and finishing. Structural issues require a different approach—one that prioritizes bonding strength and material compatibility over the ease of a patch. The landscape of options expands further when we consider the broader ecosystem of fairing components. For riders who want to avoid the patch-and-paint loop entirely, a robust path involves replacing damaged panels with OEM-equivalent parts or exploring compatible aftermarket shells that restore the original geometry and aerodynamic properties. In this sense, the chapter’s core message is pragmatic: know what you are repairing, understand the limits of your chosen method, and choose the path that preserves both the bike’s performance and its aesthetic cohesion over the long haul. If you are inclined to explore a broader repair landscape, a quick glance at Honda fairings in their dedicated category reveals a spectrum of options for appropriate restoration or replacement, from factory-matched shells to options that preserve the bike’s silhouette while upgrading the materials involved. Honda fairings
For readers seeking deeper, more technical coverage, a detailed external discussion of the limitations and best practices for repairing plastic fairings with fillers provides additional context and nuance. The resource examines adhesion strategies, substrate preparation, and the interplay between filler chemistry and paint systems, offering a grounded perspective on when a filler repair is prudent and how to execute it more reliably. This external perspective complements the chapter’s practical guidance by anchoring the discussion in field-tested considerations from experienced technicians and credible repair specialists. External resource: https://www.motorcycle-mechanics.com/repairing-plastic-fairings-with-bondo/Limitations-and-Best-Practices
Sourcing the Right Epoxy-Based Repair Kit for Motorcycle Fairings: A Practical Guide to Quick, Safe Fixes
When a motorcycle fairing bears the signs of a ride—a scratched surface, a small dent, or a hairline crack—the temptation is to reach for a quick fix. Riders often turn to epoxy-based body fillers sold in repair kits because they offer the right balance of plasticity, strength, and finish potential for non-structural damage. The practical reality is that the fairing, while not a structural component in the same sense as the frame, is still a critical piece of the aerodynamics and aesthetics of the bike. A careful repair can restore the smooth line of the curve and the uniform light reflection that makes a bike look pristine, but it must be done with materials and processes appropriate to plastic or composite fairings. In this chapter we explore where to find reliable repair kits, what to expect from them, and how to integrate a repair into the broader maintenance mindset of the machine, so the fix feels permanent and the finish remains in harmony with the original paint and shape.
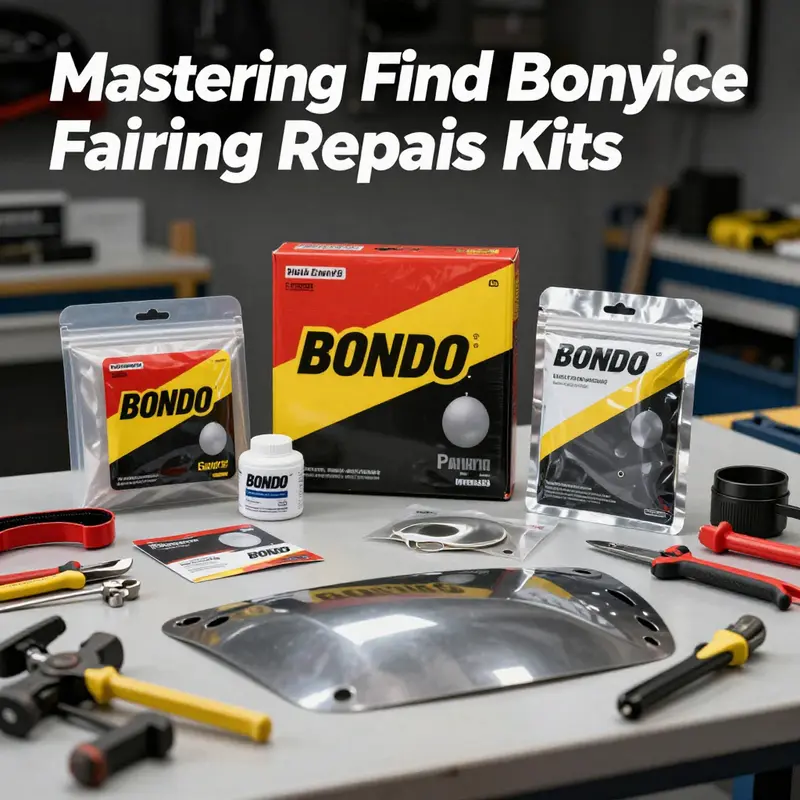
The first thing to recognize is that a repair kit for fairings is not a one-size-fits-all solution. Different plastics and composites—ABS, fiberglass-reinforced plastic, polycarbonate blends, and the like—absorb moisture and solvents in distinct ways. A good kit will address these material differences with compatible resin systems, hardeners, and stabilizers that cure to a durable, feathered edge. It will also include or expect a set of tools and consumables that make the job feasible without specialized workshop equipment. A typical kit should offer a two-part epoxy-based filler or similar plastic repair compound, a hardener or catalyst, a small spreader or putty knife, and abrasives suitable for progressive smoothing toward the surface. Some kits also bundle color-matching pigments or a primer designed for plastics, though color matching often requires a paint system that can be adjusted separately after the repair has cured.
Where to find these kits boils down to two reliable channels: authorized outlets that carry official maintenance materials and well-regarded online retailers that specialize in motorcycle repair and customization products. Authorized sources tend to stock a curated range of repair solutions that are verified for compatibility with common fairing plastics. These channels also provide current guidance on model compatibility and the proper use ratios for the included hardeners. Online retailers, especially those dedicated to motorcycle parts and bodywork accessories, expand access to a broader array of repair systems and color-matching options. The key is to verify that the kit is intended for non-structural fairing repairs and that the resin system is designed for plastics, not metal or wood. To ensure you’re making a responsible choice, read product specifications carefully, paying attention to cure times, recoat windows, and any cautions about use on heat-sensitive or UV-damaged plastics.
As you consider options, think about how the kit will fit into your typical repair workflow. A well-designed kit is not merely about the filler; it is about a complete path from damaged surface to finished paint. The steps begin with a clean, dry surface and a mechanical key to the base layer—lightly scuffing with a fine abrasive to create a profile that the filler can grip. The filler is then mixed with the hardener in exact proportions and applied in thin layers, with each layer allowed to cure before the next. The goal is to build up the damaged area gradually, feathering the edges so that the repaired zone blends into the surrounding surface as the paint job proceeds. This approach minimizes the need for heavy sanding and reduces the risk of creating new valleys or ridges that will show through the final paint. The spreader or putty knife included in the kit is a small but vital tool here, because it lets you sculpt the compound to the exact contours of the fairing without gouging or overfilling.
Crucially, a repair that uses this kind of filler should be treated as non-structural maintenance. If you encounter a large crack that compromises the fairing’s integrity or, worse, a deformation that alters its aerodynamic profile, the prudent choice is to replace the part or seek a professional assessment. Epoxy-based fillers are resilient enough for light to moderate damage and for smoothing out uneven surfaces under a clear coat, but they do not restore the stiffness and impact resistance of the original material. The literature and practical guides from experienced technicians consistently emphasize this boundary: use filler for cosmetic and non-structural repairs, and reserve replacement for serious damage. This distinction matters not just for performance, but for safety at speed, where the fairing experiences substantial airflow pressures and vibration. If you keep this boundary in mind, your repairs will not only look correct but will also behave consistently with the rest of the bike’s design under normal riding conditions.
When you shop, a few practical signals help you identify a reliable kit. Look for clear instructions about surface preparation, mixing ratios, curing times, and recommended sanding sequences. A kit that includes multiple grits of sandpaper, from coarse to fine, makes the finishing stage smoother and more controllable. A well-rounded kit may also offer protective gloves and disposable mixing sticks, which can seem small but actually reduce the friction between your work and the environment—dust control, cleanliness, and personal safety all contribute to a better result. If color matching is part of the kit’s promise, expect either a tintable base or a pigment that can be mixed with the base to approximate the original paint, recognizing that perfect color cohesion often requires subsequent painting with the bike’s factory color system and a compatible clear coat. The patching process depends on a consistent, patient approach; rushing the cure or layering too thickly increases the risk of cracking, shrinkage, or a finished surface that looks flat rather than sculpted to the fairing’s curvature.
In the landscape of shopping options, it helps to keep model compatibility in mind. Fairings come in shapes calibrated for particular makes and models, and a repair kit’s compatibility information guides you toward the right choice. For example, if you’re navigating a catalog for a common make, you may encounter model-specific accessories and repair aids that align with your bike’s fairing type. A practical way to approach this is to browse through the manufacturer’s official product pages and the catalogs of trusted retailers. A model-specific catalog or category page gives you insight into which materials are favored for which plastics, which surface textures are best suited to repair, and which finishing products pair well with the filler. If your riding style includes frequent exposure to sun and UV, you’ll want a kit that emphasizes UV-stable primers and finishes so the repaired area ages consistently with the rest of the fairing. The synergy between the repair filler, the primer, and the topcoat becomes a crucial determinant of long-term appearance and durability.
To illustrate how this information translates into a practical sourcing decision, imagine you are choosing a repair route for a common, sun-exposed fairing on a mid-range sportbike. You would aim for a two-part epoxy-based filler with a dedicated hardener, plus a flexible, low-shrink finish system that tolerates minor flexing without cracking. A kit that includes a practical guide for plastics, steps for feathering the repair into the surrounding surface, and a clear recommendation for sanding progression would be ideal. The color-matching segment, if present, would motivate you to plan a paint schedule that aligns with the bike’s original finish, including a compatible primer, a base coat, and a durable clear coat. In this context, it is helpful to think of the entire sequence as a small, modular workshop within a kit, where each component—filler, hardener, abrasives, and primers—plays a defined role in the final result. If you have a preferred color you want to replicate, you might begin by testing a small, inconspicuous area to verify that the resin cures with the same sheen and hardness as the surrounding surface before proceeding with the full repair.
For model-specific exploration while shopping online, you can browse a general category of fairings that matches your bike’s brand and look for compatibility notes that point to plastic repair kits. A quick way to connect with model-relevant guidance is to explore a maker’s broader fairing catalog, or to review repair-focused product lines that emphasize plastic compatibility, flexible finishes, and non-shrink behavior under cure. Another advantage of choosing a kit from a recognized supplier is the potential for ongoing availability of replacement parts, color-matching pigments, and refinishing products designed to blend with factory finishes. The repair approach should always consider the final step: color and surface protection. After curing and sanding, applying a compatible primer ensures the repair’s adhesion to the repaired area, while a base coat can be tinted or matched to the bike’s color. A clear topcoat then seals the repair, adds gloss, and provides the UV protection needed to preserve the repair under exposed riding conditions. The goal is not simply to fill a dent but to integrate the patch so that wind, rain, and sun are no longer factors in noticing the repair, and so the aesthetic continuity with the rest of the fairing remains intact as you ride.
With these principles in mind, you can approach the act of sourcing with a clear standard: choose a kit whose documentation speaks to plastics compatibility, non-structural repair intent, and practical finishing guidance. Prioritize those that offer a straightforward workflow and a realistic cure schedule, and be prepared to invest in a matching base coat and clear coat system if color fidelity is a priority. In day-to-day practice, a successful repair reflects careful prep, exact mixing, careful application, and disciplined finishing. A well-chosen kit is not a substitute for good technique; it is a capable partner that makes the plan you form in the shed or garage a reliable, repeatable process when a new nick or dent appears on the fairing. If you ride a model with common fairing shapes and surfaces, you may find the process becomes almost routine: a certain pattern of sanding, a predictable cure time, and a finishing ritual that leaves the surface smooth and uniform to the eye and pleasant to the touch. This is the essence of a repair that lasts and that looks prepared for the next ride rather than a temporary patch awaiting the next drizzle or dust storm. In a broader sense, the decision to repair rather than replace speaks to the balancing act every rider negotiates between cost, time, and performance. The right repair kit—selected with attention to plastic compatibility, non-structural purpose, and finishing compatibility—transforms a blemish into a story of maintenance, care, and continued, confident riding.
For model-specific exploration while shopping online, you can browse a general catalog of fairings that matches your bike’s brand and look for compatibility notes that point to plastic repair kits. A quick way to connect with model-relevant guidance is to explore the Honda fairings catalog, which is structured to help riders understand the variations across CBR, VFR, and VTR lines and the corresponding material considerations in repairs. This kind of model-aware navigation helps ensure you are not buying a kit that targets a different plastic system or a surface finish that requires an incompatible primer or topcoat. When you are ready to purchase, the steps you take in your workshop should reflect the clarity of that catalog: prepare, patch, sand, prime, paint, and protect. The repair’s final appearance depends on how thoroughly you follow the sequence and how well you match the color under the clear coat. In the end, a well-sourced repair kit that aligns with your bike’s plastic system offers a practical, affordable way to restore the fairing’s form and gloss, extending the bike’s aesthetic life between more substantial replacements. The act of sourcing, then, becomes more than a shopping decision; it becomes a disciplined, thoughtful approach to motorcycle care that recognizes the fairing as a living part of the bike’s character and performance.
To guide your search with clarity, consider the following practical takeaway: verify that the kit’s documentation specifies non-structural repair use and plastics compatibility, confirm that the included abrasives and tools align with your skill level, and anticipate the finishing sequence needed to achieve a seamless blend with the surrounding paint. With these guardrails in place, you can confidently navigate the options, select a kit that provides the right mix of filler, hardener, and finishing materials, and then translate the choice into a repair that looks professional and holds up under the elements. The repair’s durability ultimately rests on your prep, your patience, and your willingness to follow the kit’s guidance step by step, from surface preparation to color protection. In the end, the right epoxy-based repair kit becomes a dependable ally for riders who want to keep their fairings looking sharp without the cost and downtime of a full replacement.
External resources can offer broader perspective on official parts and maintenance channels. For direct access to official parts outlets and product options, you can visit a trusted external resource that aggregates OEM-grade components and repair aids. https://www.h-d.com
Final thoughts
Leveraging Bondo for motorcycle fairing repairs can drastically improve the quality of service your business provides. By understanding the correct application methods and recognizing its limitations, you can ensure that repairs are aesthetically pleasing and structurally sound. Moreover, sourcing the right Bondo repair kits will enhance your operational efficiency. As consumer demand for quality repair services grows, mastering such techniques positions your business as a reliable choice among motorcycle owners.