Introduction
Motorcycle fairing repainting represents a high-value service for service-focused businesses. Plastic fairings, commonly ABS or fiberglass, demand different surface preparation, primer formulations, and finishes than metal panels. For business owners, the goal is to convert skilled labor into repeatable, predictable results that clients trust and that differentiate a shop in a competitive market. This guide translates the technical steps—surface inspection, sanding and feathering, priming and color application, and finishing and curing—into clear workflows, material choices, and equipment considerations that fit a professional shop environment. Each chapter links back to the core objective: durable adhesion on plastic, controlled texture, precise color, and efficient throughput. By treating the repaint as a systems problem—standardized wash and prep, engineering-friendly repairs, plastic-specific primers, measured color builds, and staged curing—owners can optimize labor, minimize rework, and deliver consistently high-quality outcomes. The narrative starts with thorough surface assessment, moves through disciplined sanding and feathering, then covers primer strategy and color layering, and ends with finishing protocols that protect the investment. Together, these steps form a holistic approach that aligns sustainability, safety, and customer satisfaction with bottom-line performance.
Tables of Contents
Chapter 1: How to Repaint a Motorcycle Fairing: Surface Preparation and Inspection
- How to Repaint a Motorcycle Fairing: Surface Preparation and Inspection — A Technological Deep Dive into Preparation Methods and Quality Assurance
- How to Repaint a Motorcycle Fairing: Surface Preparation and Inspection — The Economic Equation of Materials, Tools, and Labor in Prep and Inspection
- How to Repaint a Motorcycle Fairing: Surface Preparation and Inspection — Navigating Society, Regulation, and the Environmental Standards That Guide Every Coat
Chapter 2: How to Repaint a Motorcycle Fairing: Sanding, Repair, and Feathering Techniques
- Technological and Material Innovations in How to Repaint a Motorcycle Fairing: Sanding, Repair, and Feathering Techniques
- Economic Realities, Labor, and Craft Standards in Sanding, Repair, and Feathering for Motorcycle Fairings
- Color, Community, and Supply Chains: Societal and Geopolitical Threads in Repainting ABS Fairings
Chapter 3: How to Repaint a Motorcycle Fairing: Priming, Color Application, and Layer Control
- How to Repaint a Motorcycle Fairing: Priming, Color Application, and Layer Control — The Primer Stage: Surface Preparation and Priming Techniques
- Color Mastery for Plastic Fairings: Masking Edges, Mixing Ratios, and Layered Depth
- Layer Mastery: Clear Coats, Curing, and Quality Checks for Durable Finishes
Chapter 4: How to Repaint a Motorcycle Fairing: Finishing, Curing, and Aftercare
- Finishing, Curing, and Aftercare: Pushing Plastic-Flex Technology for Durable, Glossy Fairings
- How to Repaint a Motorcycle Fairing: Finishing, Curing, and Aftercare — Economic Dimensions: Costs, Labor, Materials, and Market Dynamics
- Finishing, Curing, and Aftercare — Navigating Regulation, Supply Chains, and Access in Motorcycle Fairing Repaints
Chapter 1: How to Repaint a Motorcycle Fairing: Surface Preparation and Inspection
1. How to Repaint a Motorcycle Fairing: Surface Preparation and Inspection — A Technological Deep Dive into Preparation Methods and Quality Assurance
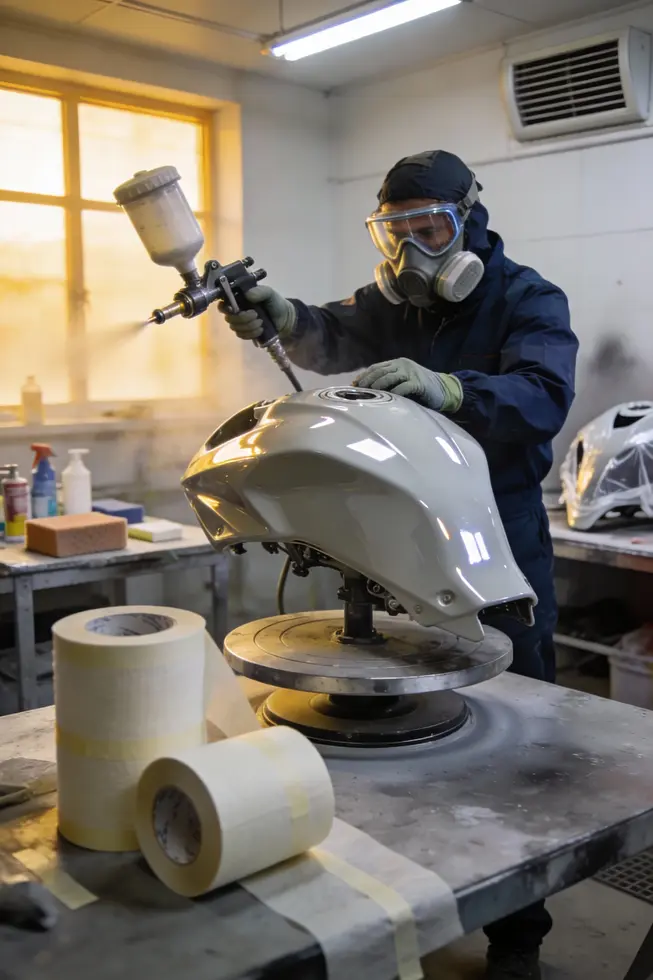
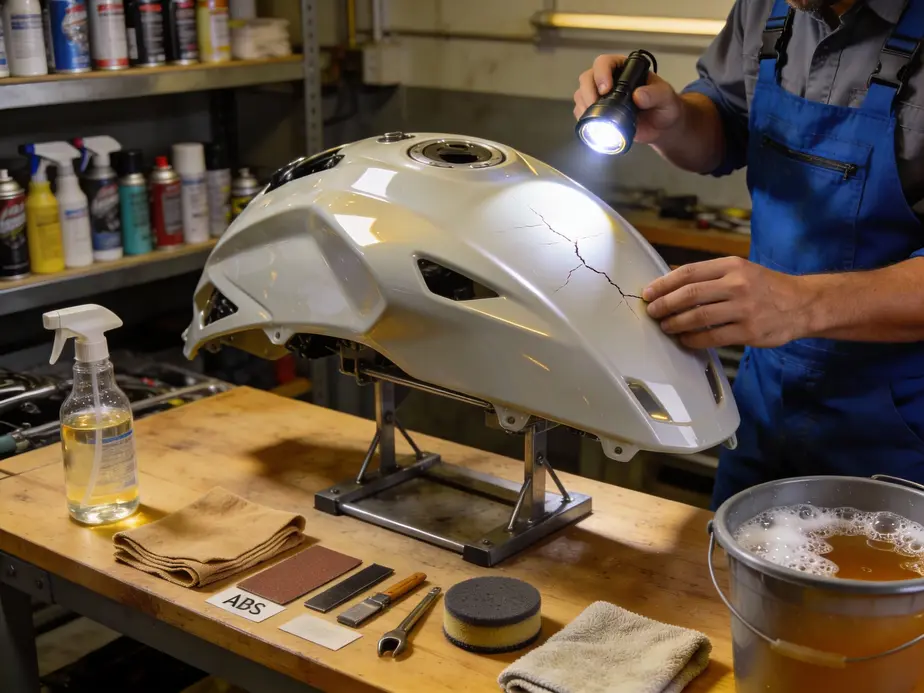
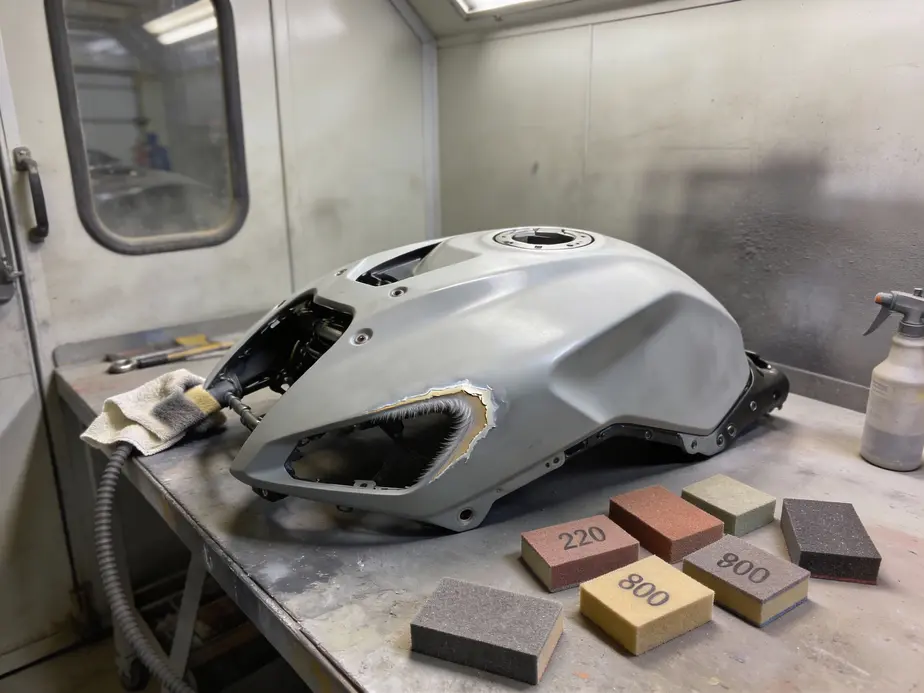
Surface preparation is the quiet engine that powers a durable, professional repaint. It begins with meticulous cleaning, continues through careful inspection, and culminates in the right primer and a flawlessly smooth foundation for color. The goal is a surface that responds to the paint system with consistent adhesion and predictable behavior under vibration, heat, and UV exposure. Start with a thorough wash of the fairings using warm, soapy water to strip away dirt, oil, and contaminants that can sabotage adhesion. Rinse and dry completely, then search the surface with a trained eye for scratches, dents, or hairline cracks. Any significant damage should be repaired before sanding begins, or the finished finish will highlight flaws rather than conceal them. A tack cloth at the end of this stage removes the last dust specks and lint, ensuring a clean slate for the work that follows. This initial discipline sets the tone for the entire project, because a glossy coat never hides a compromised substrate. \n\nInspection and preparation dovetail in a single, iterative process. While examining the fairing, consider not only visible damage but also the surface behavior under flex. ABS and fiberglass behave differently when stressed, so identify repairs that must be flexible or that may need structural backing. For minor dents or scratches, body filler can smooth the surface and feather the edges into the surrounding paint. For fiberglass sections, cured resin or fabric repair may be appropriate. The objective is a uniform, repair-free plane before any primer is applied. Skipping this step invites primer failures or color inconsistencies that become obvious after base coat. A deliberate, patient approach to repair ensures long-term durability and easier color matching. \n\nSanding is the bridge between repair and primer, and it requires a disciplined progression of grits and techniques. Begin with a coarser abrasive—240 to 400 or 600 grit—to remove old paint, gloss, and imperfections. If a scratch feels snaggy to a fingernail, wet the surface and paper and work in a cross-hatch pattern to reduce gouges. Move to 400 grit to widen the feathered area, smoothing transitions between repaired and original paint. Finish with 800 grit to create a smooth, ready-to-prime texture. For repaired areas, feather the edges carefully to avoid ridges that show through the primer. After repairs, a light, careful dry sanding is followed by a tack wipe. When primer has been applied, light wet sanding helps reduce any orange-peel texture and prepares a compliant surface for the next coat. \n\nPriming for plastics is a critical choice point. Use a primer formulated for plastic fairings, typically epoxy or urethane, to preserve flexibility and adhesion on ABS or fiberglass. Apply several thin coats rather than one heavy layer, allowing each coat to dry before the next. Light wet sanding between coats yields a velvety finish and a uniform base that enhances color depth. A final tack wipe ensures the surface is dust-free prior to base coat application. This primed foundation is the bedrock of color accuracy and long-lived adhesion, reducing the risk of blistering or lifting later in the bike’s life. \n\nThe preparation philosophy is reinforced by practical, material-aware decisions and the understanding that surface quality drives success in every subsequent layer. For those exploring related materials and accessory options, a curated selection of components can be browsed under the C65 product category. C65 product category.
2. How to Repaint a Motorcycle Fairing: Surface Preparation and Inspection — The Economic Equation of Materials, Tools, and Labor in Prep and Inspection
Economic prudence in surface preparation and inspection is not a niche concern; it underpins every durable finish you aim to achieve on a plastic fairing. The preparatory phase sets the stage for adhesion, optical quality, and long-term resilience, and the choices made here carry visible price and time consequences. By framing the process as an economic equation—materials, tools, and labor—you reveal how modest upfront decisions can pay dividends in reduced rework and longer-lasting results.\n\nMaterials represent the most visible line item in the prep bill. DIY enthusiasts naturally gravitate toward lower upfront costs, but a cheaper primer or filler can silently compromise adhesion on flexible ABS or fiberglass, inviting cracking, peel, or micro-scratches under vibration. The data suggest DIY material ranges around the low to mid hundreds of dollars when considering primers, base coats, and clear coats, with the DIY portion often quoted in the neighborhood of roughly $20–$50 for basic consumables and up to around $50–$100 more if choosing higher-grade plastics primers and durable finishes. In contrast, professional-grade systems designed for maximum longevity—especially UV resistance and adhesion on plastic—tush the budget higher by about another $50–$100, but they dramatically lower the risk of future rework. When you weigh these costs, the payoff is not merely a prettier surface but a reduced likelihood of urgent touch-ups after a few months on the road.\n\nTools constitute the second pillar of the cost structure. Essential, reusable items like sandpaper, tack cloths, guides, and cleaning solvents stay inexpensive, often around $10–$20 for the basic kit. More specialized tools—rotary tools for minor repairs or masking accessories—add a modest extra outlay, in the neighborhood of $30–$50. The crucial point is not the peak price of any single tool but the cumulative effect: a well-chosen, durable setup fosters consistent application, fewer defects, and smoother curing. These advantages translate into tangible time savings and, ultimately, a more predictable finish at a lower total cost over the life of the bike.\n\nLabor costs crystallize the decision. DIY labor can save a substantial amount—roughly $200–$500 in professional fees in many markets—but requires a significant time investment, commonly 4–8 hours of hands-on work plus curing windows of 24–48 hours for epoxy or primer and additional time between coats. Professional services, in contrast, can complete the job in a much shorter window—often 1–3 hours—but the price tag reflects not only labor but the shop’s expertise, controlled environments, and quality control. The resulting conclusion is nuanced: DIY is economical for small blemishes or budget-conscious refreshes, but for aged or deeply damaged fairings where color matching and long-term durability matter, professional repainting often delivers a lower total cost of ownership by minimizing rework and returns.\n\nBalancing these factors requires a practical framework. Start with a precise assessment of damage and a documented plan for repairs, masking, and layer sequencing. Test adhesion and finish on a scrap piece or a hidden area to avoid surprises. Consider the long-term value of a durable primer system that tolerates flex and temperature variation; sometimes investing a bit more upfront to secure a robust base reduces future maintenance. A path that blends sensible material choices with disciplined preparation—featuring thin, controllable coats and careful curing—emerges as the most economical route to a showroom-worthy finish.\n\nFor those planning a deeper dive into available material ranges and compatible prep options, see the Product Category C63 for context on compatible coatings and supplies.
3. How to Repaint a Motorcycle Fairing: Surface Preparation and Inspection — Navigating Society, Regulation, and the Environmental Standards That Guide Every Coat
Surface preparation sits at the interface of craft and policy. For a motorcycle fairing, what begins as careful scuffing and degreasing becomes a test of global standards, environmental duties, and social expectations about waste, emissions, and safety. The goal is not only a pristine bond but a responsible finish that can flex with vibration, resist weather, and endure lifecycle demands. This context shifts the painter’s hand from purely technique to a broader responsibility to the environment, workers, and communities that encounter the coating ecosystem.
Societal currents drive customization, but they also demand accountability. Enthusiasts want bold colors and complex textures, yet regulators and consumers increasingly favor low-VOC formulations, safer disposal, and recyclable packaging. Those pressures shape every choice in surface preparation—from the solvents and cleaners used to the abrasives selected for plastic substrates. The result is not a cosmetic outcome alone but a durable, eco-conscious finish that reduces hazardous waste, minimizes exposure, and aligns with broader sustainability goals. In practice, that means prioritizing surface cleanliness, using plastic-friendly primers, and embracing practices that limit dust, solvent use, and waste streams without sacrificing adhesion or color integrity.
Geopolitically, coatings practice is embedded in a patchwork of rules that vary by region. In the United States, federal and state rules curb volatile organic compound emissions from refinishing, pushing reformulations toward low-VOC systems and more efficient application methods. The European Union pursues strict solvent limits and continuous emissions monitoring, driving the industry toward waterborne, powder, and UV-curable chemistries that perform under automotive stress while reducing footprint. Canada enforces VOC limits for automotive refinishing through federal regulations, with provinces implementing additional hazardous-waste and technician-qualification requirements. In Asia, Japan and Korea emphasize low-VOC, PFAS-free approaches with lifecycle thinking that supports sustainability alongside durability. These regional differences influence product availability, labeling, and the documentation shops must produce to demonstrate compliance.
Standards provide the framework that unites these pressures with practical workflow. ISO 8501-1 offers a visual language for surface cleanliness, with automotive contexts commonly aiming for a high level of cleanliness such as Sa 2.5 prior to coating. While SSPC standards originate in heavy industries, automotive OEMs and high-end refinish shops translate core principles into practices for plastic fairings, preferring surface profiles and cleanliness levels that ensure adhesion without creating brittle edges. ISO 12944 guides corrosion-protective systems and environmental performance, while ISO 14001 links coatings operations to environmental management, auditing, and continual improvement. Chemical regulations like REACH constrain substances in coatings, nudging formulators toward PFAS-free, low-VOC, and recyclable solutions. In UK and Commonwealth contexts, standards such as BS 381C provide color systems that support precise color matching, while I-CAR, SAE, and OEM guidelines shape the training and process controls that ensure consistency across repair and customization work. The convergence of these standards ensures a surface that not only looks right but endures and remains compliant.
Environmental considerations permeate every decision in surface preparation and inspection. Waste management, abrasive media recovery, and solvent minimization reduce ecological impact and comply with regulatory expectations. Proper segregation of waste streams, solvent recovery where feasible, and the adoption of water-based or powder alternatives where suitable all contribute to safer shops and cleaner environments. Worker safety remains essential; ventilation, appropriate PPE, and safe handling of chemicals protect people and nearby communities while supporting regulatory compliance. As one region tightens limits, others adapt, and the craft of repainting a fairing becomes a forward-looking practice that honors both aesthetics and planetary health. For context on cross-border VOC guidance, see Canada’s automotive refinishing regulations, which outline limits and compliance expectations in detail: SOR/2009-197 VOC limits for automotive refinishing (Canada).
In sum, surface preparation and inspection for repainting motorcycle fairings sit at a dynamic crossroads of culture, regulation, and environmental stewardship. The best practice integrates meticulous preparation with an awareness of regional standards, waste management, and health and safety, delivering a finish that is beautiful, durable, and responsible.
Chapter 2: How to Repaint a Motorcycle Fairing: Sanding, Repair, and Feathering Techniques
1. Technological and Material Innovations in How to Repaint a Motorcycle Fairing: Sanding, Repair, and Feathering Techniques
Innovations in motorcycle fairing repainting bring together smarter surface preparation, tougher yet flexible coatings, and lighter, more advanced materials. This convergence has raised the baseline for professional results while expanding what is possible in custom finishes. Wet sanding, plastic-specific primers, and evolving composite technologies now anchor the workflow, from initial prep to the final clear coat, ensuring adhesion, durability, and color depth amid the flex and heat that fairings experience in service.
Wet sanding stands out as a pivotal advance in preparing plastic surfaces. By lubricating the sandpaper with water, craftsmen can achieve finer smoothing with less clogging and wear. The goal is a surface that feels uniformly smooth to the touch and looks devoid of orange-peel texture once the paint seals it in. The typical progression starts with coarser abrasion to remove old finishes and establish a key for primer, then moves toward around 800 grit for a dull, even backdrop. Light, thorough wets between coats help maintain a consistent texture, while cross-hatch patterns during initial sanding improve coating adhesion and evenness. The emphasis is on controlled removal rather than aggressive scraping, preserving structural integrity while smoothing imperfection transitions.
Material-specific primer technology has become essential as plastics dominate fairing construction. Epoxy and urethane primers are chosen for their flexibility and their ability to bond to ABS or composite substrates, reducing the risk of crack or peel under flex. Multiple thin coats are favored over heavy applications, with very light wet sanding between coats to yield a velvety base that accepts color evenly. This layer not only anchors the color but also helps manage the micro-texture of the surface, so the subsequent color coat can lay down with uniform opacity and depth.
Advanced material considerations push the discussion beyond traditional ABS. Carbon fiber fairings—though less common and more costly—present unique finishing demands. Repainted carbon fiber surfaces require compatible resin systems and careful color layering to avoid revealing the underlying weave or causing separation at the edges where flex is greatest. In some modern workflows, eco-friendly resins and reinforced composites are paired with compatible clear coats to maintain durability without compromising the aesthetic of the weave or surface texture. For these materials, the finishing approach often combines precise color matching with a high-build clear that protects against UV exposure and micro-scratches while preserving the distinct visual character of the composite.
The professional paint process remains a reliable framework, now enhanced by material science: a seven-stage approach that layers primer, color, decals, and multiple clear coats. Gloss and metallic finishes tend to deliver the most durable, easy-care results, while matte and pearl effects demand careful handling to prevent hazing or scratching. A minimum of three clear coats is typical to achieve depth, with attention to proper curing between layers. When done correctly, the result is not only vibrant color but also long-term resilience against sun, temperature shifts, and road wear. The practical takeaway is that embracing these innovations—wet sanding, flexible primers, and composite-aware finishes—supports predictable results that stay true over time.
For readers seeking a distilled, practice-oriented reference, many respected guides emphasize the same core cadence: prepare meticulously, apply thin, even coatings, and respect the cure window. This narrative aligns with the broader chapter’s emphasis on sanding, repair, and feathering, while illustrating how modern materials and finishing science expand what can be achieved in a garage or shop setting. For a consolidated, stepwise approach, see the detailed guidance on the best way to paint motorcycle fairings.
Best way to paint motorcycle fairings
2. Economic Realities, Labor, and Craft Standards in Sanding, Repair, and Feathering for Motorcycle Fairings
Viewed through an economic lens, repainting a motorcycle fairing becomes a negotiation between cost, time, and anticipated durability. The DIY path keeps upfront material costs modest—roughly under $100 for sandpaper, tack cloths, fillers, primers, paints, and clear coats—yet that figure hides the true price of mistakes. A small misstep in feathering or edge preparation can necessitate rework or even component replacement, inflating both time and expense. By contrast, a professional repaint quickly raises the price to a range of five hundred to two thousand dollars but offers calibrated results, a controlled environment, and fault tolerance that many hobbyists cannot replicate. The decision is rarely about one perfect method; it’s about the finish you want, the tolerance for risk, and the time you’re prepared to invest. In practical terms, your budget should reflect not only the stickers on the receipt but the hours spent building a seamless surface.
From a workflow perspective, the economic footprint mirrors the sequence of surface preparation. Start with thorough inspection and cleaning, then coarse sanding to flatten old paint and reveal defects. The bulk of labor and cost often lies in repair and feathering: filler or resin, careful application, and skillful feathering to make transitions invisible under color. Each feathered edge demands gentler, repeatable strokes, and the goal is to minimize material removal while preserving substrate integrity. As you progress, finer sanding reduces texture and prepares for primer, then for base color and clear coats. The more layers you commit to—base color, optional metallic/pigment effects, and multiple clear coats—the higher the cumulative cost in materials and the longer the cure schedule. In premium finishes, wet sanding after primer and in-between coats can yield a flawless flat surface, but it doubles the effort and requires disciplined technique. For readers aiming to keep costs predictable, the rule of thin, even coats and strict adherence to drying times pays dividends in saved material and less rework. For the curious, this is where the practical choice of paint system—solid color versus metallic or pearlescent—begins to influence the bill and the final appearance. paint and coating supplies.
Industry practice, whether in a home garage or a small shop, centers on accuracy, repeatability, and durability. The classic approach favors a uniform primer, controlled sanding, and a multi-coat color system designed to resist vibration and weather. In many cases, professionals lean toward more advanced equipment and a ventilated space to maintain consistent results and reduce dust. Wet sanding is widely recognized as a pathway to premium finishes without extreme machinery, but it demands skill and careful solvent management. The feathering technique is treated not as an optional flourish but as a core method for hiding repairs and blending new material with the original contour. As with any craft, practice—beginning with scrap plastic—builds consistency and reduces the risk of visible seams. The interplay between cost and quality explains why some shops emphasize a slower, methodical approach, while DIY enthusiasts balance speed and humility with the promise of personal customization. These realities set the stage for understanding how standards, environmental constraints, and market trends will shape material choices and service options discussed in the next section.
In sum, economic considerations are not separate from technique. The right balance of thin coats, careful feathering, and disciplined curing protocols yields a durable finish without breaking the bank. Whether pursued by a hobbyist or a shop, the objective remains the same: a smooth, color-accurate surface that can endure flex, heat, and road wear while preserving the aesthetic intent of the fairing.
3. Color, Community, and Supply Chains: Societal and Geopolitical Threads in Repainting ABS Fairings
When repainting a motorcycle fairing, practitioners rarely consider the broader social and geopolitical currents that subtly shape choices in color, repair, and feathering. Yet these decisions ripple beyond aesthetics, touching sustainability, local economies, and the regulatory environments that govern how plastics are worked and finished. The process centers on ABS or fiberglass plastics, where flexibility, adhesion, and long-term durability interact with environmental realities. Choosing to repair rather than replace aligns with a growing emphasis on waste reduction and resource stewardship, a theme echoed in many DIY and professional repair cultures. This mindset informs not only the materials selected—primer systems, base coats, and clear coats—but also the philosophy behind feathering and blending repaired sections. The aim remains practical: a seamless, durable finish that tolerates vibration and temperature shifts while keeping waste to a minimum through careful, conservative material use and reuse of existing parts.
Sustainability, in this context, is a practical lens through which to view technique. Filler-based repairs and plastic welding offer distinct pathways to durability, with ongoing debates about which method performs best under flex and impact. Some recent observations in training videos and community discussions point to welding as advantageous in flex-prone areas, while others favor traditional fillers for ease and speed. The evolving discourse reflects a broader truth: material choice and repair strategy must be tailored to the specific stress patterns of the fairing and the owner’s maintenance habits. By prioritizing thin, controllable coats and precise feathering, the repair not only looks right but also behaves more like the original plastic under thermal cycling and vibration, reducing the likelihood of future cracking and repaint failures. This alignment between technique and sustainability resonates with communities that see repairs as a form of stewardship—extending the life of fairings, reducing scrap, and slowing the consumption cycle in a world where raw materials and energy are finite.
Beyond environmental considerations, societal factors shape access to supplies, knowledge, and skilled labor. The DIY enthusiast community thrives on shared knowledge, which lowers barriers to high-quality outcomes but also highlights the need for safe practices and proper ventilation. Local economies may benefit when individuals repair parts instead of immediately replacing them, sustaining small repair shops and hobbyist networks that cultivate craftsmanship and problem-solving—skills that travel across borders as tutorials and demonstrations circulate online. While ABS supply chains and regulatory regimes vary regionally, the core message remains: optimal repainting results come from responsibly chosen materials, carefully managed processes, and an informed stance toward safety and disposal. VOC limits, disposal guidelines for solvents, and the responsibility to minimize waste all influence the year-to-year practicality of repair strategies and color choices.
Feathering, sanding, and priming are not merely steps toward a glossy finish; they are decisions about how to integrate an repaired panel into a broader system of parts, vehicles, and communities. The aim is to blend restored areas so that the entire fairing behaves as a unified unit under heat, sun, and road salt, while the color system remains stable and legible over time. In this light, even the choice of masking, thinning ratios, and curing windows takes on meaning beyond the sink and spray booth. For readers seeking practical guidance on sourcing compatible materials in a way that respects environmental and social considerations, see product-category/c61/.
As these considerations weave through sanding, repair, and feathering techniques, they guide a holistic approach to repainting. The next sections translate this awareness into concrete practice: how to balance durability, aesthetics, and sustainability in every thin coat and feathered edge, keeping the project economical without compromising safety or performance.
Chapter 3: How to Repaint a Motorcycle Fairing: Priming, Color Application, and Layer Control
1. How to Repaint a Motorcycle Fairing: Priming, Color Application, and Layer Control — The Primer Stage: Surface Preparation and Priming Techniques
The primer stage is the hinge between preparation and color. It establishes adhesion, provides corrosion resistance where metal parts exist, and levels the surface so the final color sits true. On plastic fairings—whether ABS, polycarbonate blends, or composites—the goal is a thin, uniform film that remains flexible enough to withstand vibration and temperature swings. Achieving that starts with a clear assessment of the substrate, followed by meticulous cleaning, defect repair, and a deliberate layering strategy.
Begin with substrate identification and surface conditioning. Plastic fairings require care to avoid crazing or swelling, so aggressive strippers are avoided in favor of plastic-safe degreasers and gentle cleaning. Metal brackets or hinges should be stripped of rust and old coatings that could compromise adhesion. After cleaning, inspect for dents, gouges, or deep scratches. Minor blemishes are filled with appropriate plastic or body fillers, cured, and then sanded smooth. The idea is to create a canvas without pits or high points that would telegraph through the primer and color coat. Masking follows early repair work to protect edges and areas that should not receive primer.
Adhesion and surface compatibility drive primer selection. For bare metal, an epoxy or 2K primer provides robust adhesion and corrosion resistance. Fiberglass or composites likewise benefit from a two-part epoxy or urethane-based primer that tolerates flex. Plastics, especially harder polymers or polypropylene, often require an adhesion promoter before primer. The promoter acts as a bridge, so the primer can bond effectively to surfaces that are otherwise challenging to treat. Always follow the promoter’s flash-off and recoat recommendations. In practice, this means applying a thin, uniform layer and giving it the time prescribed before introducing the primer itself. Consider this as laying a foundation that will support the entire color journey.
Layering and dry film thickness (DFT) targets shape the final look. A typical epoxy primer aims for a total DFT in the 1.5–3.0 mils range across the surface, with filler primers adding modest additional height to smooth irregularities. The exact figures depend on the product data sheet and the substrate; never guess. When building the coat, apply 1–2 light coats on plastics and slightly more on areas with deeper imperfections, allowing adequate flash-off between passes. Between coats, a light scuff with 400–600 grit ensures mechanical interlock without introducing new scratches that must be buried later.
Application technique matters as much as material selection. Use a spray gun with a clean air supply and adjust the pattern to deliver a fine, even mist. Maintain a steady distance, typically several inches from the surface, and use cross-coats for uniform coverage. On plastics, avoid thick, heavy coats that can trap solvents or stress those panels as they flex. After the final coat, allow the surface to reach tack and then perform a careful, tack-cloth wipe before any topcoat.
Curing, safety, and quality control round out the primer stage. Full cure times vary with temperature and humidity, but plan for 16–24 hours of calm conditions before handling. Always conduct a tactile and visual check for pinholes, orange-peel, or gloss differences. If any flaw appears, a feathered recoat after proper flash-off often resolves it without necessitating a full redo. Safety equipment—respirator, gloves, and eye protection—remains essential, as solvents and primers can pose health risks in enclosed spaces.
For readers who want to explore related primer systems, see Product category c62 for primer-related offerings. The careful choices in this stage influence not only color accuracy but the long-term durability of the finish, linking directly to the next topic: achieving consistent color and layer control across the entire fairing surface. This continuity is essential as the narrative moves from primer to base color and the final clear coat, tying back to the economic realities of materials, tools, and labor highlighted in the forthcoming section.
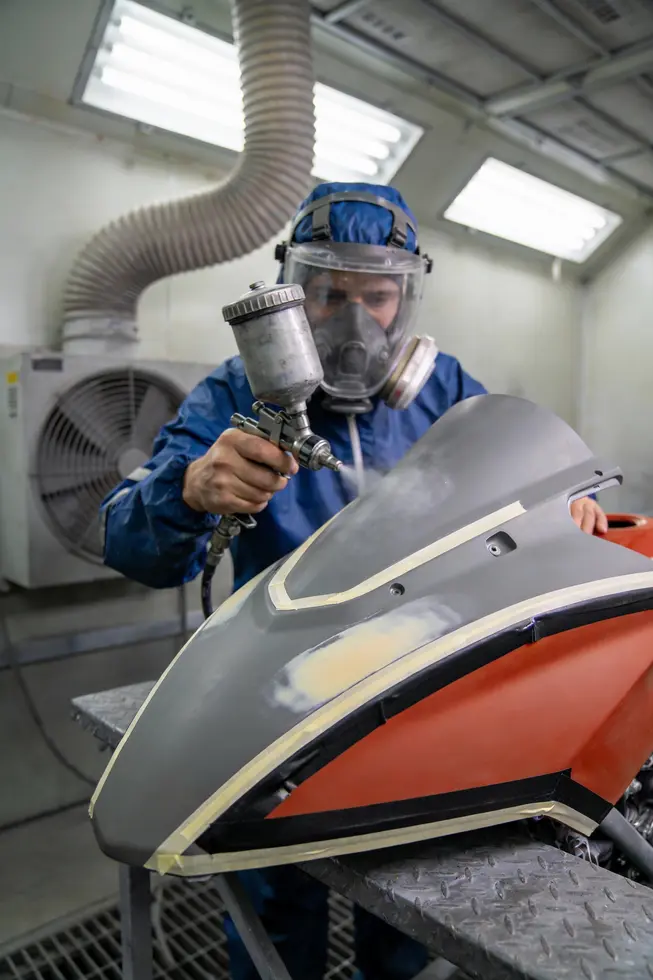
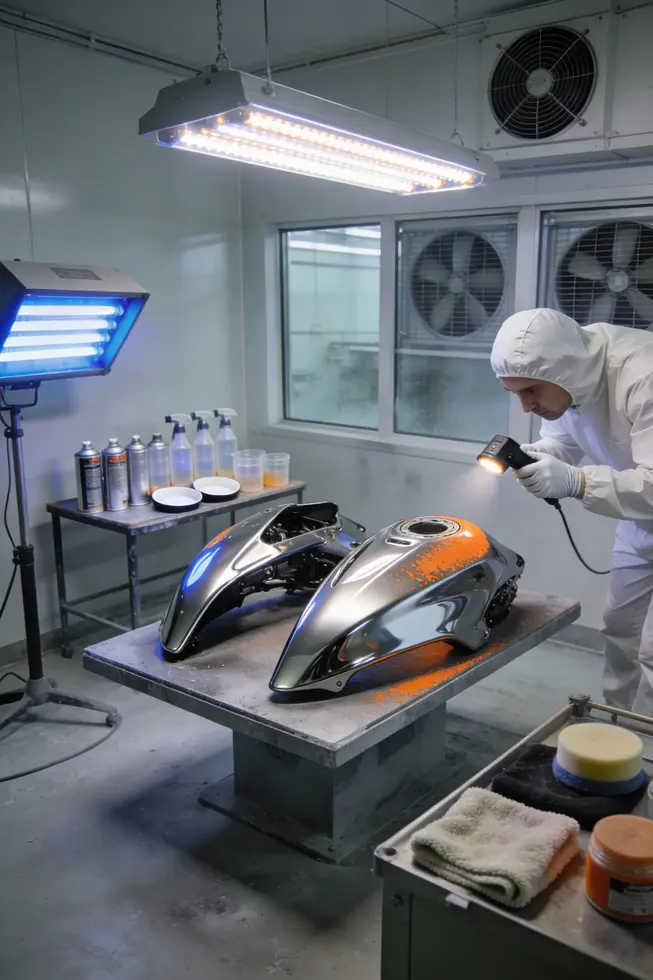
2. Color Mastery for Plastic Fairings: Masking Edges, Mixing Ratios, and Layered Depth
Color application follows a carefully laid primer and surface refinement, but it is equally pivotal in determining the final look, durability, and perceived quality of the repaint on flexible plastic. This section threads masking, mixing, and layer strategy into a cohesive practice that respects the unique behavior of ABS and fiberglass fairings. The aim is to build depth and uniformity without sacrificing the surface’s required flexibility, while keeping edges crisp and colors true under variable temperatures and vibration. A thoughtful approach to masking sets the stage for clean color edges; precise tape placement and pressure along boundaries prevent bleed, while for complex curves, liquid masking film can deliver edge quality that tape alone cannot. The practitioner then translates the chosen color system—whether a solid, metallic, pearl, or candy—into a predictable sequence of coats that yields even opacity and controlled texture, all while maintaining the plastic surface’s flexibility.
Masking is not merely a prelude to color; it governs the entire perception of the final finish. Areas that should remain unpainted or receive different texture must be protected with care. Edges require seal integrity to prevent color creep during adjacent color passes. When facing intricate shapes, the film approach reduces edge feathering and bleed along compound curves, producing a sharper boundary line and reducing the need for extensive post-paint touch-ups. The masking strategy must align with the planned layer sequence, ensuring that masking waste and overspray do not become a hidden source of later adhesion issues or trapped contaminants.
Mixing, too, demands restraint and discipline. Most plastic paints rely on urethane-based systems that blend well with flexible plastics, but exact ratios are manufacturer-specific. A common starting point is around four parts pigment to one part reducer, with a catalyst where applicable, yet each color family—solid, metallic, pearl, or candy—carries its own viscosity and settling characteristics. Thorough, not aggressive, mixing minimizes air entrapment and bubble formation while preserving flow. Testing color and opacity on scrap plastic or a dedicated test panel is essential before committing to the fairing. It confirms not only hue accuracy but also how the color shows through under the primer’s guidance and on the specific plastic’s texture.
Layer strategy turns masking and mixing into durable reality. Begin with a tack coat to promote adhesion, then apply multiple thin color coats, typically three to five, with 10–15 minutes of flash between passes. Maintain a consistent distance, about 8–10 inches, and use light, even sweeps to avoid runs and orange peel. If necessary, gentle wet sanding between coats with 800–1000 grit can refine the surface and improve downstream clarity. After achieving even color, transition to the clear coats—three or more to build gloss, depth, and UV resistance. Full cure often requires 24–48 hours, with longer times in cooler environments. The result should be a smooth, depth-filled finish that preserves edge integrity and shows a uniform surface texture across the fairing.
For practitioners seeking a practical link to expanded product context, relevant paint systems and related supplies are discussed in available category collections; see category resources for color systems and finishing options. https://ultimatemotorx.net/product-category/c62/c71/ (category c62/c71 paints) offers context on compatible formulations and finishes that align with the described masking, mixing, and layering approach. Keeping the process patient and iterative—mask precisely, mix thoughtfully, and layer evenly—yields longevity and aesthetic sophistication, while preserving the fairing’s essential flexibility.
3. Layer Mastery: Clear Coats, Curing, and Quality Checks for Durable Finishes
With the base color settled and the surface cured, the final stage hinges on the clear coats that protect, enhance, and unify the entire panel. Clear coatings do more than add gloss; they seal the pigment, resist UV exposure, and cushion the plastic against the flex and vibrations that riders expect. The approach here is deliberately incremental, using thin, even passes rather than a single heavy application. Start with a tack coat—a light adhesion layer that helps the subsequent coats flow with fewer holidays. Allow it to set for the recommended recoat window, then apply the first full wet coat in smooth, steady sweeps. Maintain a consistent gun-to-surface distance and a steady pace to prevent runs and sags. A habit of layering thin coats pays dividends in depth and durability, especially on soft plastic fairings that are prone to micro-cracking if the film is too thick too soon.
Curing is a critical variable that often trips hobbyists. Temperature and humidity govern how quickly solvents evaporate and how the film hardens. In many setups, base and clear coats reach a functional cure within 24 to 48 hours, but full hardening may take longer in cooler or damper environments. Work within the product’s guidance, and avoid rush or heat-driven drying that can trap solvents and cause clouding. Between coats, a light scuff with 1000 to 1500 grit is common to promote adhesion and to knock down any tiny imperfections. A quick wipe with a tack cloth resets the surface before the next layer.
The choice of finish—gloss, matte, metallic, pearl, or candy—shapes both technique and maintenance. Glossy clear coats emphasize depth and color saturation, while matte or satin finishes demand a more controlled approach to avoid high texture or burnishing marks. Metallic and pearlescent layers often require careful anchoring and additional coats to ensure uniform particle distribution and color matching across panels. For metallics or pearlescents, keep consistent spray pressure and, in some workflows, adjust distance for the final coat to maximize particle laydown without pooling. A dedicated tack coat and a few light layers yield the most even, artifact-free results. For reference, exploring a dedicated product category can provide additional clarity on available finishes and their handling. C66 product category.
After the final clear coat has been applied, the surface needs time to cure fully. Avoid handling or washing the panel until the coating has achieved its initial hard set, typically 24–48 hours, and plan for a longer cure before any aggressive cleaning or polishing. Once cured, a careful post-cure inspection is essential. Visually scan for orange peel, dust nibs, or tiny fish-eyes, and perform a light dry-sand with very high-grit paper if necessary, followed by a polish or fine compound to restore maximum clarity. A thorough quality check includes the tape test for adhesion in inconspicuous areas and a tactile drag test to ensure a uniform friction profile across the fairing.
In the end, the layer-control phase binds all prior steps into a durable, display-worthy finish. Proper application of thin, even clear coats, mindful curing, and disciplined quality checks yield protection from UV, abrasion, and weather, while preserving the flex and color integrity of plastic fairings. This stage completes the cycle of priming, color application, and layer discipline, ensuring the repaint not only looks fresh but endures the ride ahead.
Chapter 4: How to Repaint a Motorcycle Fairing: Finishing, Curing, and Aftercare
1. Finishing, Curing, and Aftercare: Pushing Plastic-Flex Technology for Durable, Glossy Fairings
Finishing, curing, and aftercare are where paint science meets real-world riding. In modern practice, technological advances in surface preparation, paint systems, and curing methods transform plastic fairings—whether ABS or fiberglass—into surfaces that withstand vibration, temperature shifts, and sun without losing color or gloss. The aim is a multi-layer system that flows smoothly, resists UV, and stays flexible enough to cope with flexing panels. Small changes in substrate or humidity can cascade into defects, so the finishing stage requires not only steady hands but an eye for material behavior and process control. The result is a surface that reads as uniform in texture and tone, with depth from the base color and protection from the clear coat, yet resilient enough to survive rides, washes, and the occasional track day crash-test of life on two wheels.
Finishing is a disciplined sequence that blends technique with material science. Begin with a light tack coat on cleaned, dry surfaces, then apply three or more thin, even coats of base color, allowing each pass to achieve the desired opacity before the next. For metallics, pearls, or candy tones, the layering must be precise to build depth without washing out highlights or causing color drift. Masking should be crisp; high-quality tape and careful edge-work prevent bleed-under and ensure sharp transitions between colors or between painted and unpainted areas. After the color base, seal in that depth with clear coats. Three or more thin clears, each given time to flash off and level, minimize orange peel and runs. The goal is a surface that looks wet when dry but remains free of sags, while maintaining the subtle texture that complements the plastic substrate. Wipe dust between coats with a tack cloth, and keep air pressure and spray technique consistent to avoid over-atomization or heavy coats that dull the finish.
Curing dynamics connect the cosmetic outcome to long-term durability. The initial cure window typically spans 24–48 hours, during which handling should be minimized to avoid fingerprints, dust embedding, or slight imprinting of texture. For multi-layer systems, some professional methods incorporate additional clear coats to boost elemental endurance and depth, with full cure potentially extending to seven days depending on ambient temperature and relative humidity. Emerging frontier methods introduce infrared curing and UV-curable clears that accelerate hardening while preserving the essential flexibility of the plastic. However, heat must be managed carefully on plastics to prevent warping, and curing times must not be shortened at the expense of adhesion or gloss. In all cases, follow the paint system’s guidance for drying times, then condition the surface to a stable state before final handling or assembly.
Aftercare completes the cycle. Once cured, cleaning should use mild soap and soft cloths, avoiding abrasive cleaners that mar gloss or dull matte effects. Gloss and metallic finishes are typically more forgiving of routine maintenance, while matte or pearl finishes require gentler products and more frequent inspection for micro-scratches or hazing. Regular waxing or protective sealants help sustain gloss, color depth, and UV resistance. Periodic inspection for chips or lift can signal adhesion issues, prompting prompt reapplication of a clear layer to restore continuity. Store the bike away from direct sun to preserve color fidelity and consider re-coating only after a careful assessment of surface readiness. For readers seeking compatible materials and finishes, explore the available catalog in this category to tailor the system to your fairing’s needs.
For a concise materials reference and compatible options, see this catalog entry: Ultimate MotorX product category C63.
2. How to Repaint a Motorcycle Fairing: Finishing, Curing, and Aftercare — Economic Dimensions: Costs, Labor, Materials, and Market Dynamics
Finishing and aftercare are not just about looks; they determine how long a repaint lasts under vibration, heat, and sun. The economic dimension sits at the heart of every choice in this stage. Each thin clear coat adds a layer of durability and gloss, but it also adds cost and curing time. When you weigh final results, the value comes from balancing a pristine appearance with long-term resilience. The decision matrix starts with material quality and ends with the budget you can sustain over the bike’s life.
From a budgeting perspective, the costs break down into three broad streams: materials, labor, and time. In a DIY scenario, the material bill for a full fairing repaint commonly falls in the range of fifty to a couple of hundred dollars. That includes primers, base coats, clear coats, reducers, and masking supplies, plus the sanding papers and tack cloths that keep dust from trapping in the finish. Professional jobs, by contrast, tend to range from roughly five hundred to two thousand dollars or more, depending on the bike, finish complexity, and whether custom graphics or embellishments are requested. Labor costs mirror this split: DIY work relies on your own hours, typically in the ten- to twenty-hour window, while professional labor often falls in the fifty-to-one-hundred-dollar-per-hour range, with longer rosters for more elaborate finishes.
Time is not only money but a determinant of finish quality. Finishing calls for multiple thin coats and careful curing windows between applications. Each coat adds gloss and depth but multiplies the waiting periods. A longer cure at a controlled temperature yields fewer defects—less orange peel, fewer sags, and better adhesion. This translates into a lower risk of you redoing sections, which would otherwise erase the upfront savings. The market responds to these realities. Demand for glossy, metallic, or pearlescent finishes tends to push prices upward because they require more precise color matching, extra coats, and longer cure cycles. Custom decals or graphics, applied before the final clear, add both visual value and cost, since they demand additional masking, alignment precision, and occasional re-clear after application.
Material choices shape both cost and longevity. Epoxy or urethane primers provide flexibility and adhesion, but they come at a premium. Base coats for metallics and pearls demand more coats to achieve solid color and depth, increasing material use and labor. Clear coats enrich UV protection and gloss but require accurate spray technique and longer cure times. A key economic insight is that higher-quality coatings deliver better long-term durability, reducing maintenance costs and the likelihood of early repaint touch-ups. In this light, a higher initial investment can yield lower ongoing costs and higher resale value.
To manage the economics without compromising quality, plan a clear budget and a cautious scope. Create a simple bill of materials, estimate blank areas, and factor in potential rework if you notice imperfections after masking or during curing. For those seeking a practical reference to material options and price ranges, see automotive paint and clear coat products. automotive paint and clear coat products
Ultimately, finishing, curing, and aftercare performance hinges on disciplined material selection, deliberate layering, and patience during cure cycles. The economic dimension links every practical choice to a long-term payoff: a durable, visually appealing fairing that withstands the test of time and value, not just a quick cosmetic refresh.
3. Finishing, Curing, and Aftercare — Navigating Regulation, Supply Chains, and Access in Motorcycle Fairing Repaints
Finishing and curing are the final acts that translate days of prep into a durable, glossy finish. The color layer adds depth, and the clear coat shields the surface from UV light, temperature swings, and road grit. In practice, painters typically apply 2–3 thin base coats to achieve even opacity, followed by 3–4 thin clear coats for protection and clarity. The goal is a uniform color with controlled texture, where orange peel is minimized rather than left to chance. The technique matters as much as the materials: whether you use a spray gun or a quality aerosol, maintain a consistent 8–12 inch distance from the surface and employ light, sweeping motions to prevent runs. Between coats, a gentle, wet-sand with 1000–1500 grit helps feather any texture and prepares the surface for the next layer. For metallics or pearls, color depth hinges on precise coat matching; misalignment becomes visible as an uneven shimmer. A widely recommended seven-step sequence emphasizes careful adhesion, steady technique, and deliberate curing as the backbone of a durable finish.
Curing is where the finish settles from concept to endurance. After the final clear coat is laid, allow the job to cure in a dust-free, well-ventilated space at room temperature. Typical handling readiness occurs within 24–48 hours at about 21°C (70°F). Full hardness may take up to a week, depending on the chemistry, humidity, and thickness of the layers. Temperature stability and airflow matter; drafts or direct sunlight can alter curing dynamics and gloss. The environment during cure influences gloss retention, UV resistance, and long-term adhesion, so plan the workspace accordingly and respect manufacturer-recommended drying windows. The environment during cure influences gloss retention, UV resistance, and long-term adhesion, so plan the workspace accordingly and respect manufacturer-recommended drying windows. A patient approach here pays dividends in years of service from a fairing that looks as good after months as it did on the first day.
Aftercare ties the repaired surface to everyday use. Gentle washing with mild soap and water preserves the film integrity, while avoiding harsh chemicals helps maintain finish clarity. Wax or sealants should be applied on gloss finishes every one to three months to sustain UV protection and shine. Matte or satin finishes demand matte-specific care products to prevent unintended gloss. Regular inspections for chips or micro-scratches enable prompt touch-ups, preserving color uniformity. For storage, keep the motorcycle indoors where temperature and humidity are controlled, reducing exposure to moisture and contaminants that could compromise the coat. While the base materials and techniques determine initial durability, the ongoing maintenance plan—gentle cleaning, timely protection, and careful re-coating when needed—preserves the finish over time.
In evaluating finishing, curing, and aftercare, broader societal and regulatory contexts subtly shape choices. Environmental regulations around volatile organic compounds (VOC) influence the availability and selection of clear coats and primers, pushing the market toward low-VOC or waterborne systems in many regions. Supply chains and regional access affect which formulations are readily available or affordable, with global fluctuations in pigment and resin pricing echoing in consumer costs and project timelines. These dynamics matter not only for professionals but also for DIY painters who must balance performance with compliance and cost. When planning a repaint, consider not only the color and gloss you want but also the local regulatory landscape, supplier accessibility, and the practical implications of curing times in your climate. Your finished fairing benefits from this broader view, yielding a resilient surface that endures both sunlight and street-level realities. For practical, tested technique in finishing, see the detailed guide on painting motorcycle fairings as a reference to proven methods and best practices.
Best way to paint motorcycle fairings
Final thoughts
Repainting a motorcycle fairing is both an art and a disciplined business process. When owners treat surface preparation, repair feathering, primer selection, controlled color layering, and careful finishing as interconnected steps, they unlock repeatable quality and predictable timelines. The payoff is stronger client trust, higher-margin projects, and a competitive edge built on durable, factory-like finishes on plastic components. By investing in the right primers for plastics, maintaining a dust-free environment, and enforcing a staged curing routine, a shop can reduce rework and improve throughputs. This holistic approach—rooted in material science, coating technology, and operational discipline—turns a complex task into a scalable service that meets customer expectations and drives sustainable growth.
Upgrade your ride with UltimateMotorX’s premium motorcycle fairings—durably crafted, precision-fitted, and stylish. Meeting OEM standards for easy installation, our collection suits upgrades or replacements. Shop now for fast shipping, secure checkout, and expert support. Give your bike the ultimate quality it deserves!
About us
At UltimateMotorX, we’re rider-founded experts in top-tier motorcycle fairings. We source premium materials, partnering with trusted manufacturers for perfect fits and durability. Enjoy expert advice, hassle-free returns, and seamless shopping. Ride with confidence—style and quality guaranteed!